Currency
Toggle Nav

New Arrival KIT For Your IOT Projects
August 17, 2016
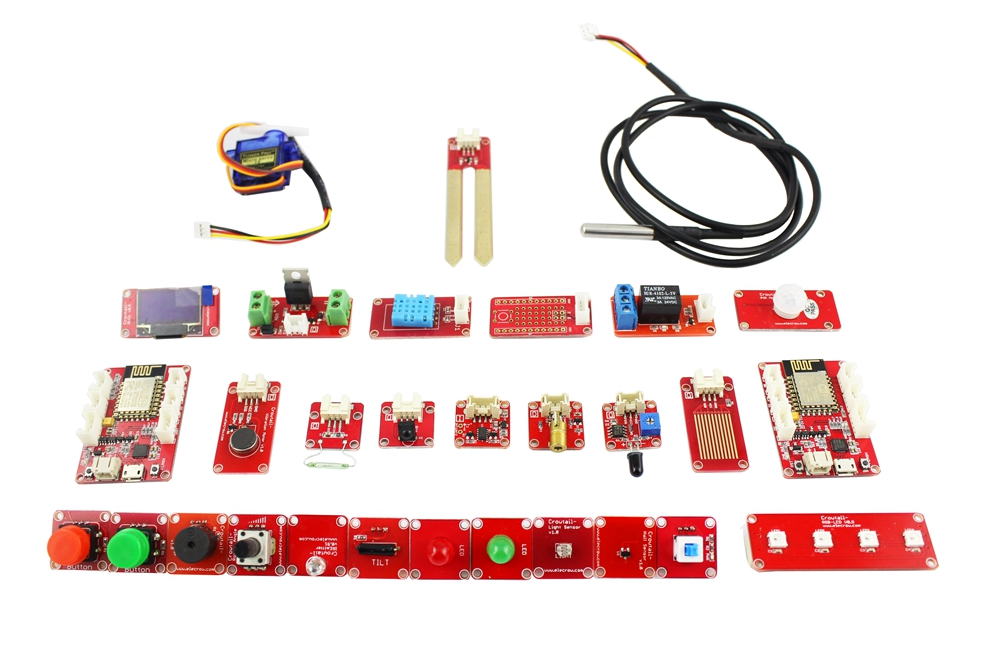
 Today I wanna introduce ESP8266 NodeMCU IOT Kit for you which is an ESP8266 WiFi module with Crowtail interface for IOT Projects. IOT or internet of things is an upcoming technology that makes use of internet to control/monitor electronic/mechanical devices, automobiles and other physical devices connected to the internet. IOT gives user the ability to control more than digital things easily through a comfortable GUI over the internet. And ESP8266 NodeMCU IOT Kit is right great thing to make plenty of IOT Projects with 19 lessons tutorials and 27 kinds of Crowtail modules. Here I gonna to share several hot lessons of ESP8266 NodeMCU IOT Kit for your reference.
 1 One Wire Waterproof Temperature Sensor
This sealed digital temperature probe lets you precisely measure temperatures in wet environments with a simple 1-Wire interface. Material: Crowtail- ESP8266 NodeMCU x 1 Crowtail- One wire Waterproof Temperature Sensor x 1
Hardware Connection
1 One Wire Waterproof Temperature Sensor
This sealed digital temperature probe lets you precisely measure temperatures in wet environments with a simple 1-Wire interface. Material: Crowtail- ESP8266 NodeMCU x 1 Crowtail- One wire Waterproof Temperature Sensor x 1
Hardware Connection
 Open the LuaLoader, click the “Upload File…” to choose ESP8266 NodeMCU kit demo code -> P12_DS18B20_One_Wire_Waterproof_Temperature_Sensor -> ds18b20.lua. After the upload completed then click “Download ” to download the ds18b20.lua file. Then click the “Upload File…”choose the init.lua in the same folder, download it. ( Welcome to click the title to view the detailed lesson)
2 Rainbow Light
Do you want to make a RGB-LED like a colorful rainbow. Here is an example of how to make it. It is easy and only need one microcontroller pin. Now, let’s go into the colorful world. Material: Crowtail- ESP8266 NodeMCU x 1 Crowtail- RGB LED x 1
Hardware Connection
Open the LuaLoader, click the “Upload File…” to choose ESP8266 NodeMCU kit demo code -> P12_DS18B20_One_Wire_Waterproof_Temperature_Sensor -> ds18b20.lua. After the upload completed then click “Download ” to download the ds18b20.lua file. Then click the “Upload File…”choose the init.lua in the same folder, download it. ( Welcome to click the title to view the detailed lesson)
2 Rainbow Light
Do you want to make a RGB-LED like a colorful rainbow. Here is an example of how to make it. It is easy and only need one microcontroller pin. Now, let’s go into the colorful world. Material: Crowtail- ESP8266 NodeMCU x 1 Crowtail- RGB LED x 1
Hardware Connection
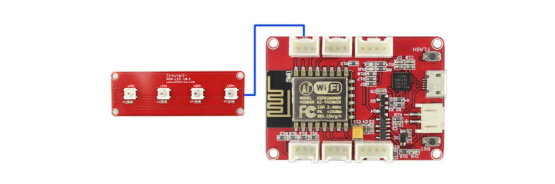 Open the LuaLoader, click the “Upload File…”choose ESP8266 NodeMCU kit demo code -> P13_Rainbow_Light -> init.lua. After the upload completed then click “Download ” to download the init.lua file ( Welcome to click the title to view the detailed lesson)
3 MOSFET Control Fan
The MOSFET is a kind of switch. It enables you to control higher voltage project with low voltage. There are two screw terminals on the board. One for input power source and the other for device you want to control. In this lesson we will teach you how to use the MOSFET to control a fan. Material: Crowtail- ESP8266 NodeMCU x 1 Crowtail- MOSFET x1
Hardware Connection
Open the LuaLoader, click the “Upload File…”choose ESP8266 NodeMCU kit demo code -> P13_Rainbow_Light -> init.lua. After the upload completed then click “Download ” to download the init.lua file ( Welcome to click the title to view the detailed lesson)
3 MOSFET Control Fan
The MOSFET is a kind of switch. It enables you to control higher voltage project with low voltage. There are two screw terminals on the board. One for input power source and the other for device you want to control. In this lesson we will teach you how to use the MOSFET to control a fan. Material: Crowtail- ESP8266 NodeMCU x 1 Crowtail- MOSFET x1
Hardware Connection
 Open the LuaLoader, click the “Upload File…”choose ESP8266 NodeMCU kit demo code -> P14_MOSFET_Control_Fan -> init.lua. After the upload completed then click “Download ” to download the init.lua file. print("Crowtail- MOSFET Test") ( Welcome to click the title to view the detailed lesson)
4 DHT11 Temperature Display System
In this lesson you will know how to use the DHT11 temperature sensor, and display it on the OLED, It is easy to make us always know the current temperature. And we will use two ESP8266 NodeMCU for the sake of knowing the temperature of the DHT11 that placed anywhere. Material: Crowtail- ESP8266 NodeMCU x 2 Crowtail- OLED x 1 Crowtail- Temperature & humidity Sensor x 1
Hardware Connection
Open the LuaLoader, click the “Upload File…”choose ESP8266 NodeMCU kit demo code -> P14_MOSFET_Control_Fan -> init.lua. After the upload completed then click “Download ” to download the init.lua file. print("Crowtail- MOSFET Test") ( Welcome to click the title to view the detailed lesson)
4 DHT11 Temperature Display System
In this lesson you will know how to use the DHT11 temperature sensor, and display it on the OLED, It is easy to make us always know the current temperature. And we will use two ESP8266 NodeMCU for the sake of knowing the temperature of the DHT11 that placed anywhere. Material: Crowtail- ESP8266 NodeMCU x 2 Crowtail- OLED x 1 Crowtail- Temperature & humidity Sensor x 1
Hardware Connection
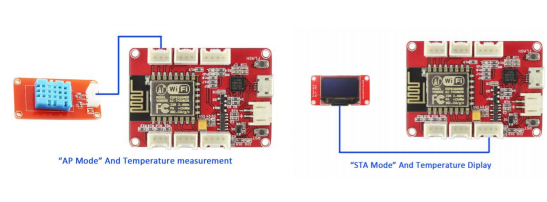 Open the LuaLoader, click the “Upload File…”choose ESP8266 NodeMCU kit demo code -> P18_DHT11_Temperature_OLED_Display-> TCP Server->init.lua. After the upload completed then click “Download ” to download the init.lua file. Then Click “Upload File”, Choose the”main.lua” in the same folder, download it. The following, set another serial port which connect the NodeMCU (“AP mode”) and connecting , then click the “Upload File…” after connecting successful, choose ESP8266 NodeMCU kit demo code -> P18_DHT11_Temperature_OLED_Display ->DHT11-> init.lua. After the upload completed then click “Download ” to download the init.lua file. Then Click “Upload File”, Choose the” dht11.lua” in the same folder, download it. ( Welcome to click the title to view the detailed lesson)
Above are selected lessons of ESP8266 NodeMCU IOT Kit, you could get 19 lessons tutorials by clicking each lesson above, and I sincerely hope you could get how to fully make use of this kit to feel its powerful functons.
Finally, I am pleased to share two videos on ESP8266 Module, wishing them helpful for your projects.
Meet The Arduino Killer: ESP8266
Android Arduino Wifi Control Devices with ESP8266 Module
Open the LuaLoader, click the “Upload File…”choose ESP8266 NodeMCU kit demo code -> P18_DHT11_Temperature_OLED_Display-> TCP Server->init.lua. After the upload completed then click “Download ” to download the init.lua file. Then Click “Upload File”, Choose the”main.lua” in the same folder, download it. The following, set another serial port which connect the NodeMCU (“AP mode”) and connecting , then click the “Upload File…” after connecting successful, choose ESP8266 NodeMCU kit demo code -> P18_DHT11_Temperature_OLED_Display ->DHT11-> init.lua. After the upload completed then click “Download ” to download the init.lua file. Then Click “Upload File”, Choose the” dht11.lua” in the same folder, download it. ( Welcome to click the title to view the detailed lesson)
Above are selected lessons of ESP8266 NodeMCU IOT Kit, you could get 19 lessons tutorials by clicking each lesson above, and I sincerely hope you could get how to fully make use of this kit to feel its powerful functons.
Finally, I am pleased to share two videos on ESP8266 Module, wishing them helpful for your projects.
Meet The Arduino Killer: ESP8266
Android Arduino Wifi Control Devices with ESP8266 Module