Currency
Toggle Nav

Top 5 Professional Applications of the Elecrow Pi Terminal
June 27, 2025
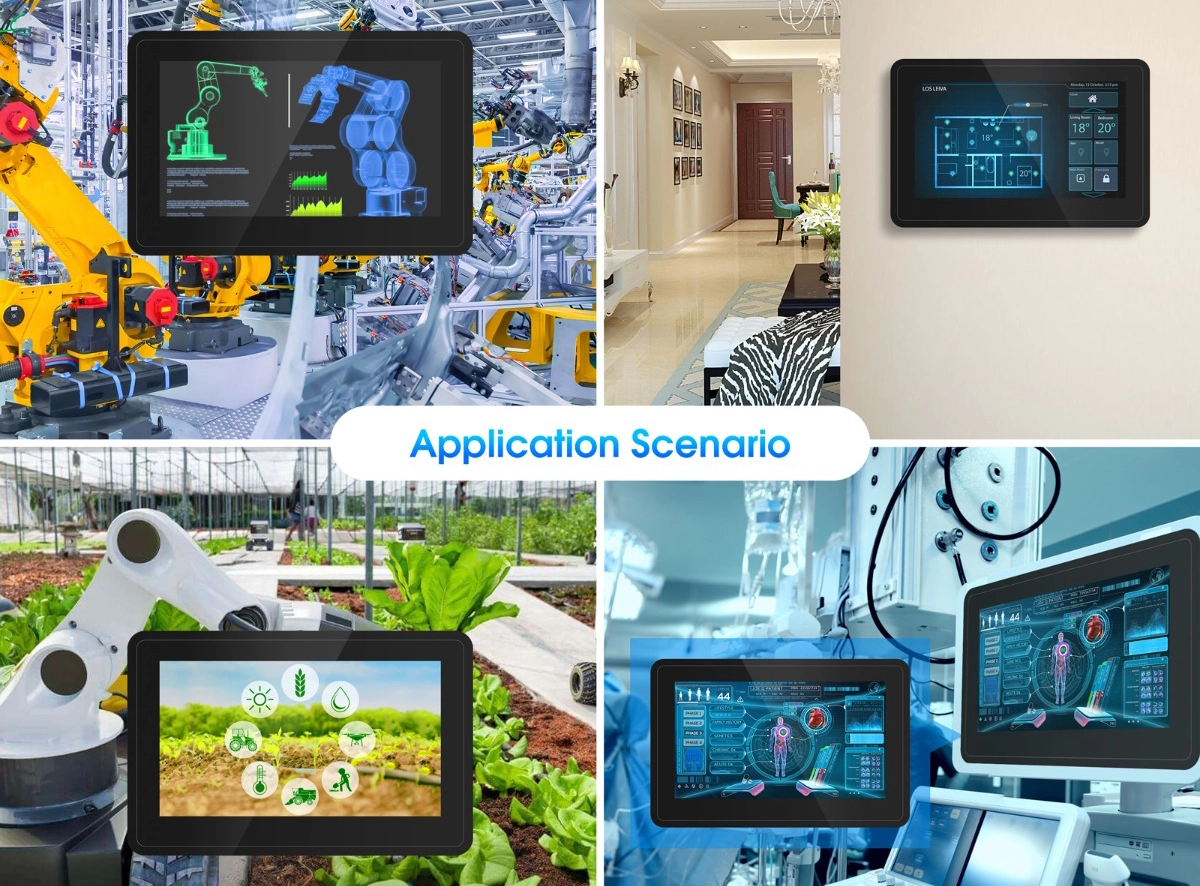
Have you ever found that scaling a Raspberry Pi concept from a test bench to a reliable, deployable system introduces significant challenges in housing, display integration, and I/O expansion? The Elecrow Pi Terminal is engineered to solve this exact problem. It is not an accessory, but an all-in-one platform that seamlessly integrates a Raspberry Pi Compute Module 4, a 7-inch touchscreen, and a comprehensive suite of industrial-grade interfaces.
But with such a capable device, the critical question becomes: "How can it be leveraged in a professional setting?"
For a quick overview, the table below summarizes the core applications. Click on any application title to jump directly to the detailed section.
| Application | Core Function | Key Enabling Features |
|---|---|---|
| #5. Edge AI & Machine Vision Terminal | On-device AI for real-time visual inspection, analysis, and response. | CM4 Processor, CSI Camera Interfaces |
| #4. Compact PLC & Automation Controller | Reliable automation for machinery, process control, and workshop tasks. | Isolated Digital I/O, Onboard Relays |
| #3. CAN Bus Analyzer & Diagnostic Tool | Professional diagnostics and data logging for automotive & industrial machinery. | Native CAN Bus Interface |
| #2. Industrial IoT (IIoT) Gateway | Connecting legacy industrial equipment to modern IT networks and cloud platforms. | RS485 Port, Gigabit Ethernet/Wi-Fi, 4G/LoRa Expansion (Mini-PCIe) |
| #1. Interactive HMI & SCADA Node | Centralized, interactive touch control for any machine or process. | 7" Capacitive Touchscreen, Pre-installed Node-RED Software |
Application #5: Edge AI & Machine Vision Terminal
Core Function:
Deploying intelligent vision systems directly at the source of data, reducing latency and network dependency.
How It's Achieved:
- Powerful Core: The Pi Terminal is powered by a Raspberry Pi CM4, featuring a quad-core ARM Cortex-A72 processor capable of running lightweight machine learning frameworks like TensorFlow Lite.
- Visual Input: The onboard CSI camera interfaces allow for the direct connection of high-resolution cameras.
- Use Cases: With the installation of the OpenCV library, you can develop systems for quality control on production lines, vision-based access control, or automated reading of analog gauges. All results and user interactions can be managed directly on the integrated 7-inch display, creating a self-contained solution.

CM4-Excellent Ability
Application #4: Compact PLC & Automation Controller
Core Function:
Serving as a reliable automation core for small-scale machinery, process control, and workshop automation.
How It's Achieved:
- Robust Inputs: Utilize the photo-electrically isolated Digital Inputs (DI) to connect industrial sensors like limit switches and proximity sensors, ensuring signal integrity in noisy environments.
- Direct Actuation: The onboard relays can directly drive small loads such as solenoids, contactor coils, and indicator lights.
- Flexible Logic Programming: Implement complex sequential logic with ease using the graphical Node-RED environment for rapid prototyping, or write sophisticated control programs in Python or C++ for mission-critical applications.
Application #3: CAN Bus Analyzer & Diagnostic Tool
Core Function:
Streamlining the development and diagnostics for automotive, robotics, and industrial machinery applications.
How It's Achieved:
- Native Interface: The Pi Terminal features an onboard CAN bus interface, eliminating the need for external, often unreliable USB-to-CAN adapters.
- Standard Software Integration: By installing the standard
can-utilssoftware suite in Raspberry Pi OS, engineers can monitor, log, and transmit CAN packets professionally. - Custom Diagnostic Interfaces: Develop custom Python scripts to parse specific CAN IDs—such as vehicle speed or engine RPM—and display the data in real-time on the HMI screen, creating a purpose-built diagnostic tool.
Many Systems Supported
Application #2: Industrial IoT (IIoT) Gateway
Core Function:
Bridging the gap between legacy Operational Technology (OT) and modern IT infrastructure, enabling data connectivity for non-networked equipment.
How It's Achieved:
- Data Acquisition: Use the integrated RS485 interface to poll data from field devices like VFDs, PLCs, and temperature controllers using the industry-standard Modbus protocol.
- Network Connectivity: Transmit the acquired data via MQTT to cloud platforms (AWS IoT, Azure) or on-premise servers using the built-in Gigabit Ethernet or Wi-Fi.
- Remote Deployment: For locations without wired or Wi-Fi access, the Mini-PCIe slot allows for the integration of a 4G LTE module for true remote monitoring capabilities.
Application #1: Interactive Human-Machine Interface (HMI) & SCADA Node
Core Function:
To serve as a professional, intuitive touch-control center for any machine, process, or project—this is its primary mission.
Why This is the Core Application:
Regardless of which of the other applications you implement, an HMI provides the essential layer for observation and control. The Pi Terminal is, by its very design, a perfect HMI device, making this its most direct and powerful capability.
Implementation Example: A Desktop Monitoring Dashboard
This foundational project demonstrates the device's power by creating an HMI to monitor sensors, control actuators, and respond to inputs.
Objective:
- Monitor: Read an analog value from a light sensor and display it on a gauge.
- Control: Toggle a small fan connected to a relay via a touchscreen button.
- Respond: Display an immediate alert when an emergency stop button is pressed.
Key Implementation Steps:
- Hardware Connection:
- Sensor: Connect the analog sensor's signal wire to the
ADC_IN0Phoenix terminal. - Fan: Wire the fan through the
Relayinterface (usingNO1andCOM1terminals) to its external power source. - Button: Connect the emergency stop button to the
DI0(Isolated Digital Input) andGNDterminals.
- Sensor: Connect the analog sensor's signal wire to the
- Node-RED Software Configuration (Core Logic):
- Access the Node-RED interface via a web browser at
http://:1880. - Control Logic: Drag a
ui_switchnode (for the UI button) and anrpi gpio outnode (configured to the relay's GPIO) onto the canvas. Connect them. This creates a functional touchscreen switch. - Status Monitoring: Use an
rpi gpio innode to read the button's state. Feed this into aswitchnode to determine the logic ("Normal" vs. "Emergency"). Output the corresponding text to aui_textnode for display. - Deploy & View: Click "Deploy." The complete HMI is now live and accessible on the device's screen or via the
/uiURL.
- Access the Node-RED interface via a web browser at
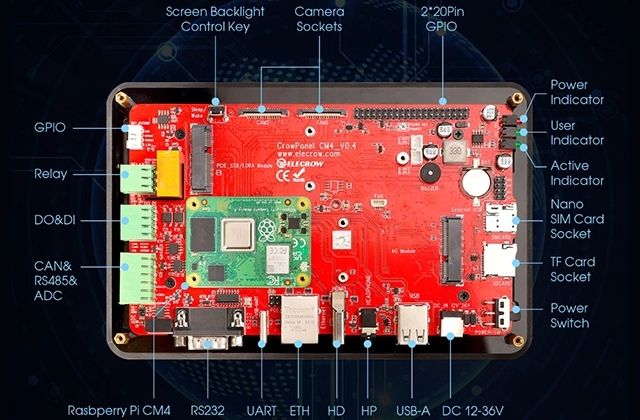
Various Interfaces on Pi Terminal
From Concept to Deployment
These five applications illustrate a core principle: the Elecrow Pi Terminal is engineered to remove foundational hardware hurdles, allowing your team to focus on what truly matters—your software and application logic. It effectively bridges the gap between a promising proof-of-concept and a deployable, industrial-grade solution. The hardware integration is solved. The platform is ready. The only remaining question is: which of your operational challenges will you address first?