
Story
Review of the Elecrow “All-in-One” Starter Kit for Micro:bit: The Complete Box to Kickstart Your Learning
The original article is on my blog : https://www.framboise314.fr/starter-kit-microbit-elecrow-test/
1. Unboxing the Elecrow Micro:bit Starter Kit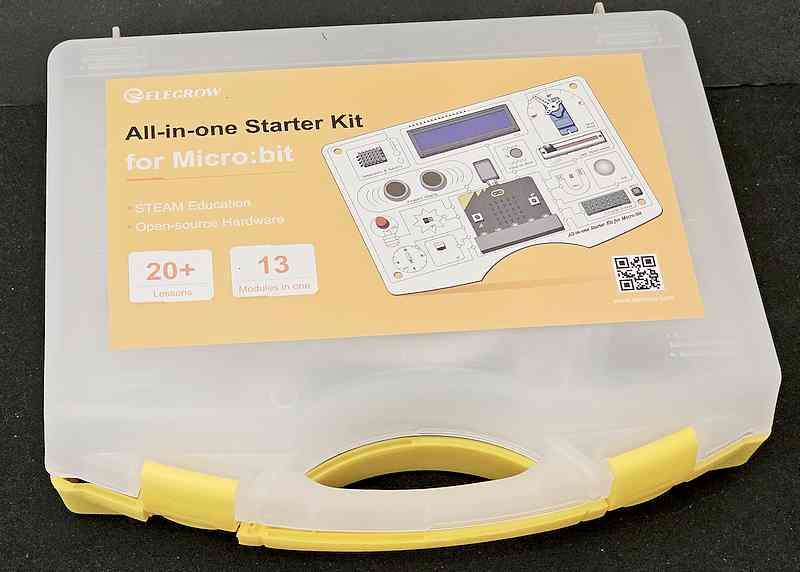
A Ready-to-Use, All-in-One Case
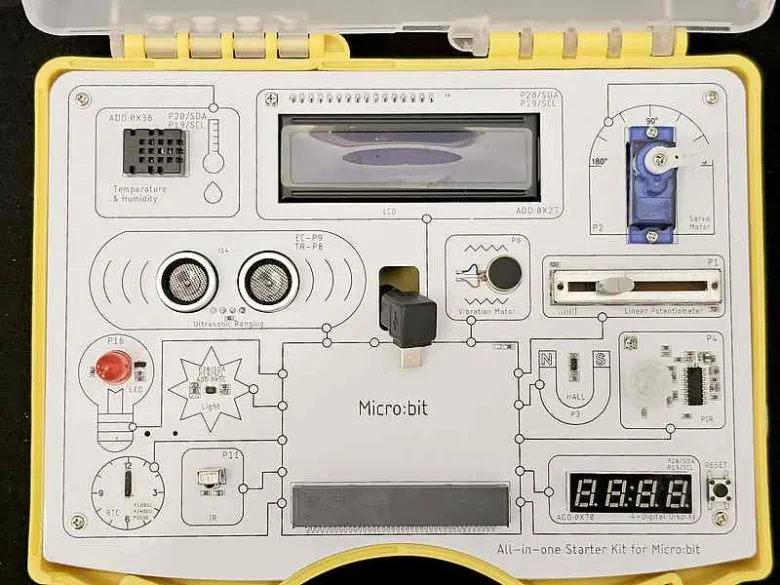
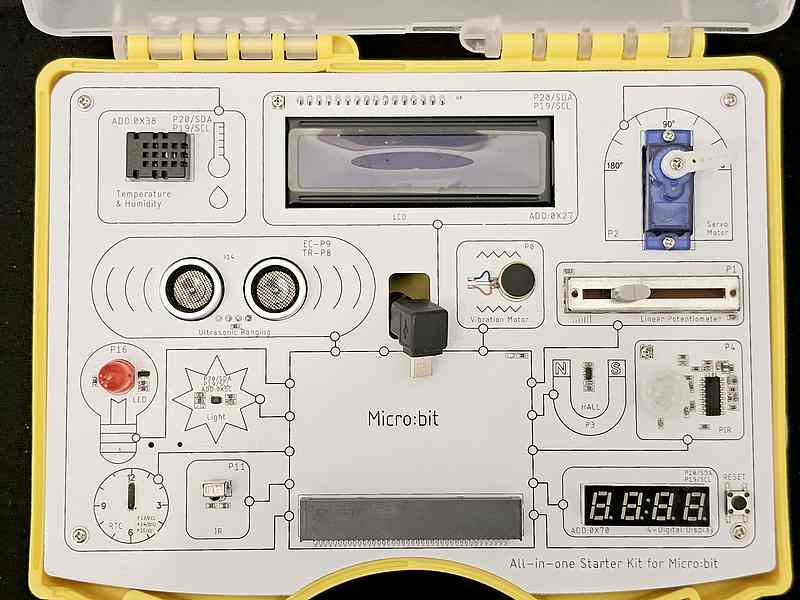
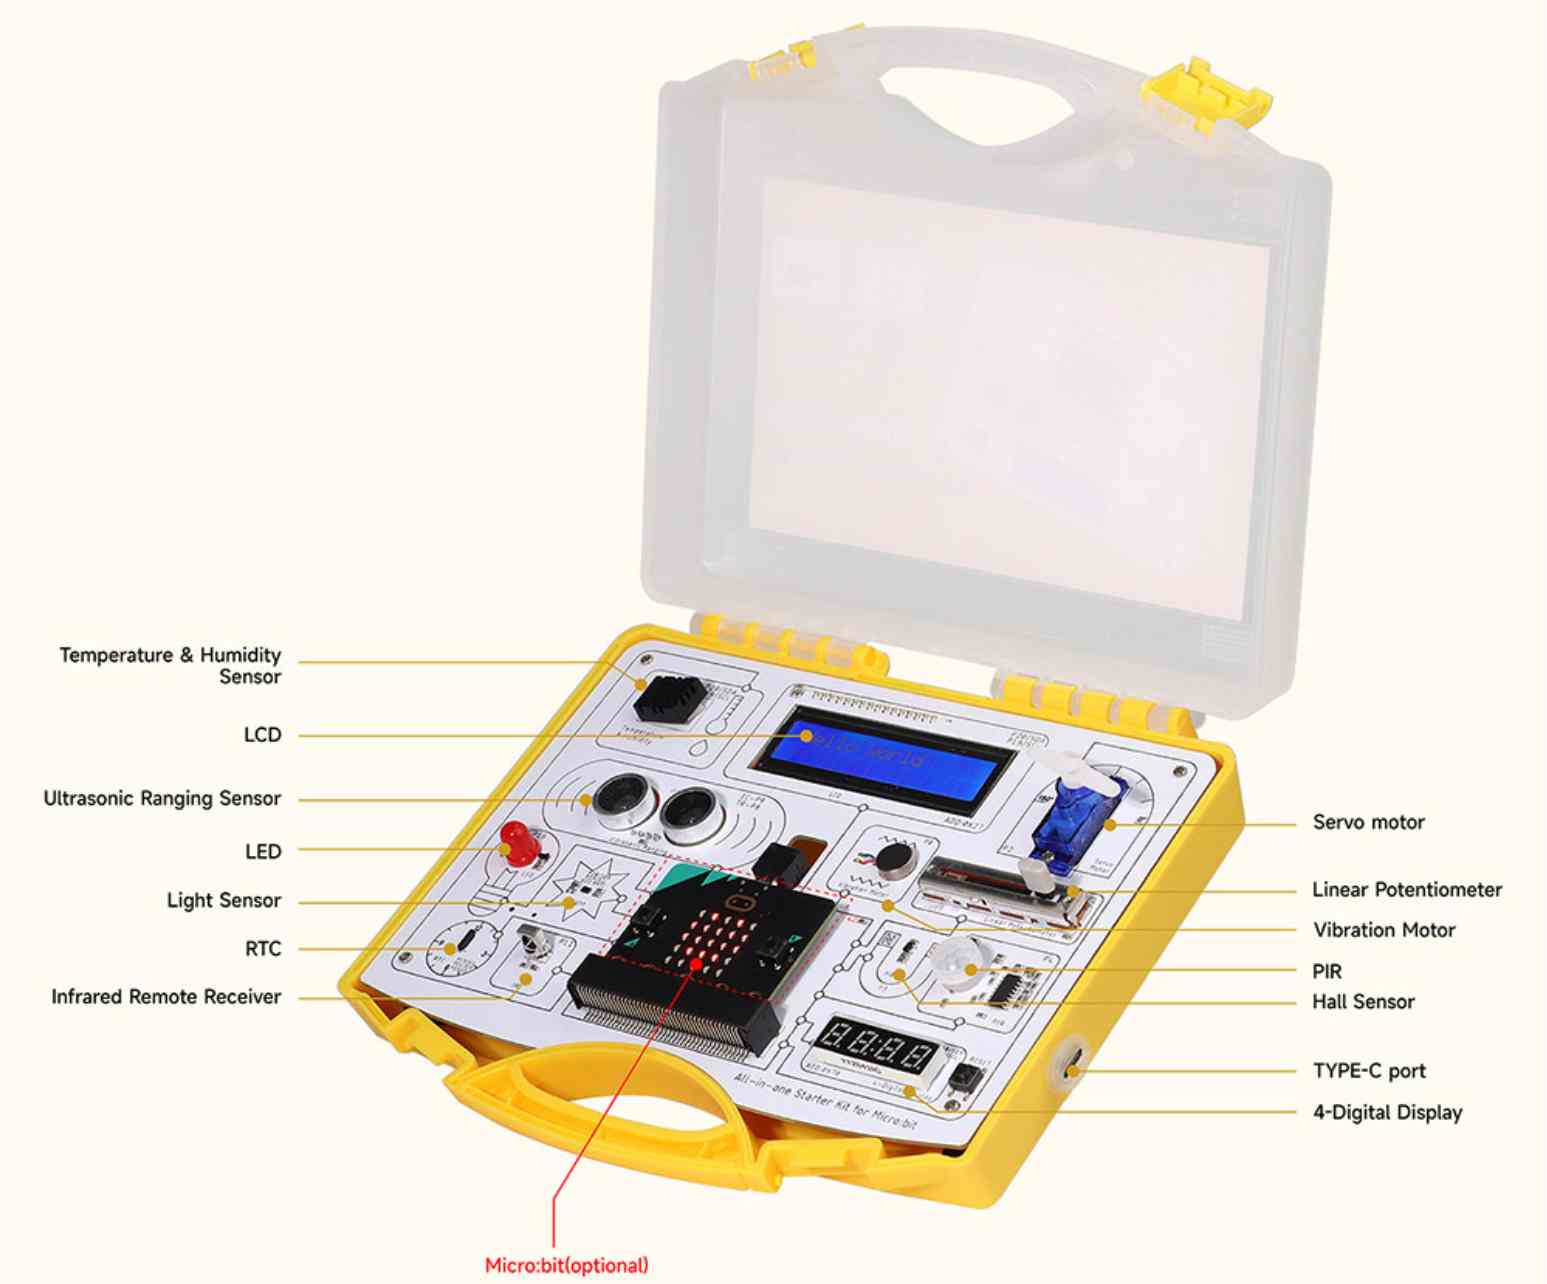
The Elecrow “All-in-One” Starter Kit for Micro:bit comes in a sturdy yellow-green case with a translucent lid. No little bags, no scattered parts: all the modules are already pre-mounted on a main board, ready to welcome your Micro:bit in just a few seconds.
This all-in-one design guarantees a truly plug-and-play experience—just open the case, insert your Micro:bit (if it’s not already included), plug in the USB cable… and you’re good to go!
This setup is especially reassuring for beginners, teachers, or makers in a hurry, since it completely eliminates any risk of wiring mistakes or complicated assembly. You can focus on programming the peripherals before worrying about advanced assembly.
The USB Cable: Essential to Get Started

Inside the case, you’ll also find a USB to USB-C cable that powers the Micro:bit and connects it to your computer for uploading code.
This universal cable is long enough for comfortable use on a desk or in a classroom, and saves you from scrambling to find a compatible one at the last minute.
The Included Remote Control
The kit also includes a ready-to-use infrared remote control.
You can use it to control certain modules at a distance or to try out interactive projects right from the start.
The IR receiver is already integrated into the board, making setup ultra-simple: no wiring required, everything works as soon as you open the case.
The Micro:bit Board (optional)
Note: The Micro:bit board is not included in the case.
If you already own a Micro:bit, you can choose the “modules only” version.
Otherwise, it’s best to select the full kit with the Micro:bit board for a truly all-in-one, ready-to-use solution—no need to add anything else!
2. What’s Inside the Kit: Modules and Included Components
Detailed list of included modules:
| Included Module | Quantity |
|---|---|
| Ultrasonic sensor | 1 |
| Light sensor | 1 |
| Linear potentiometer | 1 |
| LED | 1 |
| Temperature and humidity sensor | 1 |
| LCD screen | 1 |
| Infrared remote control | 1 |
| Servo motor | 1 |
| RTC (real-time clock) | 1 |
| Vibration motor | 1 |
| Hall effect sensor | 1 |
| PIR (motion) sensor | 1 |
| 4-digit display | 1 |
3. A Closer Look at Key Modules
Ultrasonic Sensor
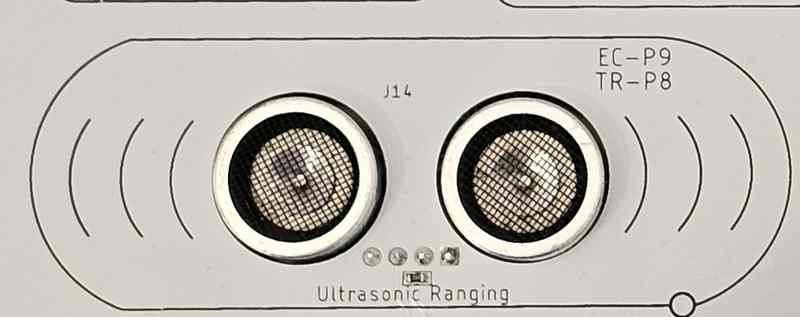
This module measures the distance between the kit and an obstacle. It’s the perfect gateway to projects like radar, parking sensors, or intruder detection.
It’s a concrete example of how a device can interact with its environment and introduces beginners to “advanced” sensors and programming.
LCD Screen
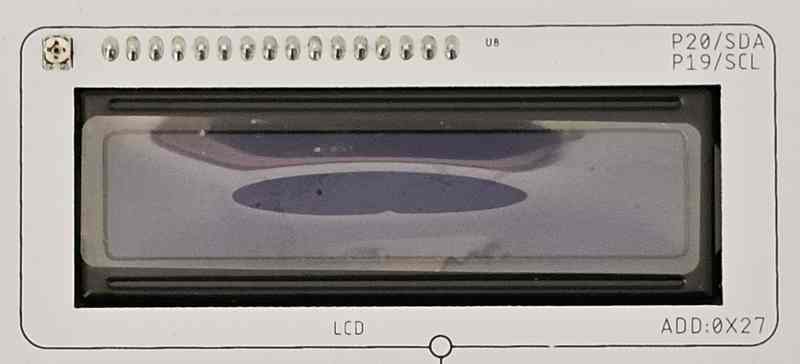
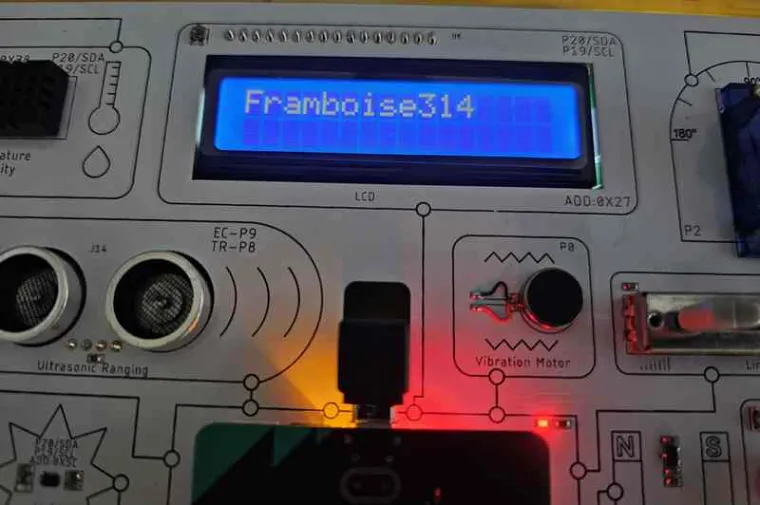
The included LCD screen lets you display messages, sensor readings, or calculation results.
It’s a great teaching tool: it makes the program’s output visible without needing to connect the Micro:bit to a PC or use the built-in LEDs.
Think weather stations, clocks, or game scoreboards—so many project possibilities!
Servo Motor
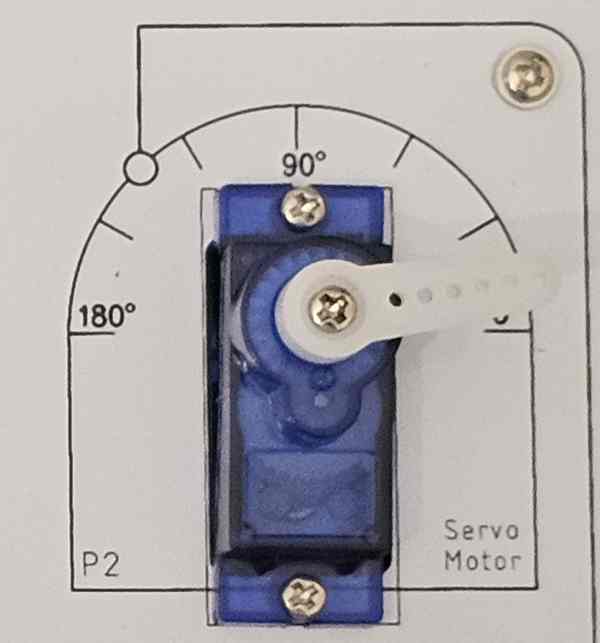
The servo motor lets you create movement: lift a barrier, point a needle, open a trap door…
It’s the perfect module to explore robotics, automation, and learn about PWM (pulse width modulation) control with the Micro:bit.
PIR (Motion) Sensor
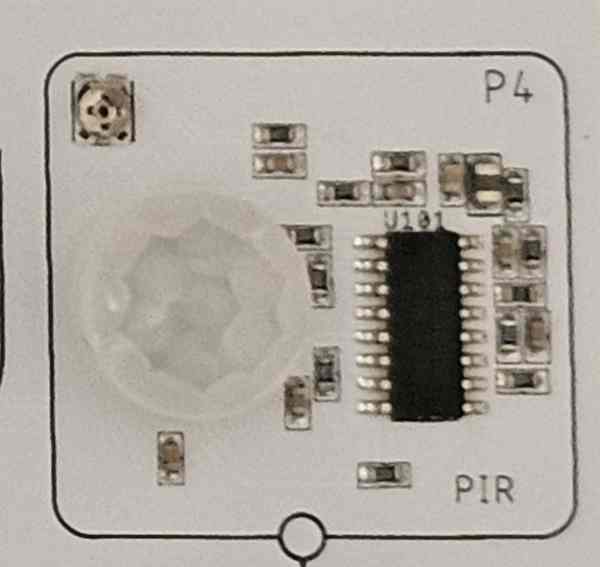
This module detects the presence or movement of a person near the kit.
Perfect for making alarms, people counters, or smart sleep/wake systems.
It brings your Micro:bit to life, making it responsive to its environment.
4. Getting Started with the Elecrow Micro:bit Starter Kit
Installing the Micro:bit Board
Before exploring the possibilities of the Elecrow Micro:bit Starter Kit, you’ll need to install the Micro:bit board onto the kit’s main board.
It’s very simple: just gently insert the Micro:bit into the dedicated connector (easy to spot on the base plate), then plug in the USB cable to power it and upload your programs from your computer.
⚠️ Important: Safety and Handling
Always make sure the Starter Kit is unplugged (no USB cable, no power) before inserting or removing the Micro:bit.
This prevents short circuits or damage to the board.
Never handle the board while powered on—always cut the power before mounting or unmounting the Micro:bit.
First Steps with the Micro:bit
Getting started with the Elecrow Micro:bit Starter Kit is immediate—even for complete beginners.
After inserting the Micro:bit into its connector, just connect the kit to your computer with the included USB-C cable: everything powers up automatically, with no complicated setup.
You’re ready to upload your first program and explore all 13 included modules!
To help you get started, here’s a step-by-step guide for connecting your Micro:bit to MakeCode and uploading your first test program.
Transferring a Program to the Micro:bit with MakeCode (using Chrome)
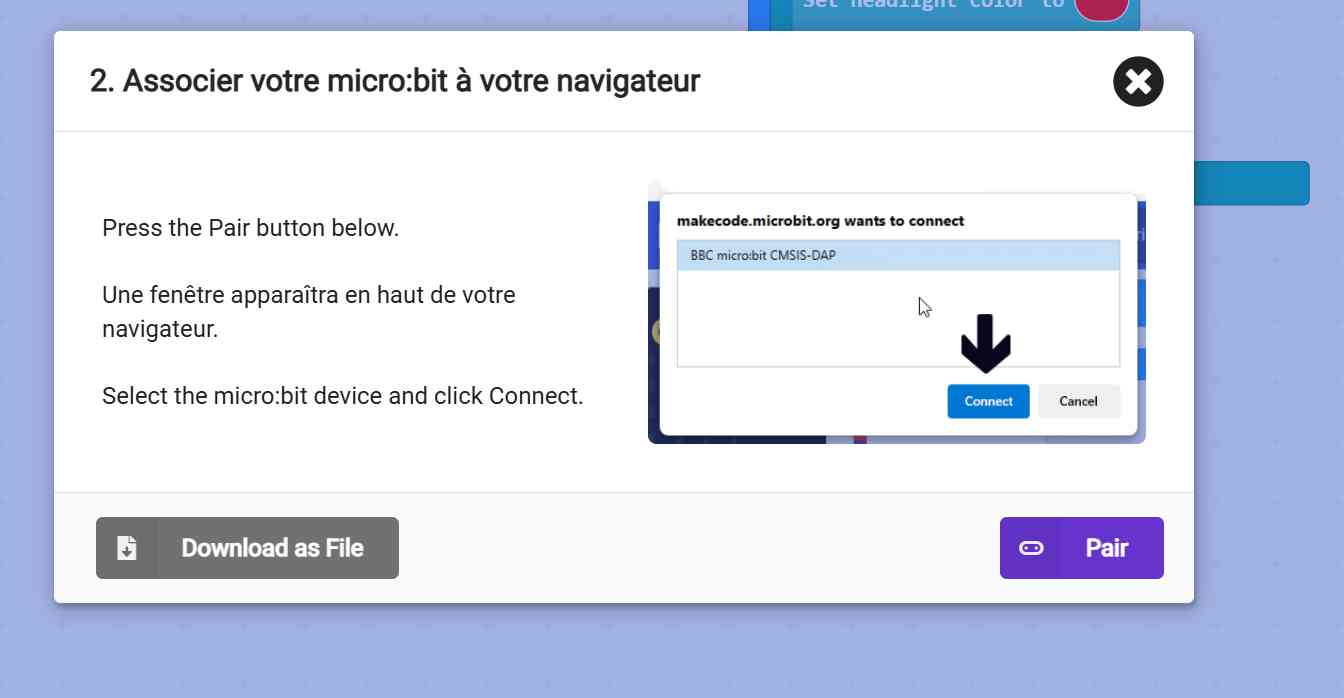
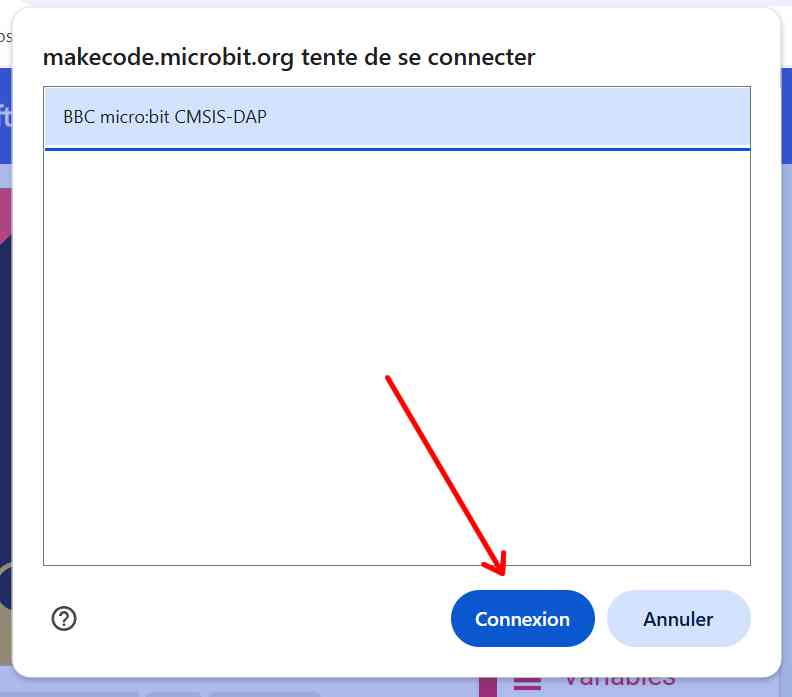
To get the most from your Elecrow Micro:bit Starter Kit and upload your first programs, it’s highly recommended to use Google Chrome.
It’s the only browser that offers reliable, direct connection between MakeCode and the Micro:bit using WebUSB.
Step 1: Connect to MakeCode
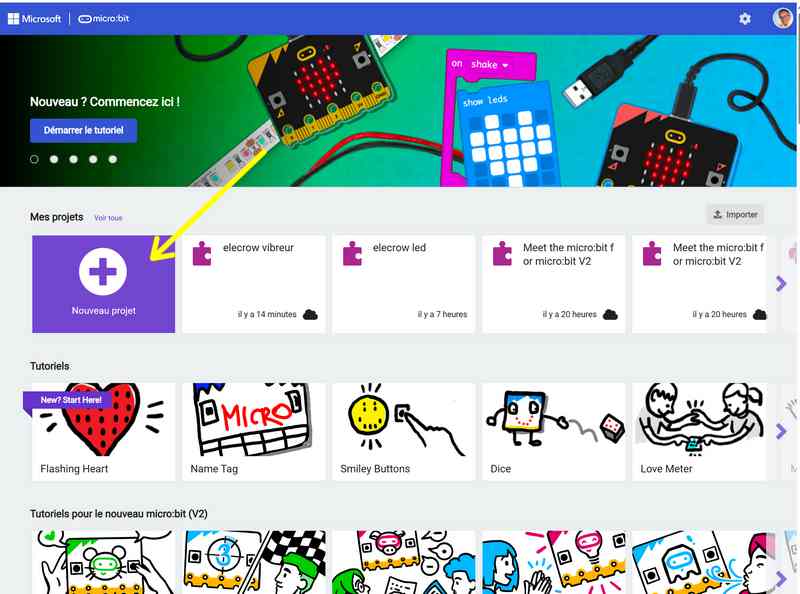
-
Open MakeCode for Micro:bit in Google Chrome.
(Create an account if you don’t have one.) -
Click on New Project to start with a blank workspace.
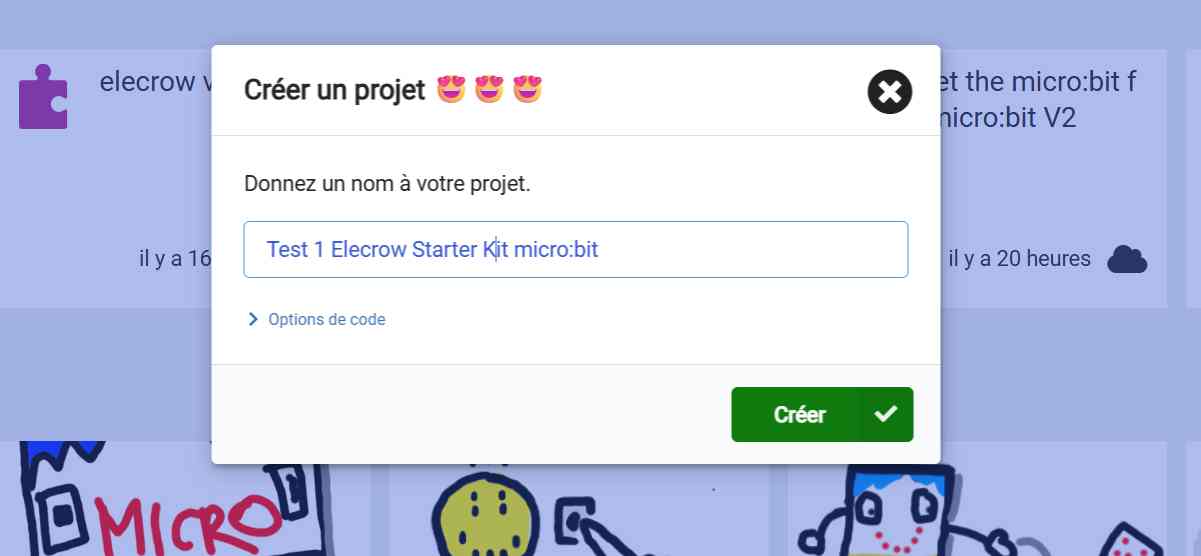
-
Give your project a name.
-
Write your program.
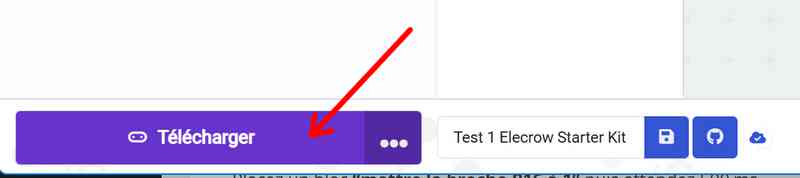
Step 2: Upload Your Program
-
Click Download (and connect your Micro:bit to your PC if needed).
-
If everything is connected properly, the program will be sent directly to your Micro:bit board and the LED connected to P16 will start blinking.
⚡ Tip:
If the direct connection fails or if the “Connect Device” button does not appear, make sure you’re using Google Chrome—this transfer method isn’t supported by Firefox or Edge. If necessary, you can always download the .hex file and copy it manually onto your Micro:bit (it appears as a USB drive).
My First Steps with the Micro:bit and the Elecrow Starter Kit
Since my Micro:bit board had already been used, the vibration motor was constantly on when I first powered up the kit.
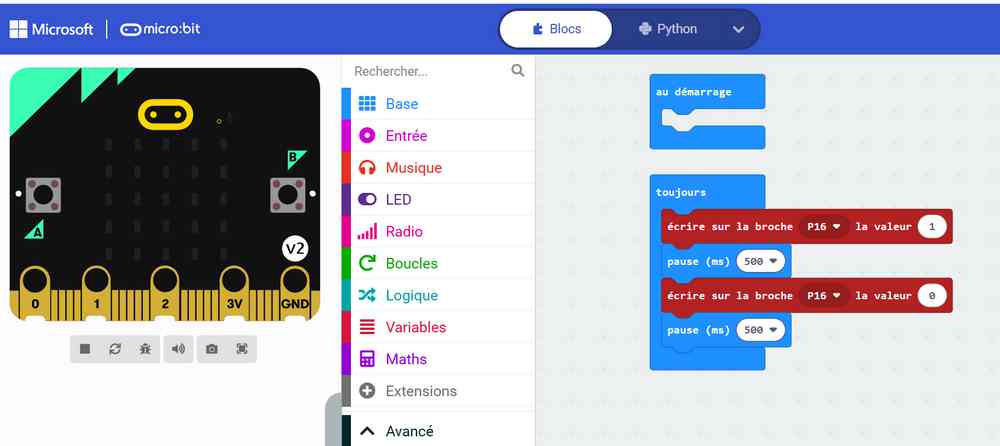
So I started by writing a simple program to control the vibration motor with the Micro:bit’s A button. 😉
def on_forever():
if input.button_is_pressed(Button.A):
pins.digital_write_pin(DigitalPin.P0, 1)
else:
# Allume le moteur
pins.digital_write_pin(DigitalPin.P0, 0)
basic.forever(on_forever)
in blocks mode
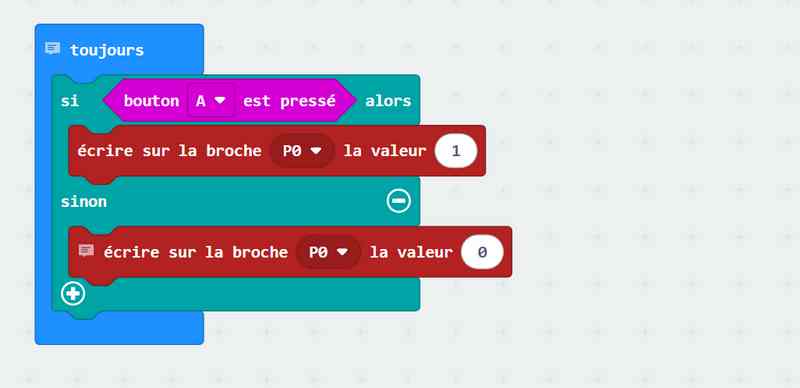
And yes : the vibration motor responds perfectly to the button (turn up the sound!).
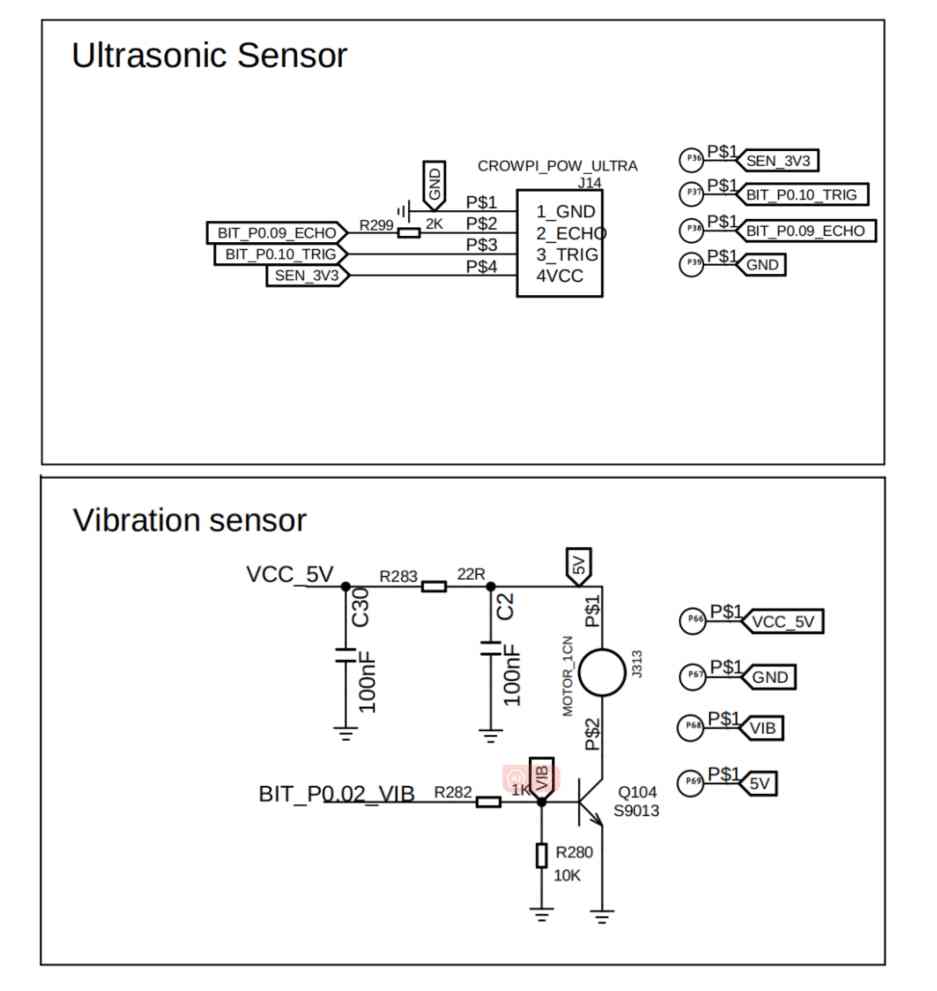
For the electronics enthusiasts, the documentation even provides circuit diagrams for the different sensors and actuators.
I just tweaked this program a bit to control the LED instead, 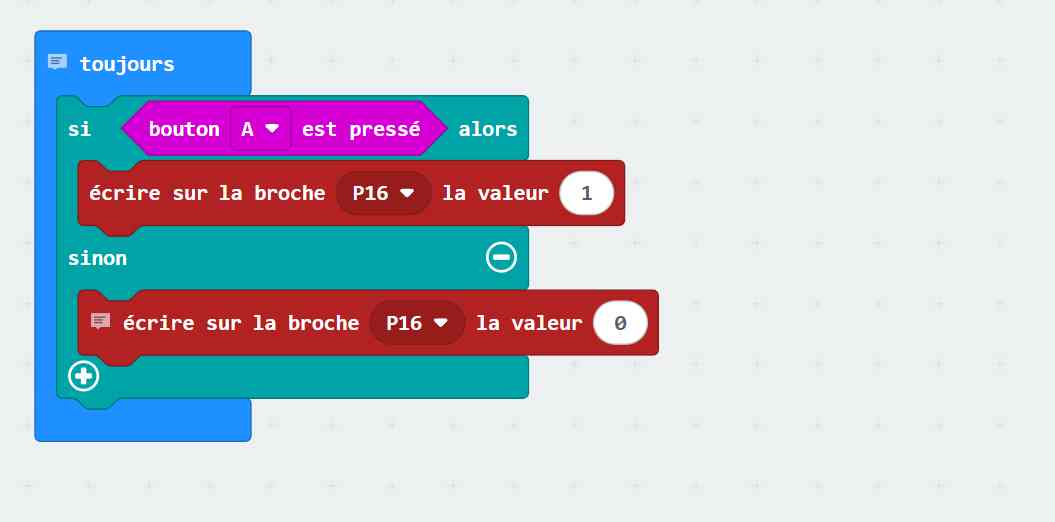
and it works the same way.
Project Examples & Tutorials with the Elecrow Micro:bit Starter Kit
Controlling the LCD with the Elecrow Micro:bit Starter Kit
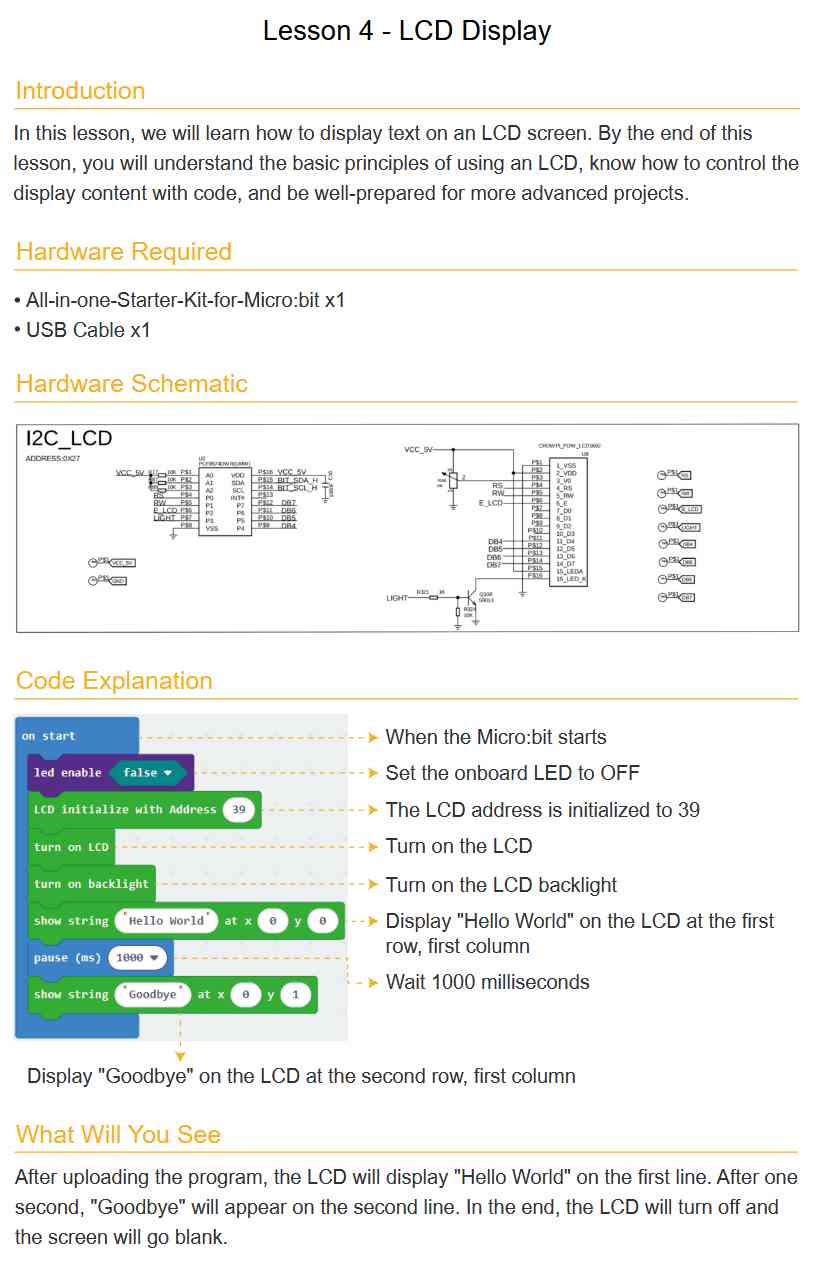
The documentation explains how to use the LCD - but skips a crucial detail: it doesn’t tell you which MakeCode extension to install!
That’s important, because to use certain modules (LCD, DHT sensor, 4-digit display, RTC…), you must add the right MakeCode extension.
Without the extension, you simply can’t use these modules - a real problem for young beginners who could get stuck even though the rest of the kit is ready to go.
💡 Framboise314 Tip:
Be sure to add the “LCD1602” extension in MakeCode before you start programming the kit’s LCD screen! For every module that isn’t recognized out of the box, search for its name in MakeCode’s extensions, and add it before you start testing your code.
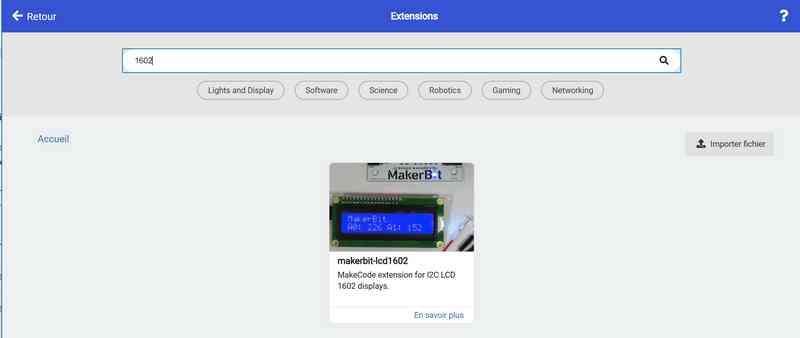
Here, I typed “1602” in the search box and found the “LCD1602” by makerbit. Sometimes it’s more complicated… Click on the extension, then on “Import File”.
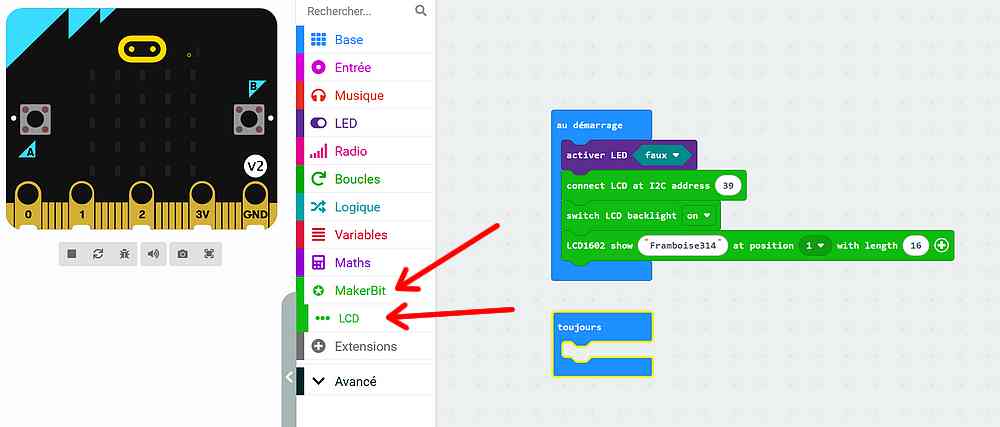
The MakerBit extension then appears in your block list, and you’ll find all the blocks for the LCD screen. Enter your program as above and upload it to the Micro:bit.
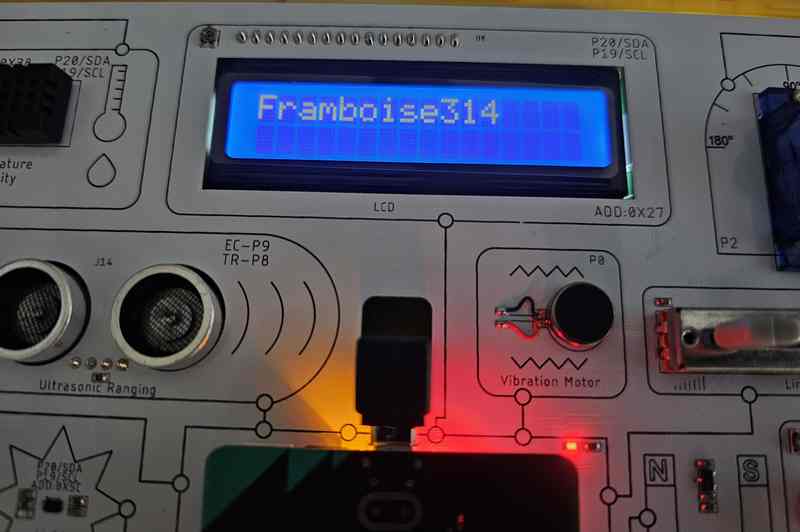
The text displays perfectly on the screen.
List of Lessons in the Elecrow Micro:bit Starter Kit and MakeCode Extensions to Add
A key improvement for Elecrow:
The printed documentation for the Elecrow Micro:bit Starter Kit never explicitly says which MakeCode extensions are needed to use each module (LCD, DHT, RTC, etc.).
You have to dig through the official videos to figure out which extension to install—not practical, especially for beginners or in classroom settings.
Hopefully, a future version of the documentation will include a clear table listing the required extensions for each lesson.
| No. | Lesson Title | MakeCode Extension(s) to Add |
|---|---|---|
| 1 | LED Control | |
| 2 | LED Control with Buttons | |
| 3 | Breathing LED (Potentiometer) | |
| 4 | LCD Display | i2cLCD1602 |
| 5 | Smart Street Lamp (Light Sensor) | BH1750 |
| 6 | Distance Display (Ultrasonic Sensor) | i2cLCD1602 + Sonar |
| 7 | Proximity Alarm (Ultrasonic + Vibrating) | Sonar |
| 8 | Brightness Adjustment (Pot + LED) | i2cLCD1602 |
| 9 | Temperature/Humidity Detection (DHT) | i2cLCD1602 + https://github.com/MKleinSB/pxt-dht20 |
| 10 | Servo Control | https://github.com/myrobotbit/PXT-MyServo |
| 11 | LED Control via IR Remote | IRremote in apprentice_car |
| 12 | PIR Motion Detection (LED activation) | |
| 13 | Servo Angle Control via IR + LCD | IRremote + i2cLCD1602 + https://github.com/myrobotbit/PXT-MyServo |
| 14 | Automatic Door (servo + LCD + button) | i2cLCD1602 + https://github.com/myrobotbit/PXT-MyServo |
| 15 | Sound Alarm (microphone + vibrating motor) | |
| 16 | Acceleration Calculation (accel. + LCD) | i2cLCD1602 |
| 17 | Smart Corridor (light, sound, PIR, LED) | BH1750 |
| 18 | Hall Counter (magnetic detection + LCD) | i2cLCD1602 |
| 19 | 4-Digit Display | JoyPi-Advanced |
| 20 | Accurate Clock (RTC + 4-digit display) | RTC DS1302 + JoyPi-Advanced |
| 21 | Alarm Clock (RTC + 4-digit + touch + buzz) | RTC DS1302 + JoyPi-Advanced |
| 22 | Compass (Micro:bit’s compass) |
💡 Adding a MakeCode Extension by GitHub Address
Some modules in the Elecrow Micro:bit Starter Kit need extensions not listed directly in MakeCode.
If you don’t see the extension in search, you can add it by pasting its GitHub URL:
-
In MakeCode, open the “Extensions” menu.
-
Paste the GitHub extension URL in the search box.
-
Click confirm—the extension is now added to your project!
Tip: GitHub addresses (likehttps://github.com/microbit/micropython-lcd1602) are often listed in forums, tutorials, or here in this table. Copy/paste to save time!
Project Example: A Clock on the LCD Display
Block Mode
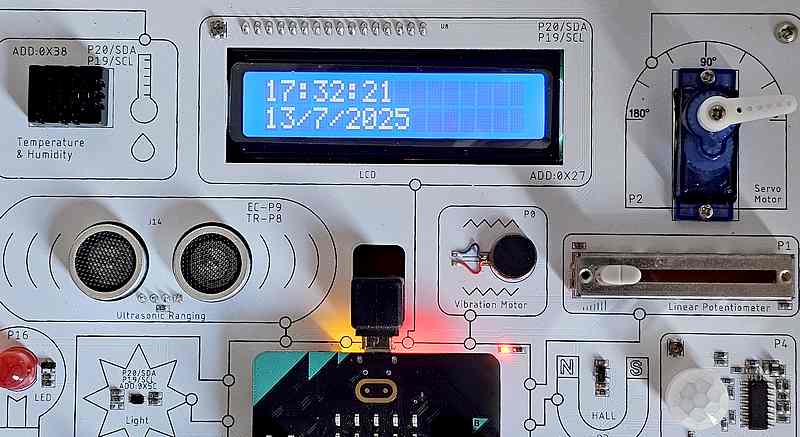
This program uses the RTC (real-time clock) module in the Elecrow Micro:bit Starter Kit to display the current time and date on the kit’s LCD1602 display.
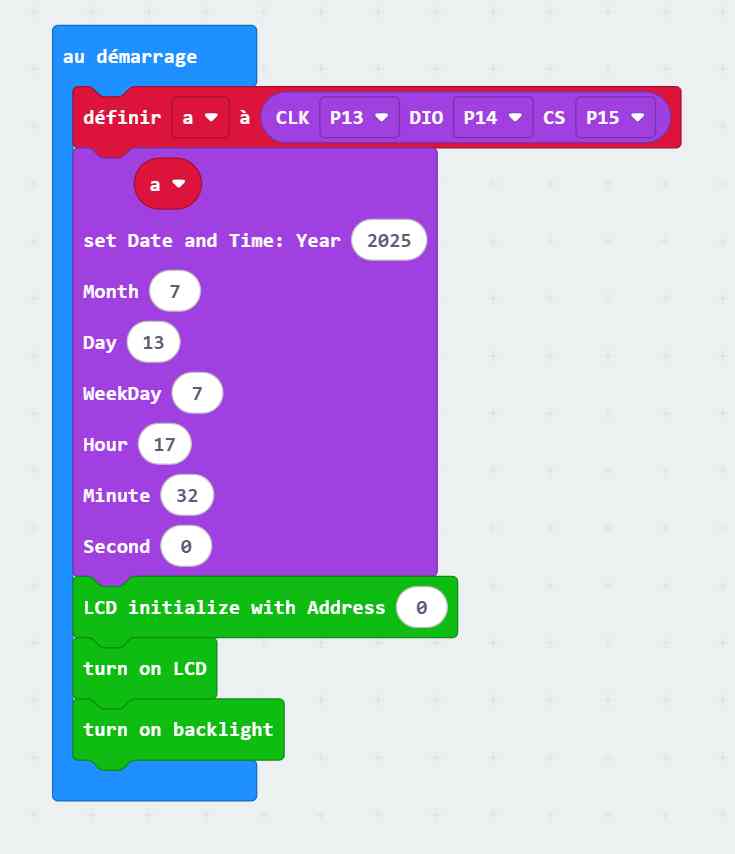
On startup, the Micro:bit initializes the RTC with the date and time, then sets up the LCD.
In the main loop, the program combines hours, minutes, and seconds as “hh:mm:ss” on the LCD’s first line, and the date as “dd/mm/yyyy” on the second line.
With this setup, the clock updates every 500 ms, so you can see the seconds ticking by and the calendar changing. It’s a great way to practice using both RTC and LCD extensions in MakeCode, and to learn how to display dynamic data on external hardware.
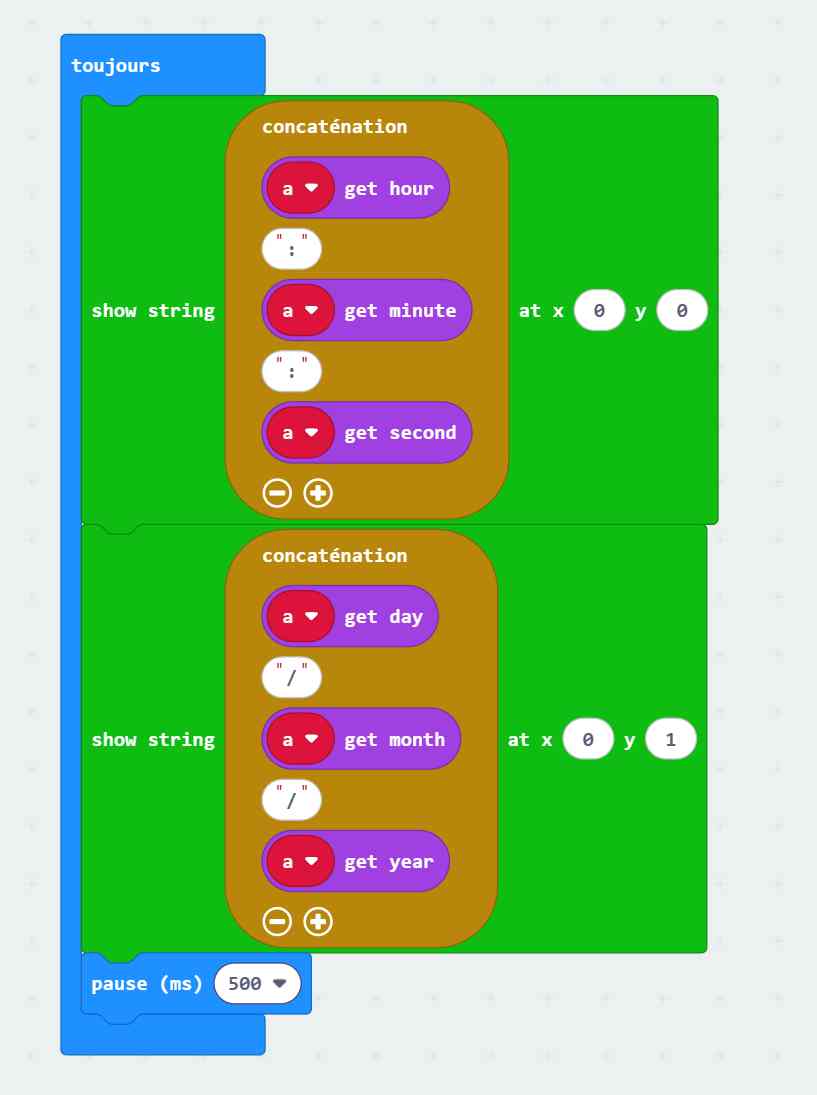
Room for Improvement:
When hours, minutes, or seconds are single digits (e.g. 7 h, 5 min, 9 s), the display is not aligned: there’s no zero before the digit (“7:5:9” instead of “07:05:09”).
For perfect display, each value should be “padded” with a leading zero if it’s less than two digits—a useful optimization for a really “pro” project!
In MakeCode Python: The Same Program
a = DS1302.create(DigitalPin.P13, DigitalPin.P14, DigitalPin.P15)
a.date_time(2025, 7, 13, 7, 17, 32, 0)
I2C_LCD1602.lcd_init(0)
I2C_LCD1602.on()
I2C_LCD1602.backlight_on()
def on_forever():
I2C_LCD1602.show_string("" + str(a.get_hour()) + ":" + str(a.get_minute()) + ":" + str(a.get_second()),
0,
0)
I2C_LCD1602.show_string("" + str(a.get_day()) + "/" + str(a.get_month()) + "/" + str(a.get_year()),
0,
1)
basic.pause(500)
basic.forever(on_forever)
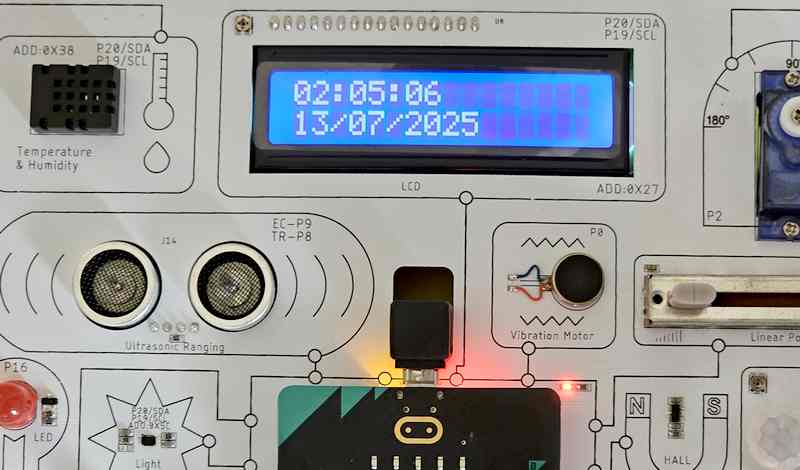
The Improved Version with Two Digits for H, Mn, and Sec
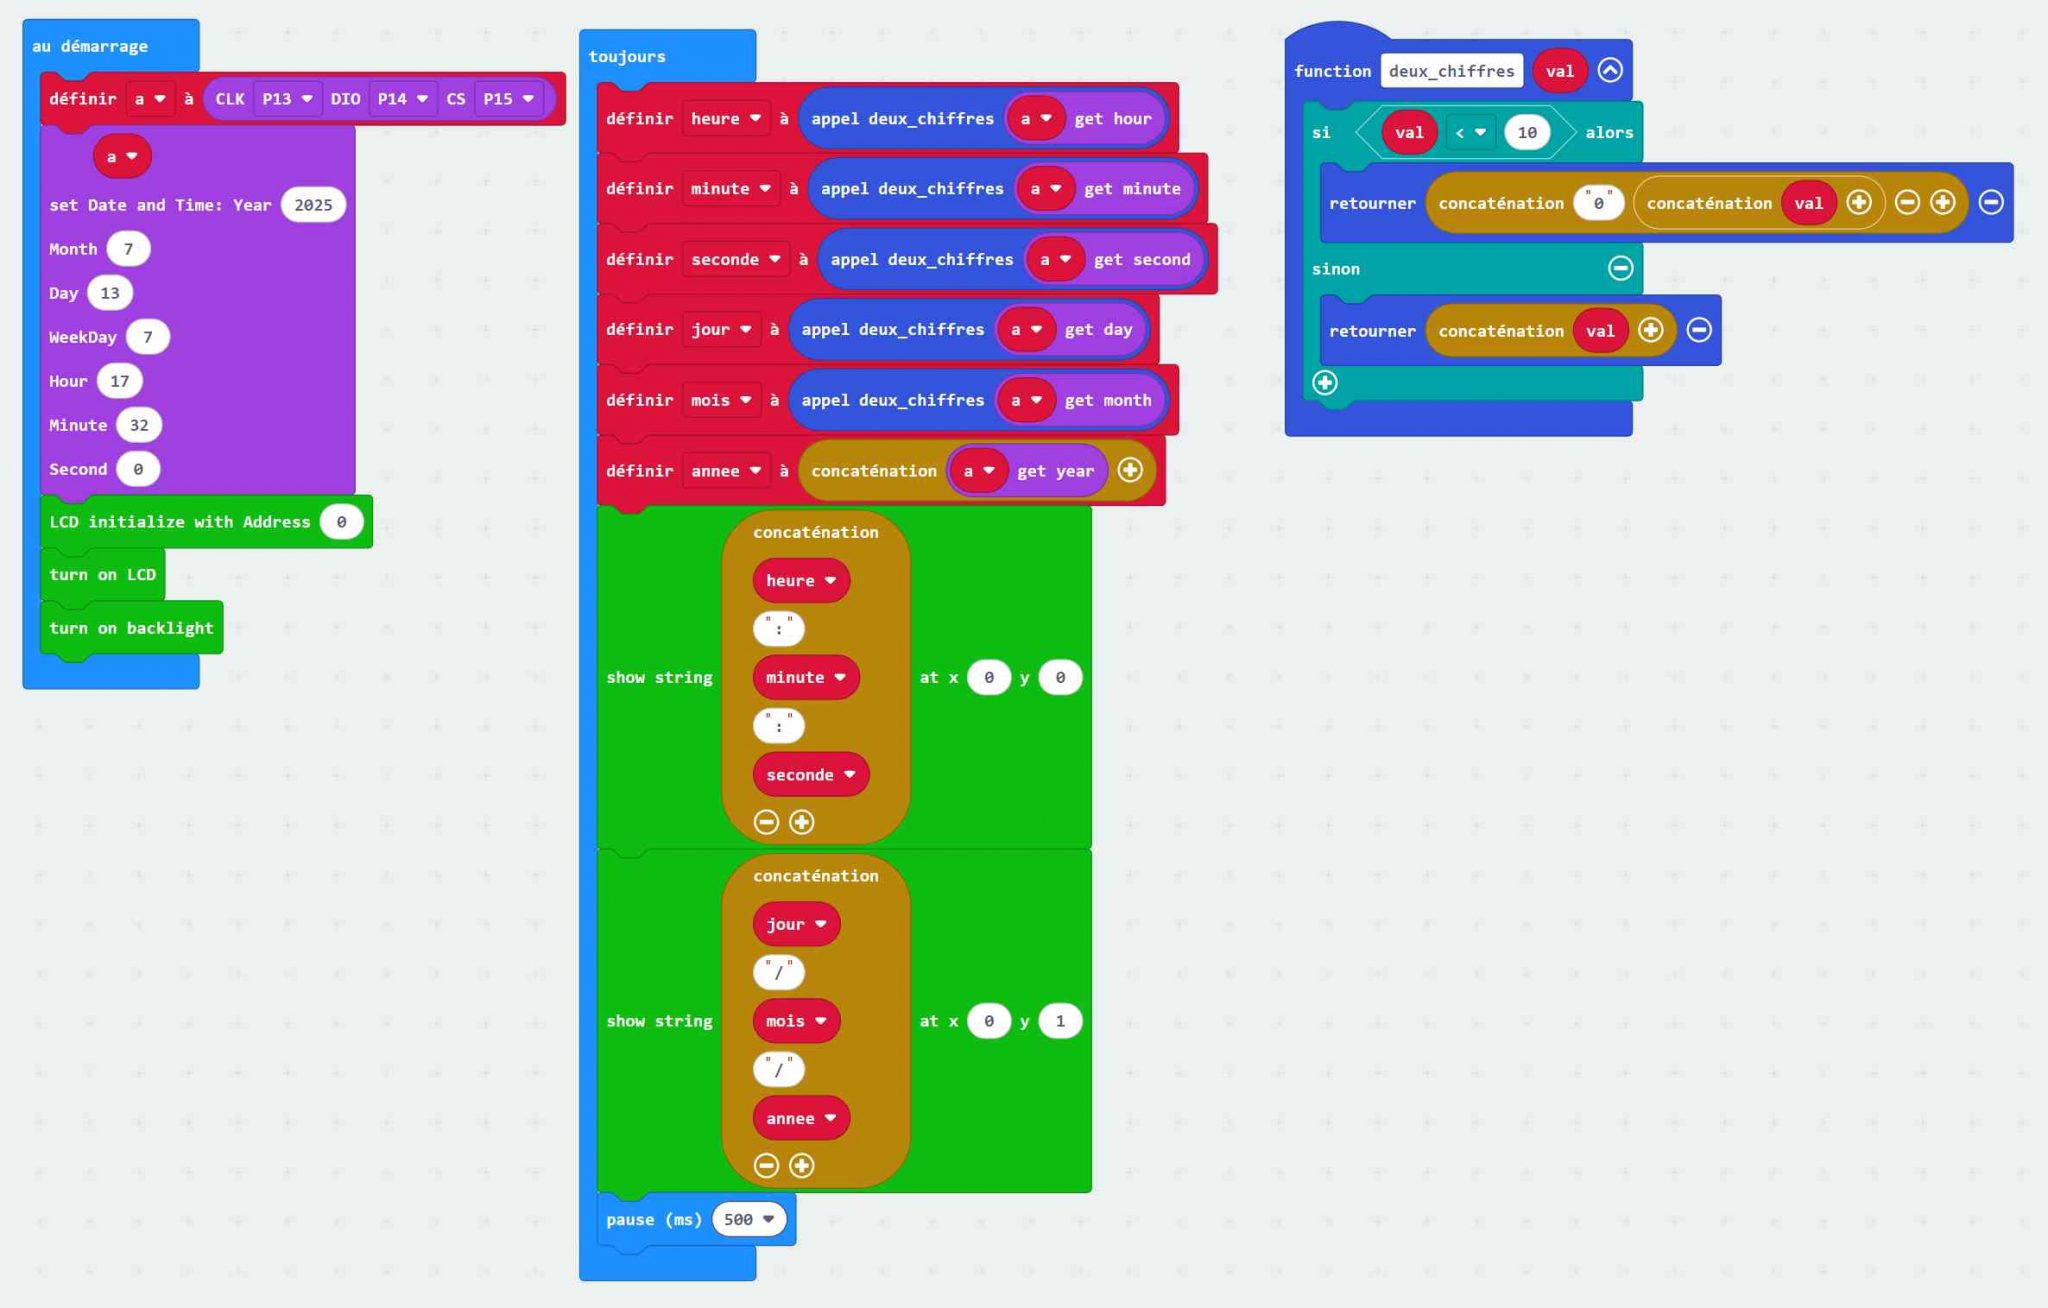
Now even single-digit values display correctly!
💡 MicroPython vs. MakeCode Python: What’s the Difference?
“Pure” MicroPython (on python.microbit.org) is the official Python version for the Micro:bit. It uses standard MicroPython instructions like from microbit import *, button_a.is_pressed(), or pin0.write_digital(1).
MakeCode Python (on makecode.microbit.org) offers a simplified version, designed to match MakeCode blocks. Some classic Python functions aren’t available or have different names. For example, to read button A, use input.button_is_pressed(Button.A) instead of button_a.is_pressed().
Remember:
-
The two platforms are not compatible: a Python program for python.microbit.org won’t always work on makecode.microbit.org, and vice versa.
-
MakeCode Python is designed for beginners, with a vocabulary close to MakeCode Blocks.
-
For advanced projects or to use Python libraries, it’s best to stick to “pure” MicroPython.
Tip: Always check which platform you’re coding for before copying examples from the Internet!
Conclusion
The Elecrow Micro:bit Starter Kit is a complete, practical, and well-designed case for starting out in electronics and programming with zero hassle. All modules are prewired: just insert the Micro:bit, plug in, and you’re ready to go!
Small downside: the documentation does not clearly indicate which MakeCode extensions to install for each tutorial—unless you watch all the videos… This feedback has been sent to Elecrow, and here in this article, you’ll find the full list of extensions to add for each lesson.
With this info, you’ll never be stuck: you can get the most out of the kit, even if you’re just starting out.
In short: a fantastic kit to learn, progress, and have fun—at home, in school, or at the fablab!