Story
Product Link: https://www.elecrow.com/all-in-one-starter-kit-for-pico-2-with-common-board-design-17-sensors-and-21-lessons.html?idd=6
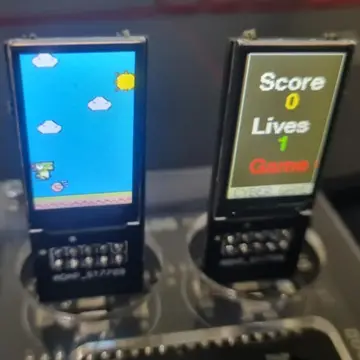
Elecrow sent me this cute little All-In-One Pico2 RP2350 Starter Kit. This kit is designed for beginners to start the learning journey of Pico 2 RP2350 in a fun and simple way. The kit integrates 17 sensors with different functions on a single board and is equipped with a 2.4" TFT color touch screen. The kit is kids friendly as it does not require soldering or wiring and is ready to use straight out of the box. The kit also comes with more than 21 creative tutorials and games (Snake, Breakout, Dino Run) from the simplest to the most advanced level. Me and my 8 year old loved programming this board and enjoyed learning the basics of electronics.
In this video, I am going to unbox and show you guys how to program and use this cute little all-in-one kit from Elecrow using Arduino IDE. You can order this kit from www.elecrow.com. The product link is in the description below.
Package Contains

In the heart of the kit is a Dual-Core Raspberry Pi Pico 2 RP2350 Chip. It uses USB Type-C Interface for programming and power. The size of the kit is 195x170x46(mm) and weighs only 340g making it ideal for young and budding electronics enthusiasts.
Inside the kit is:
- 1x All-In-One Starter Kit for Pico 2
- 1x IR Remote Control and
- 1x USB TYPE-C Cable
List of Sensors

The kit has 17 onboard sensors and 20 RGB LEDs with different functions integrated on a single board which are fun to use and learn.
Each sensor module has its own unique feature and functionality designed for beginners and ideal for getting started. The sensors are all embedded on a unique portable suitcase style kit. This makes it easy for young enthusiasts to learn electronics and programming as there is no need for soldering any wires. This kit offers students a hands-on platform to learn programming through practical experience.
Here is the list of all the 17 onboard sensors that are part of this kit:
- 1x Temperature & Humidity Sensor
- 4x Button
- 1x Ultrasonic Ranging Sensor
- 1x Light Sensor
- 1x Linear Potentiometer
- 3x LED
- 1x Buzzer
- 1x Infrared Remote
- 1x Relay
- 1x Servo motor
- 1x Sound Sensor
- 1x Accelerometer & Gyro
- 1x Touch Sensor
- 1x Vibration Motor
- 1x Hall Effect Sensor
- 1x Gas Sensor (MQ2), and the
- 1x 2.4-inch TFT Display
Free 21 Lessons

The development board comes with 21 courses that are designed to be progressively challenging, engaging, and thought-provoking. These courses will guide you step-by-step to gain all the essential knowledge to learn electronics. With a variety of components and detailed tutorials, this kit is ideal for Pico beginners, schools, and Raspberry Pi enthusiasts.
Here, you will become familiar with electronic modules, improve your logical thinking skills, enhance your creative design capabilities by implementing the functionality of these modules through programming.

Using the C++ programming language, users can complete interesting projects and develop logical thinking and problem-solving skills.
Compile Environment Configuration

To program this board, we will be using the Arduino IDE. Arduino IDE is a free easy-to-use open-source platform and one of the best choices for learning programming. If you need to download and install the IDE, please go ahead and get it from the Arduino's official website, the link is in the description below. The website provides installation packages for Windows, Linux and macOS.
Config: For my demo I am using Arduino IDE version 2.3.6 and Raspberry Pi Development Board Pico/RP2040/RP2350 version 4.2.0.
To get started, we first need to add the board to our IDE.

To do so:
- Click on "File" > "Preferences"
- Then click on the "paste button" and paste the RP2040 boards URL from the description below in the "Additional Board Manager" window RP2040: https://github.com/earlephilhower/arduino-pico/releases/download/global/package_rp2040_index.json
- Then click the OK button twice.
- Now, from the side bar click on the "Board Manager" icon and enter "2040" in the search bar
- Then from the search result select "Raspberry Pi Pico/RP2040/RP2350" and change the version to "4.2.0" and hit the "Install" button
- Once Installed you should be able to select the "Adafruit Feather RP2350 HSTX" from the list of available boards.
- You also need to change the "Port" to the Adafruit port
Uploading Demo Code

Once your IDE is all set, please go ahead and download the demo codes from the Elecrow's github repository. The link is in the description below.
Before uploading a course, in order to display the corresponding course, you need to change the filename on line number 396 of "ui_screen2.c". [All-in-one_Starter_Kit_for_Pico/librariesPICO/UI/ui_Screen2.c]

Then, to enter the burn mode, you need to long press the boot key and then short press the reset key and then release it followed by releasing the boot key to force the board to enter the burn mode.
Once the code is loaded, go ahead and enjoy the beautiful world of electronics via Elecrows's Pico 2 RP2350 Starter Kit.

To know which pins are the sensors connected you can check the schematic diagram of the board, it is even indicated on the board which GPIO pin is used. There are so many things you can do with this. This is absolutely perfect for my son as he is still in the beginners phase of learning and he can concentrate on the sensors first before we go and build this on a breadboard and build bigger projects.
Resources
Where to Order: https://www.elecrow.com/all-in-one-starter-kit-for-pico-2-with-common-board-design-17-sensors-and-21-lessons.html?idd=6
RP2040 Board URL: https://github.com/earlephilhower/arduino-pico/releases/download/global/package_rp2040_index.json
Arduino IDE: Download
Elecrow Github Repository: Github
Lessons: Lessons
My Github Repository: https://github.com/tarantula3/Elecrow-Pico2-Kit
Video: https://youtu.be/TP4KN2suZ7U
Support My Work
- BTC: 1Hrr83W2zu2hmDcmYqZMhgPQ71oLj5b7v5
- LTC: LPh69qxUqaHKYuFPJVJsNQjpBHWK7hZ9TZ
- DOGE: DEU2Wz3TK95119HMNZv2kpU7PkWbGNs9K3
- ETH: 0xD64fb51C74E0206cB6702aB922C765c68B97dCD4
- BAT: 0x9D9E77cA360b53cD89cc01dC37A5314C0113FFc3
- BNB: 0xD64fb51C74E0206cB6702aB922C765c68B97dCD4
- POL: 0xD64fb51C74E0206cB6702aB922C765c68B97dCD4
- LBC: bZ8ANEJFsd2MNFfpoxBhtFNPboh7PmD7M2
- COS: bnb136ns6lfw4zs5hg4n85vdthaad7hq5m4gtkgf23 Memo: 572187879
Thanks, ca again in my next tutorial.