


Story
Do you have someone around you who loves to smoke? In my life, I like to keep the air in my room fresh, but my housemate is a smoker. So I want to make a simple project that can be used to clean the air in living or working places, especially the smell of wildfire and smoke in closed places. We all know that second-hand smoke is very harmful to our health and most of our indoor pollution comes from second-hand smoke. Second-hand smoke is still a health concern, and we all need to find ways to ensure that the air in our homes is healthy, even if we don't smoke.
I want to make a simple DIY project to build an air purification circuit, this circuit purifies the air by purifying the smoke, it not only senses the smoke in the air but also reads and displays the smoke level in the air in PPM (parts per million). This circuit will trigger a negative ion generator to clean the smoke when the smoke level is above 500 ppm, this threshold can be changed in the code upon request.
Step 1: What You Will Need
Here is a list of all the tools and parts you will need.
Electronic parts:
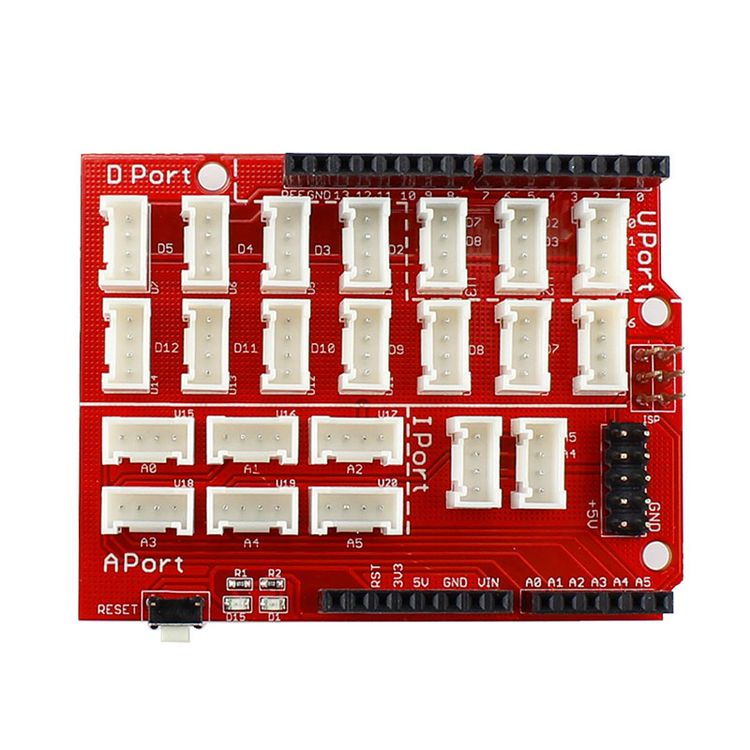
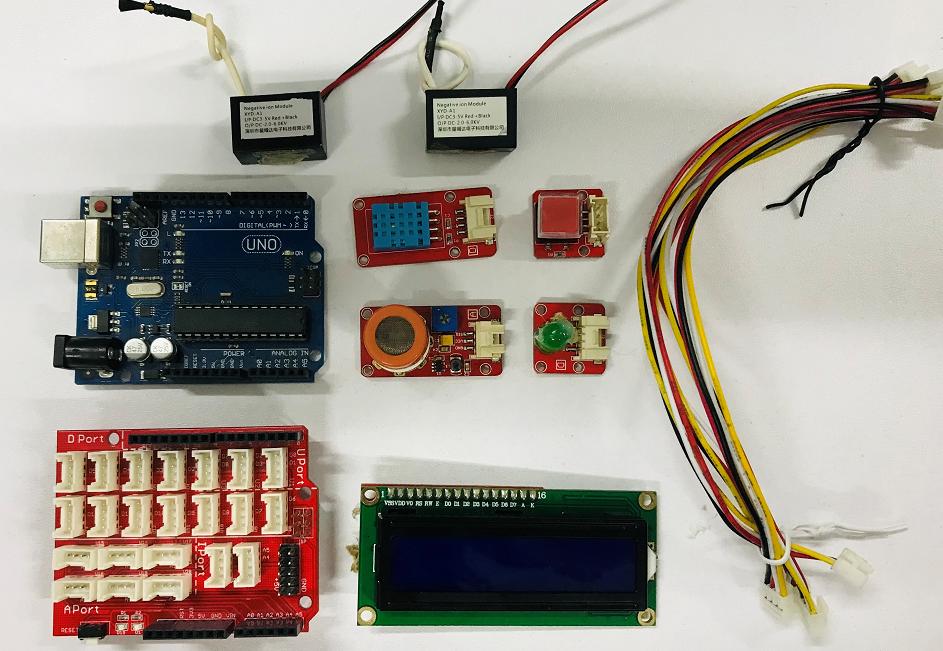
Crowtail- Base Shield for Arduino 2.0
Crowtail- Temperature& Humidity Sensor 2.0
Some Jumper Wire
Waste parts:
Discarded cardboard box
Clear Glass
Extra tools:
Hot glue gun
Double-sided adhesive
Cutter
Notice:We have updated the Negative ion generator. This one on the link has an input voltage of 180-240v, with greater negative ion release and faster purification.
Step 2: Circuit Schematic Diagram
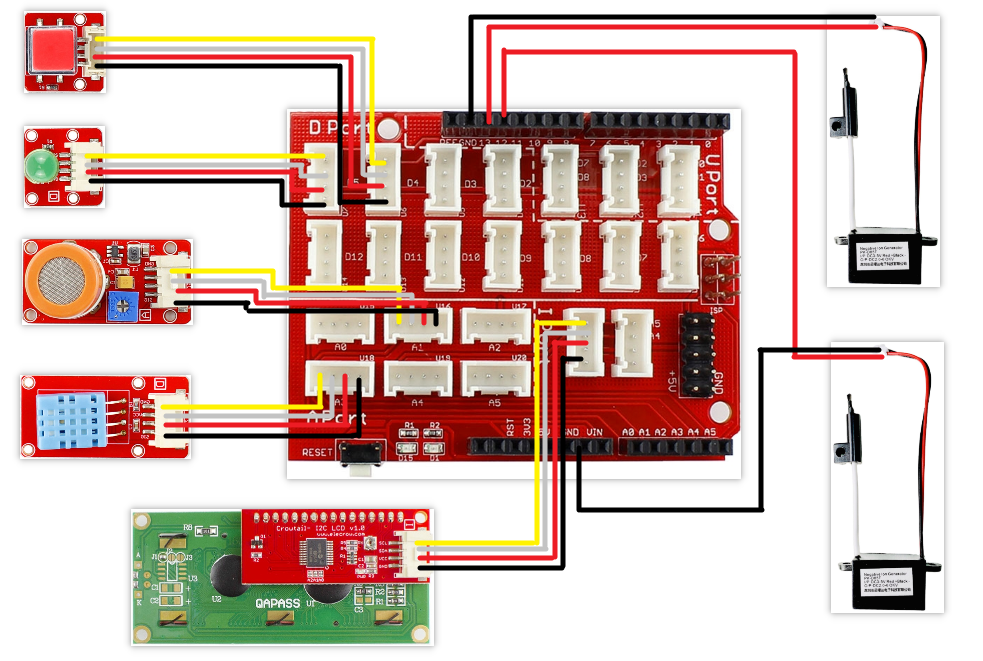
This is the circuit diagram of this project.
Connect all components according to this circuit diagram.
Sensors <--> Crowtail- base shield
Button <--> D4
LED <--> D5
Gas Sensor <--> A1
Temperature& Humidity Sensor <--> A3
LCD1602 Display <--> I2C Interface
Negative ion generator <--> 12pins,13pins
Step 3: Build the Cardboard Connecting the Diagram


Well, let's start with the basic parts.
You can find a fully transparent box, but I searched around and couldn't find anything suitable, so I found some scrap cardboard and cut them into rectangles on three sides for the sides and back of the box. Initially, I tried to glue the sides and bottom together with double-sided tape, which was obviously a bad idea, and I ended up using a hot-melt glue gun.
For the front of the box, I used a piece of clear glass in order to be able to see the effect of the smoke elimination. The four corners of the front are the design that came with the carton, and I'm glad it adds a little design to the box.
Finally, don't forget to make a top cover for the box, otherwise, the smoke will flow out from above resulting in less effective purification.
So far, a box made of cardboard is finished!. It seemed to be easy and environmental.
Step 4: Wire Up!
Next, it's time for the wiring part. Firstly, Take out our Arduino Uno R3 and Crowtail- base shield then stacking them together. The shield board is similar to a terminal block,which is very easy to plug in the wires and can be used flexibly to plug in servos and other devices.
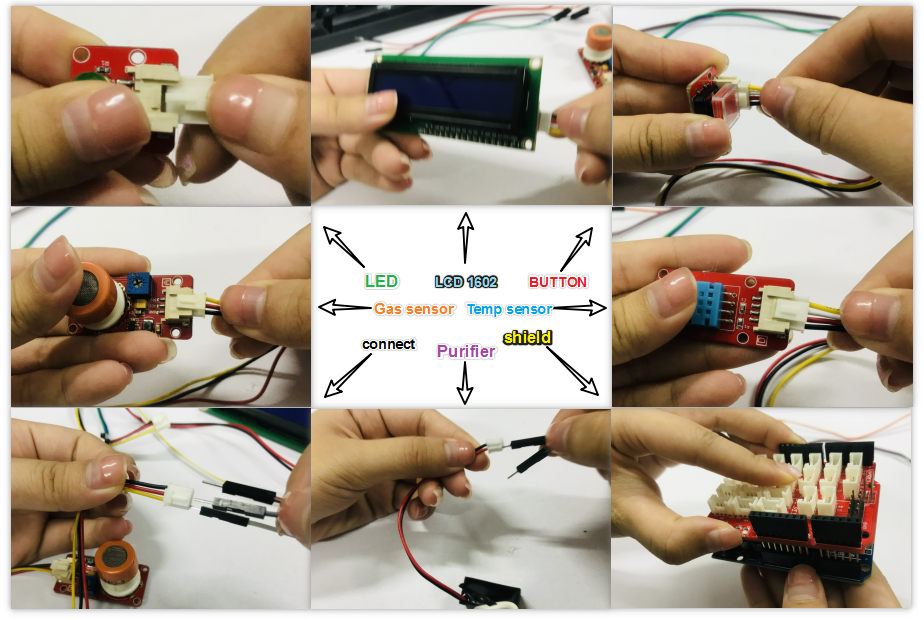
Then connect the sensor cable to the Arduino-base shield with the pins as shown in the circuit diagram in step 2.
If you're curious to know how each module works, you can connect each module individually to test them out. Otherwise, if you're confident everything will be OK, just connect everything up.
Step 5: Attach Cardboard to the Parts


All the sensors are designed to detect the internal conditions of the box, so they should be installed in the box.
Firstly, you need to determine the placement of each module. the role of the LCD is to display the smoke concentration and internal temperature and humidity, LED can display the working status of the negative ion generator, in order to be more convenient to see, I installed them in the top of the box, while the temperature and humidity sensor and smoke sensor placed in the bottom of the box. The negative ion sensor is placed vertically at the bottom of the box.
Then in the corresponding location, according to the size of each module, carefully poke 4 holes, if the hole is open, it will lead to difficulty to fix, I used a cutter for this purpose because it can effectively do the job.
Finally, insert the lead of the negative ion generator out of the hole to connect the shield plate, and then insert each sensor from the back of the box into the hole, if it is hard to fix, you can use a hot melt glue gun. Make sure it's fixed because I don't want it to fall off during the test!
Notice: The high voltage line of the negative ion generator needs to be erected so that the opening of the brush line faces upwards, otherwise the negative ion generator may not work properly.
Step 6: Programming and Source Code


Before we start to connect the cables onto the baseboard, we need to upload the program code into Arduino, a micro USB cable is necessary. Once you're connected, it's time to start our programming journey!
Firstly, to make programming less difficult and to make this project accessible to a wider group, we have used graphical programming, i.e. a graphical programming software Letcode, which is customized by our company to the hardware product, and then you need to download Letcode first, here is the link:
https://forum.elecrow.com/discussion/150/download-...
- Download the Letscode installation package and install it on your computer.
- After successful installation, open the Letscode software, click "Add Extension" in the lower-left corner, find the "Arduino-Crowtail" board type, and select.
- Enter the programming interface, you can drag the programming block to the program, when the program is written, click the "port" in the upper left corner to select the port of the Arduino board(Different ports for different interfaces)
- Of course, these are the programming steps, next, you can use the code we provide, select file-Load from your computer.
- Select the gasshow.sb3 file and load it into the programming screen.
- Finally, select the upload code.
Step 7: Running the Air Purifier
Once everything is ready, it's time to power up your circuit.
During the energization process, first, test the negative ion generator to see if it is working properly. How to detect whether the negative ion generator is working? Very simple, slowly approaches the brush head with the back of the hand, there is a weak wind sensation, indicating that in the work. Close to the time to take care not to touch the brush head, otherwise, it will be electric.
Then fill in some smoke inside the Box. LCD will display the smoke level in the air and the temperature and humidity. You can directly click the button to start the negative ion generator, not manually, when the smoke level is higher than 500ppm, will also trigger the negative ion generator to start.
Finally, you will see the smoke in the box is slowly decreasing. You can watch the video above for specific results.
Step 8: Further
This is a really fun and easy project, and you can significantly reduce the smell of smoke in the room.Have a try!Enjoy!
If you like our projects and want to see more of what we get up to each week please follow us on YouTube.


