Story
Detailed Project Description (Example for Self-Balancing Robot)
Introduction
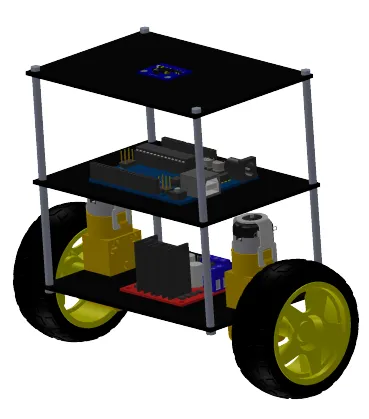
The Self-Balancing Robot is a two-wheeled mobile robot that uses control theory and sensor feedback to maintain its balance, similar to how humans balance on two legs. It demonstrates fundamental principles of robotics, mechatronics, and control engineering. This project is designed as an educational tool to learn about sensors, actuators, control algorithms, and embedded systems.
Features & Design
-
Microcontroller: Arduino Uno / ESP32 (low-cost, widely supported).
-
Sensors: MPU6050 (accelerometer + gyroscope) for tilt angle measurement.
-
Motors: Two DC motors with encoders for precise speed and position control.
-
Motor Driver: L298N / BTS7960 to control motor direction and speed.
-
Power Supply: Li-ion rechargeable battery pack.
-
Chassis: 3D-printed / laser-cut frame with two wheels.
-
Control Algorithm: PID control for maintaining balance in real time.
-
Optional Add-ons: Bluetooth module (HC-05) or Wi-Fi (ESP32) for remote control.
Working Principle
-
The MPU6050 sensor measures the robot’s tilt angle and angular velocity.
-
These values are processed by the microcontroller using a PID control algorithm.
-
The controller calculates the required correction and sends signals to the motor driver.
-
The DC motors rotate in the correct direction and speed to bring the robot back to its upright position.
-
The system continuously repeats this process in a feedback loop, achieving real-time balancing.
Program & Code
-
Written in Arduino IDE (C++).
-
Includes libraries for MPU6050 and PID control.
-
Tunable PID constants (Kp, Ki, Kd) for stable balancing.
-
Optional serial monitor / Bluetooth app for debugging and remote control.
Applications
-
Educational Tool: Demonstrates feedback control, robotics, and mechatronics.
-
Research Platform: Can be extended to autonomous navigation, obstacle avoidance, or AI applications.
-
Entertainment & Hobby Projects: Fun and challenging DIY robot project.
Step by Step Guide
-
Assemble the Chassis – 3D-printed or custom frame with wheels and motors.
-
Install Electronics – Mount Arduino/ESP32, MPU6050, and motor driver.
-
Wiring & Connections – Connect motors, driver, battery, and sensors.
-
Upload Code – Load Arduino sketch with PID control.
-
PID Tuning – Adjust parameters until the robot balances properly.
-
Optional Upgrades – Add remote control, ultrasonic sensor, or camera.
Project Media
-
Images: Show chassis design, wiring diagram, and working robot.
-
Videos: Demonstrate balancing, moving forward/backward, and recovery from small pushes.
-
Schematics: Circuit diagram with MPU6050, Arduino/ESP32, motor driver, and motors.