


Story
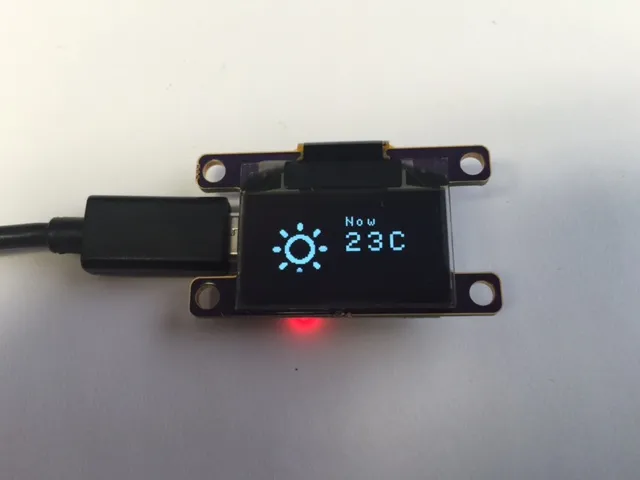
ESP8266 Weather System using the MicroUSB connector
The project was originally created by Dani at: http://blog.squix.ch/2015/07/weatherstation-kit-complete-setup-guide.html I loved this project and created a custom PCB for it. He also has written up and excellent install procedure.
Programming the Weather System Board
A. Install Arduino IDE
- Go to https://www.arduino.cc/en/main/software
- Download and install the Arduino IDE version 1.6.5
B. Add ESP8266 Support to Arduino IDE
- Start the Arduino IDE
- Go to File/Preferences
- In the "Additional Board Manager URLs:" box enter http://arduino.esp8266.com/package_esp8266com_index.json
- Click "OK"
- Go to Tools/Board/Boards Manager
- In "Filter your search..." box enter ESP
- Click "esp8266 by ESP8266 Community" to select it
- Click "Install"
- Go to Tools/Board
- Click "Generic ESP8266 Module"
C. Install ArduinoJson Library
- Go to https://github.com/bblanchon/ArduinoJson
- Click the "Download ZIP" button on the right
- In the IDE, go to Sketch/Include Library/Add .ZIP Library
- Select the ArduinoJson .zip file
- Go to Sketch/Include Library
- Select the ArduinoJson library (you should see it way down the list)
- In the IDE, go to Sketch/Include Library/Manage Libraries
- In the "Filter your search..." box enter "Adafruit SSD1306"
- Click "Install"
D. Register for a free Weather Account
- Go to https://developer.forecast.io
- Click on "Register"
- Create account
- Register for free and create a weather account at https://developer.forecast.io
- Copy down the API Key
E. Programming and Configuring the Board
- In the IDE, go to File/New
- File/Save As to "weather-station-v2" (this creates a subdirectory of the same name)
- Go to https://github.com/squix78/esp8266-projects
- Click on "Download ZIP"
- Extract contents of downloaded zip to a temporary location
- Find subdirectory weather-station-v2 and copy contents to Arduino subdirectory weather-station-v2
- In the IDE, go to File/Open
- Select the weather-station-v2.ino
- Enter your SSID and password after line 50 //note that your weather-station-v2.ino is different from the one on squix//
- Enter your forecastApiKey
- Enter your latitude and longitude from http://maps.google.com/ and noting the lat & long in the top address
- In the IDE click the checkmark button to see if it compiles without an error
- If no errors then, press and hold the little pushbutton
- While holding pushbutton, plug it into a USB port
- Wait 2 seconds and release the button
- In the IDE it should see it and auto install the driver
- Tools/Port, select the new com port and then the Right Arrow (Upload button)
- A bunch of little dots will pop up if it is successfully being programmed
More code: https://github.com/mike-rankin/ESP8266_Weather_System_MicroUSB/tree/master. This is GitHub account: https://github.com/mike-rankin where you will explore more excellent projects. He is a good DIY maker who designs custom ESP32 IoT projects using Altium Designer, Arduino IDE and Fusion360. Welcome everyone to follow.


