Elecrow's 2nd Electronics Design Contest is Heating Up! Win $6,000 cash + Maker products + Official sponsorship! Share your designs today! [Learn More]

user-img

Lily lee

  • 31 Projects
  • 3 Followers
  • Apr 02,2024
+ Follow

Mechanical Keyboard Application - Musical Keyboard

This article shows how to use multiple mechanical keyboards to simulate piano keys by pico control

Mechanical Keyboard Application - Musical Keyboard
 
  • thumbnail-img
 

Hardware Components

  • Raspberry Pi Pico

    X 1
  • Mechanical keyboard

    X 1
  • trumpet

    X 1
  • Breadboard

    X 1
  • USB cable

    X 1
  • Dupont line

    X 1

Tools, APP Software Used etc.

  • Arduino IDE

    Arduino IDE

    Arduino

Story

This article shows how to use multiple mechanical keyboards to simulate piano keys by pico control, producing different tones.Since the mechanical keyboard we use only has 12 keys, we only set tones between C4 and G5.Even so, we can still play a simple song.

Materials:

Raspberry Pi Pico x 1

Mechanical keyboard x 1

trumpet x 1

Breadboard x 1

USB cable x 1

Dupont line x 12

Step 1: Disassemble the Mechanical Keyboard

Disassemble the Mechanical Keyboard

We need to first cut out the 12 keyboard keys from the acrylic fastener.

Step 2: Prepare Dupont Wires

Prepare Dupont Wires

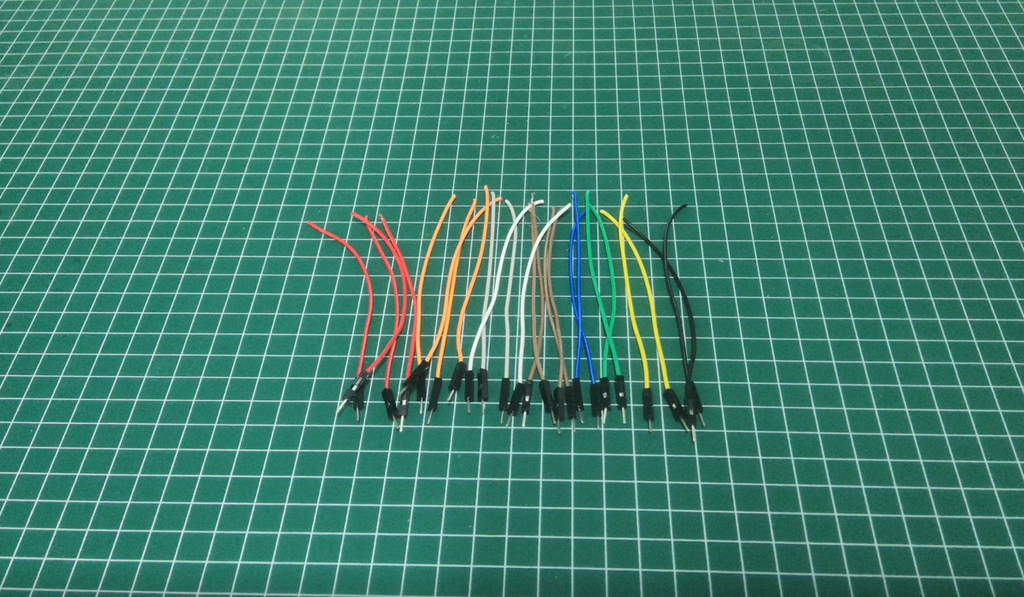
As shown in the figure above, we need to prepare 12 male to male Dupont wires and cut them in half to get 24 cut Dupont wires.Two Dupont wires are used for each keyboard key position.

Step 3: Strip the Cable, Connect the Port

Strip the Cable, Connect the Port

Use wire strippers to strip the insulating outer surface layer at the ends of two DuPont wires, and directly wind it around the two ports at the bottom of the keyboard key position.

If wire strippers are not available, use scissors to gently trim the outer layer of the insulator.

Step 4: Welding

Welding
Welding
Welding

Using a soldering iron and tin wire, weld the Dupont wire and the keyboard key ports together completely.

Follow steps Step3 to Step4 for the other 11 keyboard keys.

Step 5: Reassemble Onto Acrylic Fasteners

Reassemble Onto Acrylic Fasteners

After we weld all the keyboard keys with Dupont wires, we need to reassemble them on the acrylic firmware that we took apart before.

Step 6: Connect the Pico

Connect the Pico

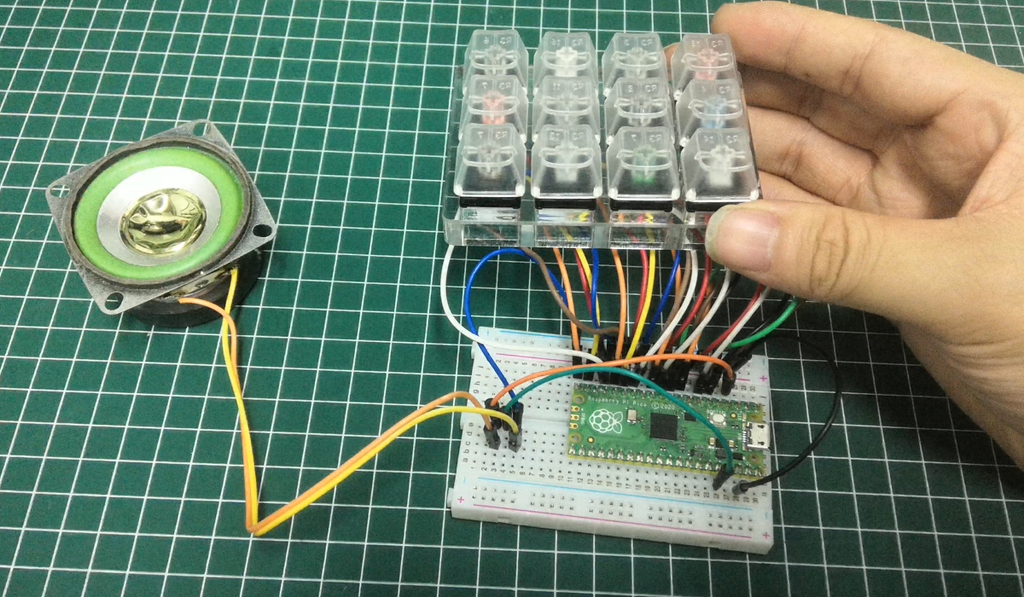
Connect one of the Dupont lines of all keyboard keys to the negative column on the bread board, and connect the other Dupont line to the corresponding pin port of Raspberry PI pico in an orderly arrangement. (Connecting pins are 4-15)

In the same way, connect the horn to the breadboard.(Connecting pin is 2)

Step 7: Download the Program

Download the Program

Open the Thonny software, set the interpreter to MicroPython, then save the program to the Raspberry PI Pico master and rename it "main.py".

Step 8: Program Running

After uploading the program successfully, you can control the sound by pressing the keyboard keys!

Code
  • keyboard.py

    keyboard_1__49aab7eda1fbbea37ecb6fd9924e335d.txt
    Download(0)
Topic
View All

Mechanical Keyboard Application - Musical Keyboard

This article shows how to use multiple mechanical keyboards to simulate piano keys by pico control

341
 
1
0
38

Share your project on social media to expand its influence! Get more people to support it.

  • Comments( 0 )
  • Like( 1 )
/1000
Upload a photo:
You can only upload 1 files in total. Each file cannot exceed 2MB. Supports JPG, JPEG, GIF, PNG, BMP

You May Also Like

View All
Add to cart
Board Type : GerberFile :
Layer : Dimensions :
PCB Qty :
Different PCB Design
PCB Thickness : PCB Color :
Surface Finish : Castellated Hole :
Copper Weight : 1 oz Production Time :
Total: US $
As a sharing platform, our community will not bear responsibility for any issues with this design and parameters.

PCB Assembly

PCBA Qty: BomFile:
NO. OF UNIQUE PARTS: NO. of Components:
Assembly Cost: US $
As a sharing platform, our community will not bear responsibility for any issues with this design and parameters.
Add to cart
3dPrintingFile : Size :
Unit : Volumn :
3D Printing Qty : Material :
Total: US $12.99
As a sharing platform, our community will not bear responsibility for any issues with this design and parameters.
Add to cart
Acrylic Type : AcrylicFile :
Dimensions: Engrave:
Acrylic Qty :
Acrylic Thickness:
Acrylic Color:
Total: US $12.99
As a sharing platform, our community will not bear responsibility for any issues with this design and parameters.
Add to cart
CNC Milling File : Size:
Unit: Volumn:
CNC Milling Qty : Material:
Type of Aluminum: Surface Finish:
Tolerance:
Surface Roughness:
Total: US $12.99
As a sharing platform, our community will not bear responsibility for any issues with this design and parameters.
Add to cart
Item Price Qty Subtotal Delete
Total: US $0.00
Certified Product | Supported Purchase: Full After-sales Protection