

Story
WiFi Weather Station - Standalone Web Server Edition
Description
WiFi Weather Station - Complete Standalone Sensor Platform
Transform environmental monitoring with this revolutionary WiFi Weather Station that combines comprehensive sensor capabilities with an intuitive web-based interface. Unlike traditional weather stations requiring external displays or complex configurations, this standalone unit creates its own WiFi network and serves a professional-grade web dashboard accessible from any device with a browser.
This cutting-edge sensor platform integrates multiple high-precision sensors including the BMP280 barometric pressure sensor, VEML6075 UV index detector, MQ-135 air quality monitor, DHT11 temperature and humidity sensor, and DS3231 real-time clock module. The system transforms raw sensor data into beautiful, real-time visualizations through a responsive web interface that updates automatically every 5 seconds.
Key Features
- Zero-Configuration Operation: Creates its own "WeatherStation" WiFi network - no existing network required
- Professional Web Dashboard: Modern, responsive interface with real-time data visualization
- Multi-Device Access: Monitor data simultaneously on smartphones, tablets, and computers
- Comprehensive Monitoring: Temperature, humidity, barometric pressure, UV index, air quality, and timestamp
- Automatic Updates: Live data refresh every 5 seconds across all connected devices
- Mobile-Optimized Design: Perfect viewing experience on any screen size
- Built-in Data Logging: Serial monitor output and JSON API for data integration
- Error Handling: Graceful sensor failure detection and user notification
Enhanced Applications
Environmental Research & Monitoring: The comprehensive sensor suite makes this ideal for meteorological studies, agricultural monitoring, and environmental research. The standalone nature allows deployment in remote locations without existing infrastructure.
Educational & STEM Projects: Perfect for teaching environmental science, IoT concepts, and web technologies. Students can access real-time data from their own devices without complex setup procedures.
Smart Agriculture: Deploy in greenhouses, farms, or gardens for continuous monitoring of growing conditions. The web interface allows farmers to check conditions remotely from anywhere on the property.
Home & Office Automation: Integrate into smart home systems through the JSON API, or simply monitor indoor air quality and conditions through the web interface.
Outdoor Adventures: Ideal for camping, hiking base camps, or weather monitoring stations where internet connectivity isn't available but local WiFi access is desired.
Industrial & Scientific Applications: Perfect for temporary monitoring setups, field research, or anywhere you need quick deployment of environmental sensors with easy data access.
Building Guide - Enhanced Sensor Platform
Required Materials & Tools
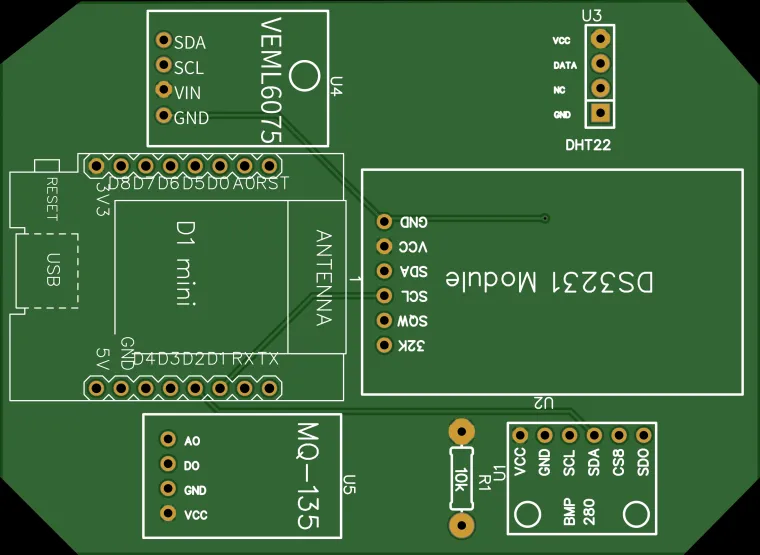
Electronic Components:
- Wemos D1 Mini ESP8266 microcontroller
- BMP280 barometric pressure sensor
- VEML6075 UV index sensor module
- MQ-135 air quality sensor module
- DHT11 temperature and humidity sensor
- DS3231 real-time clock module
- 10kΩ pull-up resistor
Assembly Tools:
- Soldering iron (temperature-controlled preferred, 350°C/650°F)
- 60/40 rosin-core solder
- Soldering flux for improved joint quality
- Desoldering wick or solder sucker for corrections
- Brass sponge or steel wool for tip cleaning
- Heat-resistant soldering mat or surface
- Precision tweezers or small needle-nose pliers
- Magnifying glass or microscope for inspection
- Isopropyl alcohol (99% preferred)
- Lint-free cleaning cloths
- Masking tape or Blu-Tack for component positioning
Assembly Process
1. Workspace Preparation Set up a clean, well-lit workspace with adequate ventilation. Ensure your soldering iron station is stable and the tip is clean and properly tinned.
2. PCB Preparation
Thoroughly clean the PCB with isopropyl alcohol and a lint-free cloth to remove manufacturing residues, oils, and contaminants that could affect solder adhesion.
3. Component Inspection Carefully examine each sensor module and verify that all header pins are straight and undamaged. Gently straighten any bent pins using needle-nose pliers.
4. Header Pin Installation Insert the appropriate header pins into each sensor module, ensuring proper alignment. The pins should sit flush and perpendicular to the module surface.
5. Component Positioning Place each component on the PCB according to the silk-screen markings, ensuring proper orientation (especially for polarized components). Use masking tape or small amounts of Blu-Tack to secure components during soldering.
6. Soldering Process
- Heat your soldering iron to the appropriate temperature (350°C for 60/40 solder)
- Tin the iron tip with a small amount of fresh solder
- For each joint: Heat the pad and component lead simultaneously, then feed solder into the joint
- Remove solder first, then the iron, allowing the joint to cool undisturbed
- Each joint should appear shiny and form a proper fillet shape
7. Quality Inspection Using a magnifying glass, inspect every solder joint for:
- Cold solder joints (dull, grainy appearance)
- Solder bridges between adjacent pads
- Insufficient solder coverage
- Component misalignment
8. Corrections & Cleanup Address any soldering defects using desoldering wick or a solder sucker. Clean the entire PCB with isopropyl alcohol to remove flux residues.
9. Initial Testing Before programming, perform a visual inspection and continuity testing to ensure all connections are proper and no shorts exist.
10. Programming & Configuration Upload the provided Arduino code using the Arduino IDE. The enhanced code includes:
- Automatic sensor initialization and error handling
- WiFi access point creation with user-friendly network name
- Complete web server with modern dashboard interface
- Real-time data API for integration possibilities
- Comprehensive serial monitor output for debugging
Post-Assembly Setup
Initial Power-Up:
- Connect the assembled board to a USB power source
- Open the Arduino IDE Serial Monitor at 115200 baud
- Verify all sensors initialize successfully
- Note the WiFi network name and IP address
Web Interface Access:
- Connect your device to the "WeatherStation" WiFi network
- Use password: "weather123"
- Open a web browser to http://192.168.4.1
- Enjoy real-time environmental monitoring!
Advanced Features
The enhanced firmware provides several advanced capabilities:
- Automatic Error Recovery: Sensors that fail to initialize are gracefully handled
- Multi-Client Support: Multiple devices can access the dashboard simultaneously
- Mobile Optimization: Interface automatically adapts to different screen sizes
- Data Export: JSON API endpoint for custom applications and data logging
- System Monitoring: Real-time connection status and sensor health indicators
- Time Synchronization: RTC maintains accurate timestamps even during power cycles
This upgraded weather station represents the perfect fusion of hardware capabilities and software sophistication, delivering professional-grade environmental monitoring in an accessible, easy-to-deploy package.