
Story
This project shows a simple, repeatable way to make an Arduino “talk” using the TinyTTS text‑to‑speech module.
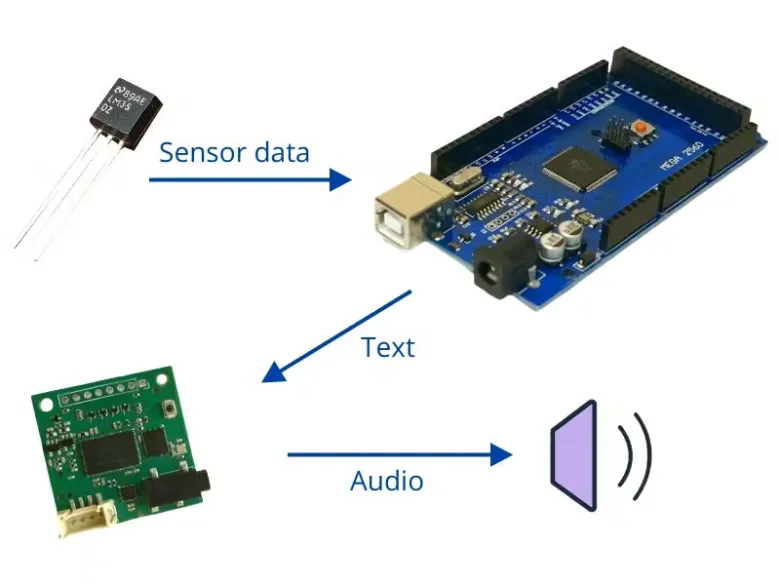
Arduino stays in its usual role: it reads sensors, runs logic, and sends plain text over a serial port. TinyTTS takes that text and generates speech on its own, through a 3.5 mm audio jack. No internet, no SD card with audio files, no codecs.
You’ll build and test two concrete scenarios:
1.USB demo – you type text into a serial terminal on your PC, Arduino forwards it to TinyTTS, and you hear it spoken.
2.Sensor‑driven version – Arduino reads a sensor value, formats a short sentence, and TinyTTS announces the result
Once this works, you can treat TinyTTS as a small “speech layer” you can drop into any future Arduino project whenever you need voice feedback instead of (or in addition to) LEDs and displays.
Project Overview
We’ll use the same basic wiring in two modes:
- Scenario 1 – USB demo
PC → Arduino (USB Serial) → TinyTTS (UART).
You send text from a terminal on your computer, TinyTTS speaks it.
- Scenario 2 – Sensor‑driven
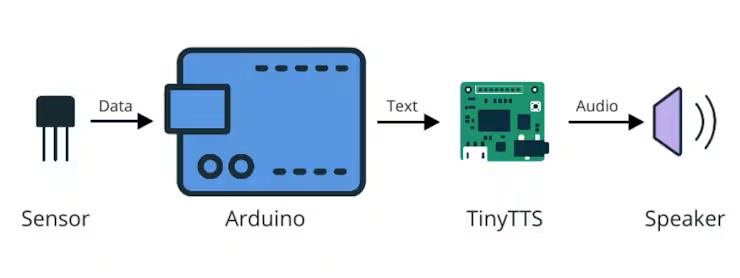
Sensor → Arduino → TinyTTS.
Arduino reads a sensor (temperature in the example), builds a string such as "Temperature is 23 degrees, " and sends it to TinyTTS.
The only real difference between the scenarios is where the text comes from.
The TinyTTS interface stays identical in both cases.
How It Works
TinyTTS behaves like a simple UART device:
- It listens on RX for lines of text.
- When it receives a line ending with newline (\n), it converts that text to speech and plays it on the audio output.
On the Arduino side:
- PC interface: Used for debugging and receiving text input from the computer.
- TinyTTS interface: Used to send the text to the module.
For Arduino Mega: This board has multiple Hardware Serial ports. You can use the standard USB connection for the PC and a second Hardware Serial (e.g., Serial1 or Serial 2) to talk to TinyTTS reliably at high speeds.
For Arduino Uno/Nano: These boards have only one Hardware Serial (Pins 0 and 1). To ensure reliable audio performance, we connect TinyTTS to the Hardware Serial. To communicate with the PC simultaneously, we use aseparate USB-TTL adapter connected via SoftwareSerial on digital pins.
In code, this boils down to just one operation:
if (debugSerial.available()) {
// 1. Read plain text from the PC via the USB-TTL adapter
// ... read into inputBuffer ...
// 2. Convert to TTS protocol and send to module via Hardware Serial
speak(inputBuffer);
}
In Scenario 1, you call speak() with text from the PC.
In Scenario 2 you call speak() with text built from sensor readings.
Hardware
You can reproduce this project with common Arduino parts.
Core components
- TinyTTS module
– UART interface for text input
– 3.5 mm audio jack for headphones or speaker
- Arduino‑compatible board
Tested with:
– Arduino Uno
– Arduino Nano
– Arduino Mega 2560
Any board that has a hardware Serial for TinyTTS and a second serial port (hardware or software) for USB will work.
- Speaker or headphones
Plugged into TinyTTS 3.5 mm output.
- USB TTL adapter
To program the board and, in Scenario 1, to send text from a PC.
Sensor for Scenario 2 (example)
- BME680 sensor
You can replace it with another sensor you know well (DHT11/DHT22, photoresistor, HC‑SR04, soil moisture, etc.). The TinyTTS part does not depend on the sensor type.
Wiring
Common Connections (TinyTTS ↔ Arduino)
The basic connections are the same for both scenarios:
- TinyTTS VCC → Arduino 5 V (check your module’s voltage rating)
- TinyTTS GND → Arduino GND
- TinyTTS RX → Arduino TX (Hardware Serial) pin of the serial port you use for TinyTTS
- TinyTTS TX → Arduino RX (Hardware Serial)
- TinyTTS audio jack → speaker or headphones
On Arduino Mega you can, for example, use Serial1:
- TinyTTS RX → Arduino pin 18 (TX1)
- TinyTTS TX → Arduino pin 19 (RX1)
On Uno/Nano you can use Hardware Serial:
- TinyTTS RX → Arduino pin 1 (TX)
- TinyTTS TX → Arduino pin 0 (RX)
Specific Wiring for Arduino Uno/Nano:
Because pins 0 and 1 are used by the TinyTTS module, you must add a USB TTL adapter to send text from your computer.
Additional Sensor Wiring (Scenario 2)
BME680 sensor (Temperature, Humidity, Pressure, Gas):
- BME680 VCC → Arduino 5 V
- BME680 GND → Arduino GND
- BME680 SCL→ Arduino analog input (e.g. A5)
- BME680 SDA → Arduino analog input (e.g. A4)
If you use a different sensor, connect it as recommended in its own documentation. The TinyTTS part of the wiring remains unchanged.
Code Overview and Upload
Scenario 1 – USB Demo: Type Text, Hear Speech
In this scenario, Arduino acts as a bridge between your PC and TinyTTS.
1. Upload the sketch
Select your board and port in the Arduino IDE.
Upload the demo sketch that:
- reads lines from Serial (USB)
- forwards them to TinyTTS via Serial1.
Important for Uno users: Disconnect the TinyTTS wires from pins 0 and 1 while uploading, then reconnect them and press Reset.
2. Open a serial terminal on the PC
Any of these will work:
- Arduino Uno: Connect the USB-TTL Adapter to your PC. Open your terminal software (PuTTY or Python miniterm) and select the adapter's COM port. Set thebaud rate to 9600.
- Mega: Connect the board's standard USB cable. Open Serial Monitor. Set the baud rate to 115200.
3. Send text
- Type a short phrase such as
Hello TinyTTS - Send it with a newline (Serial Monitor: set “Newline” or “Both NL & CR”).
- Arduino receives the text and calls
speak(line);TinyTTS speaks it.
At this point, you’ve verified:
- TinyTTS is powered and wired correctly.
- The serial link between Arduino and TinyTTS is working.
- The helper function
speak()does what it should.
Scenario 2 – Sensor‑Driven Voice
Now we switch from text typed on a PC to text generated from a sensor reading.
1. Keep the existing TinyTTS wiring
No changes are required on that side.
2. Add the sensor wiring
Connect the BME680 via I2C as described in the Wiring section.
3. Modify the sketch
Include the necessary library (e.g. CloseCube_BME680) and replace the serial input loop with sensor logic:
// Inside the loop
bme.setForcedMode();
double temp = bme.readTemperature(); // Read temp in Celsius
// Format the message
char msg[40];
sprintf(msg, "Temperature %d degrees.", (int)(temp + 0.5));
// Speak the message
speak(msg);
// Wait before next reading
delay(10000);
4. Test the talking sensor
- Power the Arduino (USB or external 5 V).
- Listen to the TinyTTS audio output.
- Touch or gently warm the sensor and check that the spoken temperature changes.
From here, you can substitute any sensor: distance, light level, soil moisture, etc.
Reusing This Pattern in Other Projects
The main goal of this build is not a single talking thermometer, but a general pattern you can reuse:
1. Reserve a serial port for TinyTTS.
2. Implement a small function like speak(text).
3. Decide in your project when to call it and what to say.
You can drop this into:
- Data loggers that occasionally read out the last measurement.
- Simple lab tools where your hands are busy, and you can listen but not look at a display.
- Accessibility‑oriented devices that speak values instead of relying only on screens or LEDs.
The rest of your application code can stay as it is.
Next Steps
Ideas for extending this project:
- Threshold alerts
Only speak when a value crosses a limit, e.g.
"Warning: temperature above thirty degrees."
- Mode announcements
Use TinyTTS to confirm state changes:
"Setup mode", "Measurement started", "Calibration complete".
- Combine with a display
Show the value on an OLED or LCD and speak it at the same time.
- Port to another MCU
The TinyTTS UART protocol works the same with other boards (e.g. ESP32). You only need one spare serial interface.
If you build your own voice‑enabled tool or experiment using this pattern, consider publishing it as a separate project and referencing this one as the TinyTTS base. That way, others can see different ways to reuse the same speech layer.

")