user-img

avi patel

+ Follow

AI voice assistant

An AI‑powered voice companion that listens to your questions, fetches live answers from the web, and speaks.

AI voice assistant
 
  • thumbnail-img
  • thumbnail-img
  • thumbnail-img
  • thumbnail-img
 

Hardware Components

  • INMP441 MEMS Microphone

    X 1 fenxiang
  • MAX98357 I2S Amplifier

    X 1 fenxiang
  • Micro SD Card Reader

    X 1 fenxiang
  • 16×2 LCD Display Green Backlight

    X 1 fenxiang
  • I2C Module for 16×2 (1602) Character LCD

    X 1 fenxiang
  • ESP32 Development Board | Doit DevKit V1 | powerful Wroom32 modu

    X 1 fenxiang
  • 6 x 6 x 8mm Tactile Pushbutton

    X 1 fenxiang
  • 8Ohm 2W Cavity Speaker | High-quality Sound

    X 1 fenxiang

Tools, APP Software Used etc.

  • Arduino IDE

    Arduino IDE

    Arduino

Story


1. Introduction & Key Features

My project is a real-time AI voice assistant built on an ESP32. It listens to your questions, transcribes them via Deepgram, queries ChatGPT for up-to-date answers, then speaks back through an I²S amp—all while showing each step on a 16×2 LCD display. This makes it a hands-free, web-connected assistant without needing a PC.

  • Live Web Data: Fetch news, weather, stock quotes, or any current event.

  • Local Logging: Records every question (WAV).

  • Clear UI: 16×2 LCD shows “Ready for Ans...”, “record start...”, “Speech to text”, and the actual text.

  • Portable Power: Runs from any USB charger or power bank—no batteries to worry about.


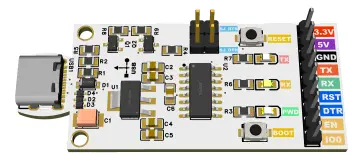
2. Hardware Design & Assembly

All pin-out and wiring details can be found in the Schematic and Layout section. In brief, the core modules are:

  • ESP32-WROOM-32: Main controller with Wi-Fi & I²S

  • INMP441 I²S Mic: Digital microphone

  • MAX98357A Amp: I²S audio output to speaker

  • microSD Module: WAV recording & logs

  • 16×2 I²C LCD: Status display

  • Pushbutton: Record trigger


3. Project Demonstration Video

See it in action:
https://drive.google.com/file/d/1I4ZKJhOAJsSllxNhRCoU3JL7TKS1CD7C/view?usp=drivesdk


4. Software Workflow & Code

st=>start: Button Press  
rec=>operation: Record WAV to SD  
stt=>operation: Deepgram STT → Text  
gpt=>operation: ChatGPT API → Reply Text  
tts=>operation: OpenAI TTS → Audio  
play=>end: Play via I²S → LCD shows steps  
st->rec->stt->gpt->tts->play
  1. Initialize Peripherals (I²S, SD, LCD, Wi-Fi)

  2. Record Audio: Hold button → WAV saved to SD.

  3. Transcribe: Upload WAV to Deepgram → receive plain text.

  4. Chat & TTS: Send text to ChatGPT → get reply → send reply to OpenAI TTS.

  5. Playback: Stream audio through MAX98357A → display messages.

  6. Loop: Ready for next query.

Code Highlights:

  • lib_audio_recording.ino – I²S + SD card WAV writer

  • lib_audio_transcription.ino – HTTPS POST to Deepgram STT

  • lib_OpenAI_Chat.ino – ChatGPT Completions API handler

  • lib_audio_tts.ino – OpenAI TTS playback routine

  • main.ino – Orchestrates button, LCD, and state machine


5. Reference Code

Find the complete source code and documentation on GitHub:
https://github.com/kaloprojects/KALO-ESP32-Voice-ChatGPT


6. Step-by-Step Build Tutorial

  1. Solder headers to each module.

  2. Wire modules per the PDF’s pin diagram.

  3. Flash firmware via Arduino IDE

  4. Insert a FAT32-formatted microSD card.

  5. Power via USB charger—watch the LCD boot.

  6. Hold the button, speak—watch and listen!


7. Lessons Learned & Pitfalls

  • I²S Buffering: Tune buffer sizes to prevent underruns.

  • Network Timeouts: Implement retries for STT and GPT calls.

  • Power Stability: Use a reliable USB supply to avoid drops during Wi-Fi.


Conclusion
This project seamlessly integrates embedded audio I/O, cloud-based AI, and real-time web access into a user-friendly device—ideal for anyone looking to explore AI assistants on the go.

Code
  • AI voice assistant code

    ESP32_Voice_ChatGPT_20250404_14978312686a12f1908f1.zip
    Download(5)
Schematic and Layout
  • pin connection and workflow

    elecrow_project_88776222686a171fdfa7f.pdf
    Download(4)
Topic
View All

AI voice assistant

An AI‑powered voice companion that listens to your questions, fetches live answers from the web, and speaks.

237
 
7
0
0

Share your project on social media to expand its influence! Get more people to support it.

  • Comments( 0 )
  • Like( 7 )
/1000
Upload a photo:
You can only upload 1 files in total. Each file cannot exceed 2MB. Supports JPG, JPEG, GIF, PNG, BMP

You May Also Like

View All
Add to cart
Board Type : GerberFile :
Layer : Dimensions :
PCB Qty :
Different PCB Design
PCB Thickness : PCB Color :
Surface Finish : Castellated Hole :
Copper Weight : 1 oz Production Time :
Total: US $
As a sharing platform, our community will not bear responsibility for any issues with this design and parameters.

PCB Assembly

PCBA Qty: BomFile:
NO. OF UNIQUE PARTS: NO. of Components:
Country: Shipping Way:
Assembly Cost: US $
As a sharing platform, our community will not bear responsibility for any issues with this design and parameters.
Add to cart
3dPrintingFile : Size :
Unit : Volumn :
3D Printing Qty : Material :
Total: US $12.99
As a sharing platform, our community will not bear responsibility for any issues with this design and parameters.
Add to cart
Acrylic Type : AcrylicFile :
Dimensions: Engrave:
Acrylic Qty :
Acrylic Thickness:
Acrylic Color:
Total: US $12.99
As a sharing platform, our community will not bear responsibility for any issues with this design and parameters.
Add to cart
CNC Milling File : Size:
Unit: Volumn:
CNC Milling Qty : Material:
Type of Aluminum: Surface Finish:
Tolerance:
Surface Roughness:
Total: US $12.99
As a sharing platform, our community will not bear responsibility for any issues with this design and parameters.
Add to cart
Item Price Qty Subtotal Delete
Total: US $0.00
Certified Product | Supported Purchase: Full After-sales Protection