Story
Hello everyone!
So, I got another development board with ESP32 directly attached to a 2.8 inch TFT display. You can find more information about the Elecrow board by accessing the link [affiliate link], plus it is presented much better than I could. 😁
And now let's start to detail the situation a little. 🤓
For start, there are a few things we need to go through to use this development board.
- I used Arduino IDE, but you can also use ESP-IDF or PlatformIO. [https://www.elecrow.com/pub/wiki/2-PACK-2.8inch-ESP32-Solo-Miner-LCD-Display-Cryptocurrency-Solo-Miner.html]
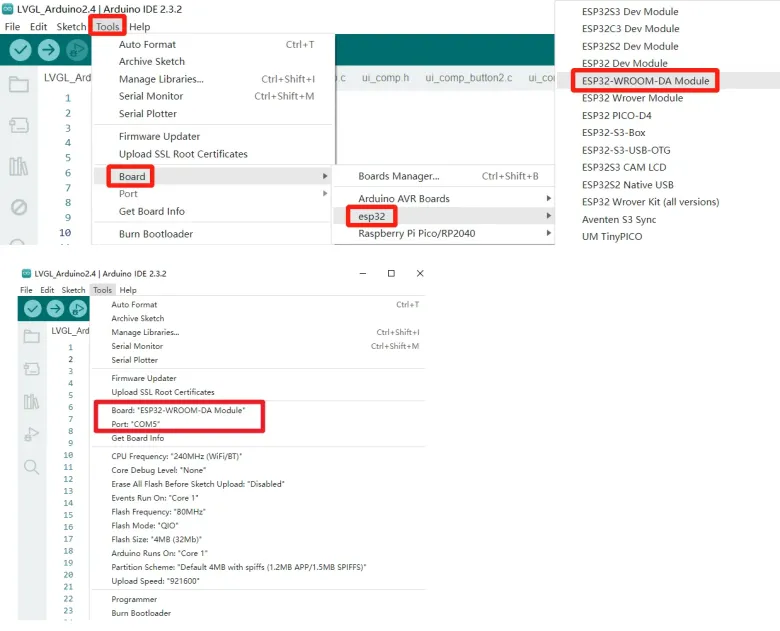
I am now using Arduino IDE 2.3.6 and I need to install the ESP32 v2.0.15 package using Boards Manager.

I tried for hours but I couldn't program the board using another version. So we follow the instructions. [https://www.elecrow.com/wiki/ESP32_Miner_LCD-2.8_inch.html#example1-led-blinking]
- Let's move on to the software libraries, which are quite a few and we need to be careful how we install them. You can find them all here [https://github.com/Elecrow-RD/2-PACK-2.8inch-ESP32-Solo-Miner-LCD-Display/tree/master/libraries].
It is important to locate the directory where the ESP32 v2.0.15 package is installed, which is something like C:\Users\user_name\AppData\Local\Arduino15\packages\esp32\hardware. In the "libraries" directory we must copy all the libraries provided by Elecrow, namely these.

If when compiling a program an error occurs generated by a library conflict, this is because you may have duplicate libraries, one of which we know for sure is the one in the ESP32 v2.0.15 package, and the other could be located in C:Documents/Arduino/libraries. Try deleting the latter, this method worked for me.
The board comes with a factory demo program, you can see it in my video:
https://youtube.com/shorts/izU4VR9i64A?feature=share
- Now that we have everything installed, let's do a quick test. We can run a very simple sketch, LED blink:
  #define D_PIN 25

void setup() {
  // put your setup code here, to run once:
  Serial.begin(115200);
  pinMode(D_PIN, OUTPUT);
}

void loop() {
  // put your main code here, to run repeatedly:
  digitalWrite(D_PIN, HIGH);
  delay(500);
  digitalWrite(D_PIN, LOW);
  delay(500);
}
Follow the instructions and links provided above, no need to repeat all the steps because Elecrow has done a pretty good job. 🙂
Now, let's prepare for the next phase, which is installing the LVGL tool. Watch the video below, it's very helpful, it will introduce you to LVGL library and Square Line Studio.
https://www.youtube.com/watch?v=LXoKEsqQGDk&list=PLwh4PlcPx2Gfrtm7TmlARyF4ccTmIy-gK&index=3&pp=iAQB
That's all for today but will continue in the next tutorial!