


Story
If you're building robots, automation projects, or anything that involves motion, controlling motors efficiently becomes essential. Instead of handling complex wiring and driver circuits manually, the L293D Motor Driver Shield offers a clean and beginner-friendly solution.
In this guide, we’ll explore how this popular shield works and how you can use it with an Arduino UNO to control DC motors, servo motors, and stepper motors—without getting overwhelmed.
What is L293D Motor Driver Shield?
The L293D Motor Driver Shield is designed to simplify motor control using Arduino. It acts as an interface between low-power control signals from the microcontroller and higher-power motors.
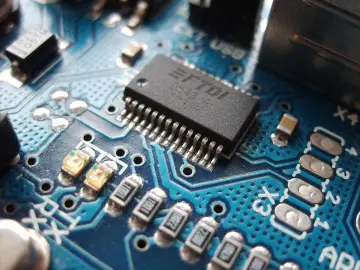
At its core is the L293D IC, which includes dual H-bridge drivers. This allows you to control both the direction and speed of motors with ease. With this single shield, you can operate multiple motors simultaneously, making it ideal for robotics and motion-based systems.
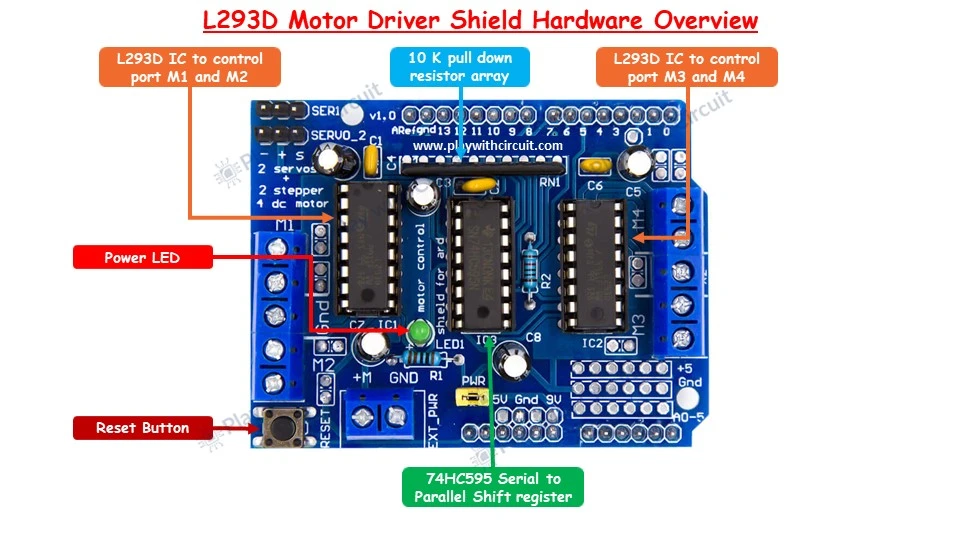
L293D Motor Driver Shield Hardware Overview
This shield supports multiple motor types while keeping wiring minimal.
You can connect up to four DC motors or two stepper motors and two servo motors. Dedicated motor terminals make connections straightforward.
A key highlight is its flexible power configuration. You can either use a single supply for both Arduino and motors or separate supplies for better stability. This is especially useful when working with motors that draw higher current.
Additionally, built-in protections like pull-down resistors help ensure motors remain off during startup, avoiding unexpected movement.
L293D Motor Driver Pinout
Understanding the pin layout helps you avoid wiring mistakes and design better projects.
The shield provides four motor output channels labeled M1 through M4. These outputs are driven by two L293D ICs and can control DC motors individually or be paired for stepper motors.
For servo motors, two dedicated headers are available. These are directly linked to PWM pins of the Arduino, enabling precise angle control.
Power handling is managed through a jumper system. When the jumper is connected, both Arduino and motors share the same supply. Removing it allows you to power motors separately via an external source.
You also get easy access to analog pins (A0–A5) and power pins like 5V, GND, and Vin, which is useful for connecting sensors, buttons, or other modules.
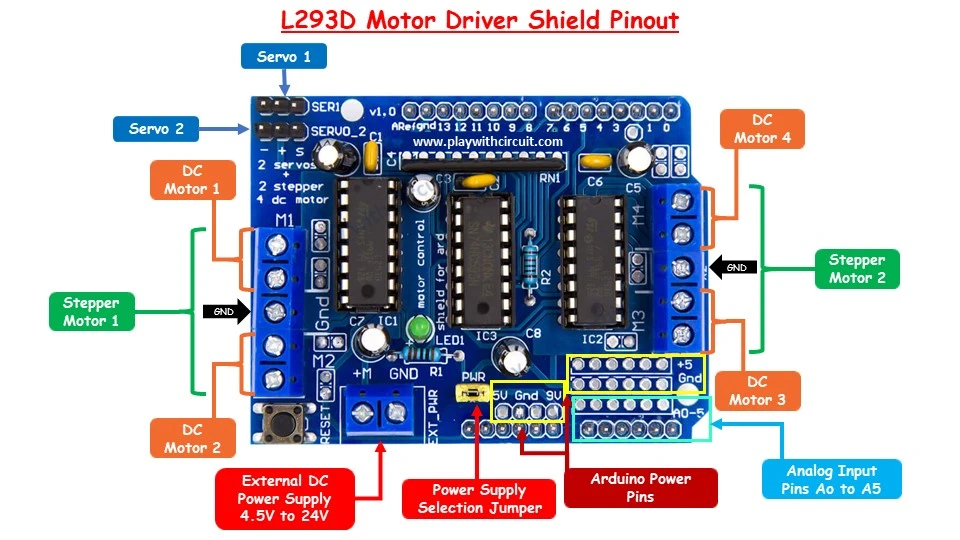
Important tip: Always double-check the power jumper configuration before powering the circuit. Incorrect setup can damage both the shield and the Arduino.
Hardware Requirements
- Arduino UNO R3
- L293D Motor Driver Shield (compatible with Arduino UNO)
- USB Cable
- 5V DC Motor
- SG90 Micro Servo Motor (5V)
- 28BYJ-48 Stepper Motor (5V, unipolar)
- Push Buttons – 3 (used for direction and stop control)
- Push Buttons – 2 (used for servo control)
- Potentiometer – 10KΩ
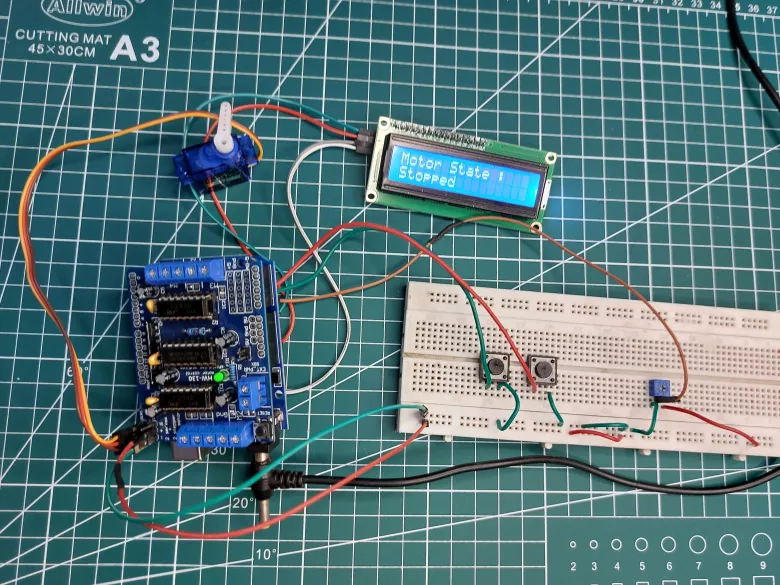
- 16×2 LCD Display (I2C Interface)
- 12V DC Adapter
- 5V DC Power Supply (external supply for L293D shield via EXT_PWR)
- Breadboard (Full-size)
- Jumper Wires (~20 pieces, for connections)
Controlling DC Motor with Arduino UNO and L293D Motor Driver Shield
Controlling a DC motor is one of the easiest ways to understand how this shield works.
In a typical setup, a motor is connected to one of the output channels (for example, M3). The speed of the motor can be adjusted using PWM signals, often controlled through a potentiometer connected to an analog pin.
Direction control is achieved using digital inputs—commonly push buttons—to switch between clockwise and counterclockwise rotation. You can also include a stop function for better control.
Since the shield uses multiple Arduino pins internally, you can repurpose analog pins as digital inputs when needed. This is a handy trick when you run out of GPIO pins.
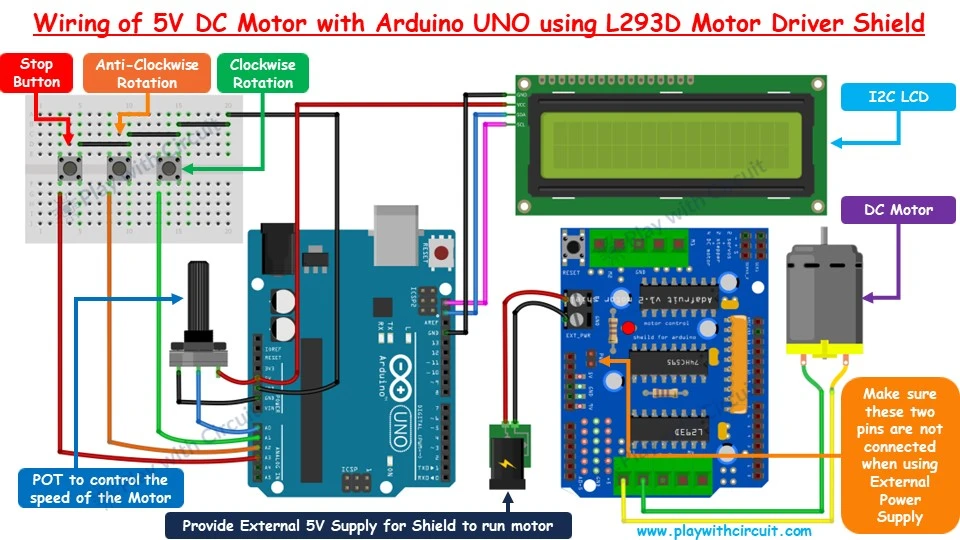
Beginner tip: Start with a simple setup—just speed control—before adding direction logic. It helps you understand PWM behavior more clearly.
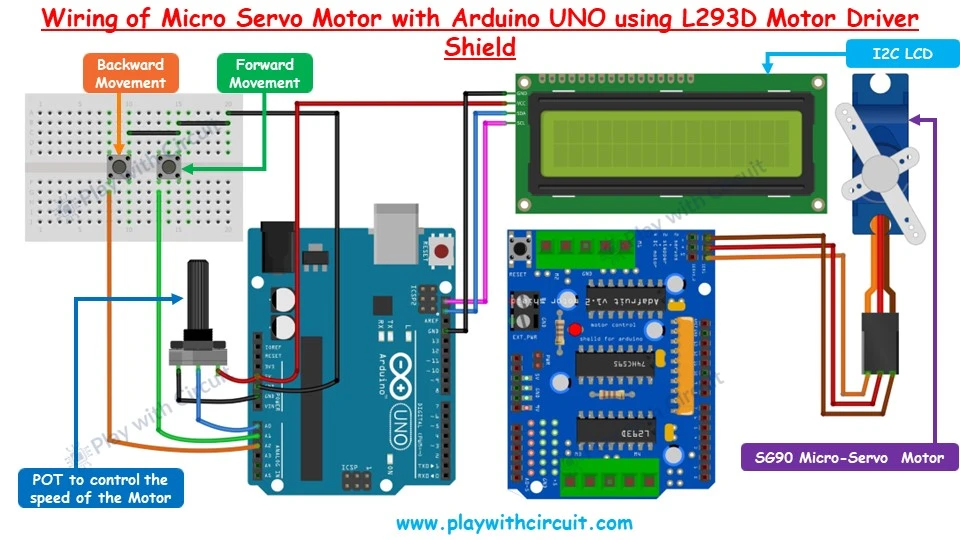
Controlling Micro Servo Motor with Arduino UNO and L293D Motor Driver Shield
Servo motors are widely used for position control, such as robotic arms or steering mechanisms.
The L293D shield provides dedicated servo headers, making integration very easy. A typical micro servo like SG90 can be connected directly, with control handled through PWM pins.
You can use buttons to move the servo in forward or reverse directions, while a potentiometer can fine-tune movement speed or angle transitions.
One important consideration is power. Since servos draw current from the Arduino’s 5V line, using high-power servos without external supply may cause instability or overheating.
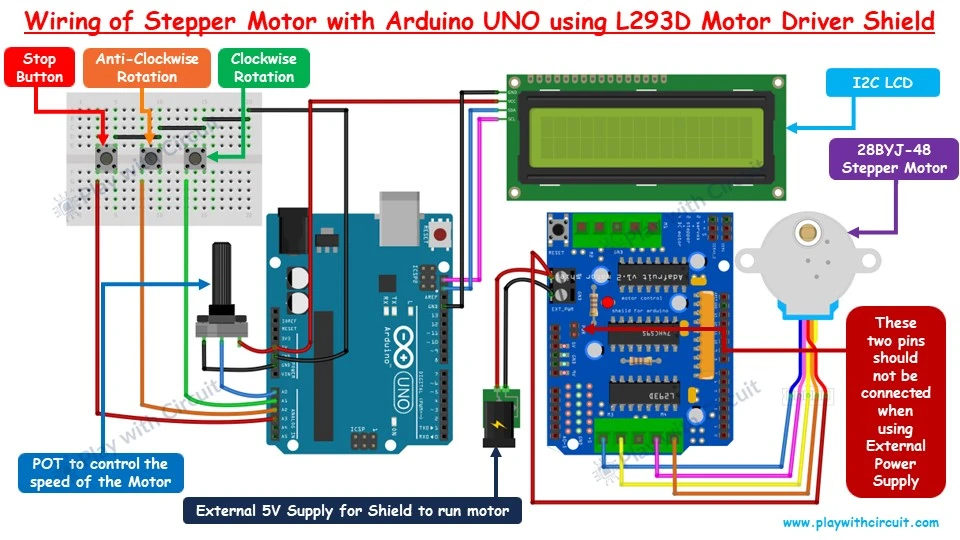
Controlling 28BYJ-48 Stepper Motor with Arduino UNO and L293D Motor Driver Shield
Stepper motors are ideal for applications requiring precise movement, such as CNC machines or positioning systems.
With the L293D shield, controlling a stepper motor like the 28BYJ-48 becomes much simpler. The motor connects across paired outputs (such as M3 and M4), allowing the shield to energize coils in sequence.
You can control rotation direction using buttons and adjust speed using a potentiometer. Unlike DC motors, stepper motors move in steps, giving you better accuracy.
Correct wiring is critical here. Misconnecting wires can lead to improper operation or even damage the motor.
Conclusion
The L293D Motor Driver Shield is a practical and beginner-friendly tool for anyone working with motors and Arduino. Whether you're experimenting with simple DC motors or building more advanced systems using servos and steppers, this shield reduces complexity and speeds up development.
Its ability to handle multiple motor types, combined with flexible power options, makes it a valuable addition to any electronics toolkit.
If you want to dive deeper with detailed wiring diagrams, code examples, and step-by-step explanations, you can explore the complete tutorial from Play with Circuit:
For complete step-by-step instructions and code, check the full guide here: https://playwithcircuit.com/l293d-motor-driver-shield-arduino-tutorial/


