

Story
⚡ ESP32 × Nextion Display — GPIO Control Demo
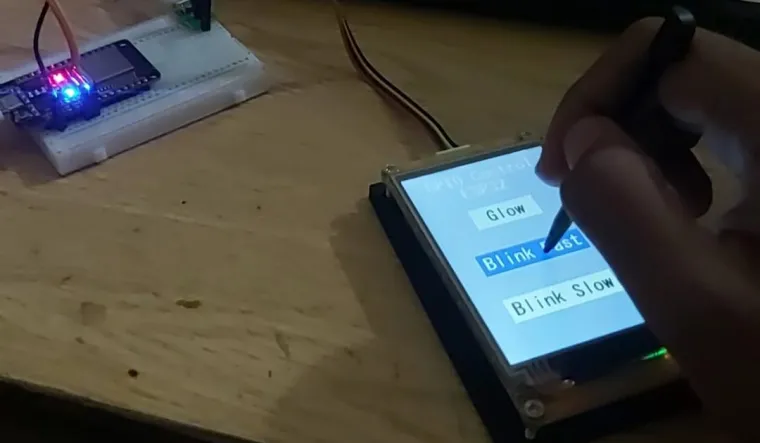
This project demonstrates how to control an ESP32’s GPIO pin using a Nextion HMI Display. It’s a clean example of two-way serial communication between the ESP32 and a Nextion Discovery series touchscreen, where user touch events directly drive an LED’s behavior.
???? Project Overview
The setup allows you to:
- Glow the LED continuously
- Blink the LED fast
- Blink the LED slow
- Turn the LED off (automatically when buttons are released)
The project showcases how to handle Nextion touch events on the ESP32 through the Serial2 port, parse the raw data packets, and execute non-blocking LED operations.
???? Hardware Used
| Component | Description |
|---|---|
| ESP32 | Main microcontroller handling logic |
| Nextion Discovery Display | Touchscreen interface for user input |
| LED | Connected to GPIO 2 |
| Wires / Breadboard | For basic prototyping and connections |
⚙️ Circuit Connections
| ESP32 Pin | Nextion Pin | Description |
|---|---|---|
| 16 | TX | Data from Nextion → ESP32 |
| 17 | RX | Data from ESP32 → Nextion |
| 5V | 5V | Power |
| GND | GND | Common Ground |
| 2 | LED Anode | LED Output Pin |
(Add a 220 Ω resistor in series with the LED if using a standard one.)
???? Nextion Display Setup
On the Nextion Editor, create three buttons with the following IDs:
| Button | ID | Purpose |
|---|---|---|
bt0 |
2 | LED Glow |
bt1 |
3 | Blink Fast |
bt2 |
4 | Blink Slow |
Make sure the buttons send a “Touch Event” (Send Component ID) when pressed and released. The ESP32 interprets these packets automatically.
???? Working Principle
-
Nextion Touch Event → ESP32: When a button is pressed, Nextion sends a 7-byte serial packet starting with
0x65. -
ESP32 Decodes Event: The ESP32 checks the header, validates terminators (
0xFF 0xFF 0xFF), and extracts:- Page ID
- Component ID
- Press/Release event
-
LED Behavior Changes Dynamically: Depending on which button is pressed:
bt0→ LED ONbt1→ LED Blink Fastbt2→ LED Blink Slow- On button release → LED OFF
-
Non-Blocking Blink: The LED blinks using a
millis()-based timer, ensuring smooth and responsive UI behavior without delays.
???? Code Highlights
switch (currentState) {
  case LED_GLOW:
    digitalWrite(ledPin, HIGH);
    break;
  case LED_BLINK_SLOW:
    blinkLed(500);
    break;
  case LED_BLINK_FAST:
    blinkLed(200);
    break;
  case LED_OFF:
  default:
    digitalWrite(ledPin, LOW);
    break;
}
✅ Non-blocking logic — LED behavior doesn’t freeze other operations. ✅ Clean event handling — Each button event is decoded and mapped clearly. ✅ Scalable structure — Easy to extend for more GPIOs or multiple pages.
???? Serial Packet Example
A button press from Nextion typically sends this 7-byte packet:
| Byte | Example | Meaning |
|---|---|---|
| 0 | 0x65 |
Touch event header |
| 1 | 0x00 |
Page ID |
| 2 | 0x02 |
Component ID (e.g., bt0) |
| 3 | 0x01 |
Event (1 = press, 0 = release) |
| 4–6 | 0xFF 0xFF 0xFF |
Packet terminator |
???? Demo Behavior
| Button | Action | LED Behavior |
|---|---|---|
| bt0 (Glow) | Press | LED stays ON |
| bt1 (Blink Fast) | Press | LED blinks rapidly |
| bt2 (Blink Slow) | Press | LED blinks slowly |
| Any button | Release | LED turns OFF |
???? Tools Used
- Arduino IDE (with ESP32 board support)
- Nextion Editor for GUI design
- Serial Monitor for debugging events