











Story
The HC-05 Bluetooth module is one of the most popular wireless communication modules used in Arduino-based projects. While it is commonly paired with smartphones, the module also supports Master-Slave mode, allowing two Arduino boards to communicate directly without requiring a mobile device.
In this project, we configure one HC-05 module as a Master and another as a Slave using AT commands. Once paired, the Master Arduino sends commands wirelessly to the Slave Arduino, which controls a 12V DC motor through an L293D motor driver. The project demonstrates Bluetooth pairing, serial communication, wireless command transmission, and PWM-based motor speed control.
Project Overview
The HC-05 Bluetooth module supports two operating modes:
- Slave Mode – waits for another Bluetooth device to initiate communication.
- Master Mode – searches for and connects to a paired Bluetooth device.
By configuring one module as the Master and another as the Slave, two Arduino boards can exchange data wirelessly. In this project, the Master sends commands for motor direction and speed, while the Slave receives those commands, drives a DC motor, and sends acknowledgements back to the Master.
This approach can easily be extended to wireless sensor networks, home automation systems, robotic platforms, and remote industrial equipment.
Configuring the HC-05 Modules
Before the Arduino boards can communicate, both HC-05 modules must be configured using AT Commands.
Connect the HC-05 module to an Arduino UNO using the SoftwareSerial library. Since the module operates at 3.3V logic, use a 1kΩ and 2kΩ voltage divider on the Arduino TX line before connecting it to the HC-05 RX pin. The Arduino RX pin can be connected directly to the HC-05 TX pin.
Upload the AT command sketch and place the module into Command Mode by holding the onboard push button while powering the module. Open the Arduino Serial Monitor at 9600 baud with Both NL & CR enabled.
Once communication is established, sending:
ATshould return:
OKconfirming that the module is ready for configuration.
Configuring the Slave Module
The HC-05 is used in Slave mode by default, but assigning a custom device name makes identification easier.
Use the following commands:
AT+NAME=SLAVEAT+ROLE=0Finally, retrieve the Bluetooth address:
AT+ADDR?Save this address because it will be required while configuring the Master module.
Configuring the Master Module
Configure the second HC-05 using the following commands.
Assign a device name:
AT+NAME=MASTERSet the operating role:
AT+ROLE=1Limit connections to one fixed device:
AT+CMODE=0Bind the module to the Slave address:
AT+BIND=xxxx,xx,xxxxxxReplace the address with the one obtained from the Slave module.
Verify the binding using:
AT+BIND?If the returned address matches the Slave module, the configuration is complete.
Communication Protocol
After both modules are configured and connected to their respective Arduino boards, the Master automatically establishes a Bluetooth connection whenever both systems are powered.
The communication protocol used in this project is intentionally simple.
To verify communication, the Master periodically sends:
*ALIVE#The Slave responds with:
*OK#Motor commands are transmitted in the following format:
*DIRECTION_BYTE, SPEED_BYTE#For example,
*1,255#rotates the motor in one direction at full speed. After executing the command, the Slave returns:
*OK#to acknowledge successful reception.
Hardware Required
The project uses the following components:
- Arduino UNO ×2
- HC-05 Bluetooth Module ×2
- L293D Motor Driver IC
- 12V DC Motor or DC Fan
- 10k Potentiometer
- Push Buttons ×3
- 1kΩ and 2kΩ Resistors
- Breadboard
- Jumper Wires
- 12V Power Supplies
Master Arduino Connections
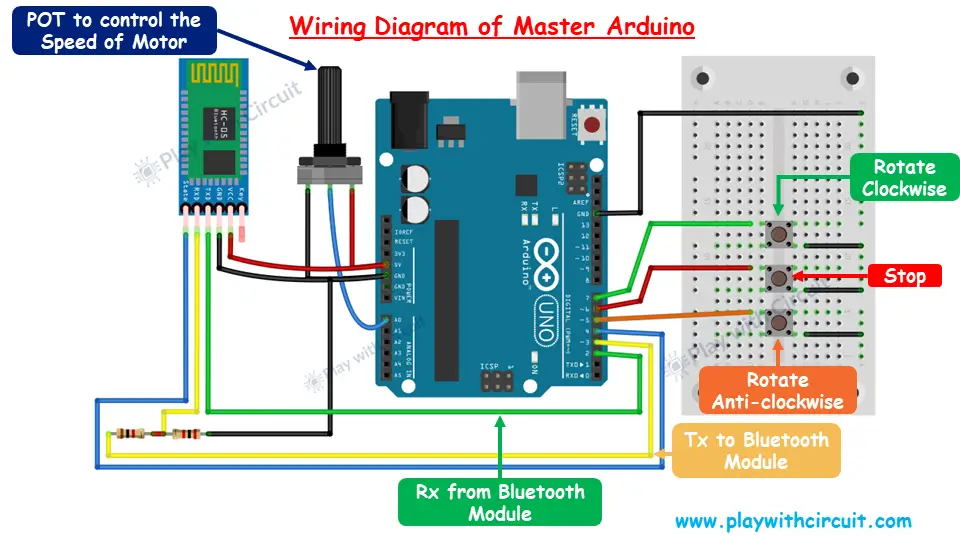
The Master Arduino generates the control commands.
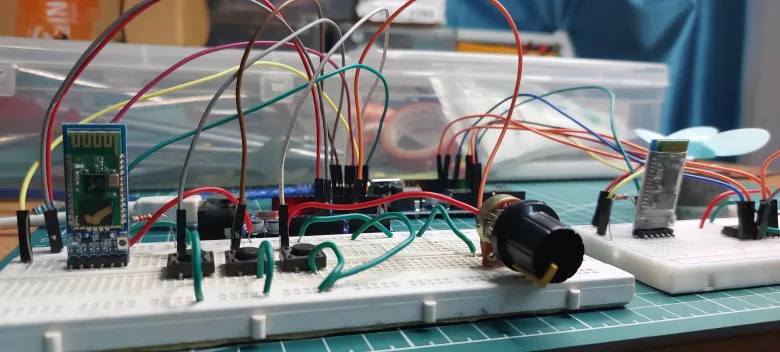
Besides the HC-05 interface, a 10k potentiometer is connected to A0 to adjust the motor speed. Three push buttons connected to digital pins 5, 6, and 7 control clockwise rotation, motor stop, and anticlockwise rotation.
The Arduino's onboard LED on pin 13 indicates the Bluetooth connection status. A steady LED indicates successful communication, while a blinking LED may indicate communication retries caused by excessive distance or interference.
Slave Arduino Connections
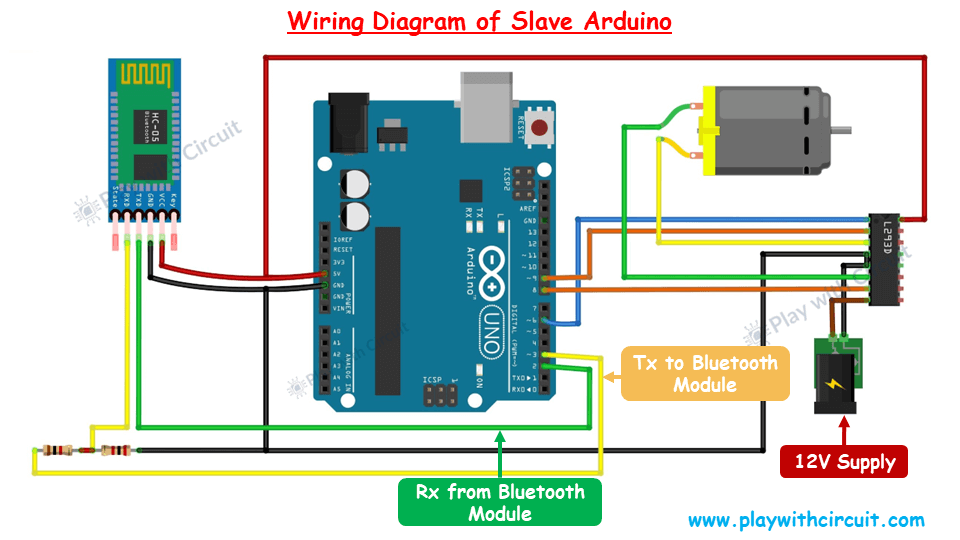
The Slave Arduino receives Bluetooth commands and controls the motor through an L293D motor driver.
The HC-05 connections remain the same as used during configuration. The Enable pin of the L293D is connected to Arduino PWM pin 6 for speed control. Arduino pins 8 and 9 drive the motor direction inputs, while the motor is connected across the driver outputs.
The motor driver receives its own 12V supply, while the Arduino is powered separately. Although separate supplies are recommended, their grounds must be connected together to provide a common reference and ensure reliable communication. This prevents voltage drops caused by motor startup currents from resetting the Arduino or disconnecting the Bluetooth module.
Applications
This Master-Slave Bluetooth architecture can be adapted for many embedded applications, including:
- Wireless robotic vehicle control
- Home automation systems
- Industrial motor control
- Remote relay switching
- Wireless sensor networks
- Educational embedded systems projects
Conclusion
This project demonstrates how two HC-05 Bluetooth modules can be configured as a Master-Slave pair to establish reliable wireless communication between two Arduino boards. By combining AT command configuration with a simple communication protocol, the system can remotely control a DC motor while providing acknowledgement of received commands. The same architecture can easily be expanded to control additional devices or exchange sensor data in larger embedded systems.
If you'd like the complete Arduino source code, AT command explanations, troubleshooting guide, and detailed wiring diagrams, visit the original tutorial on Play with Circuit:
https://playwithcircuit.com/hc05-master-slave-arduino-tutorial/