Lesson08---SD Card File Reading
Introduction
In this lesson, we will start teaching you how to use the SD card on the Advance-P4 development board to perform read and write operations on files stored in the SD card.
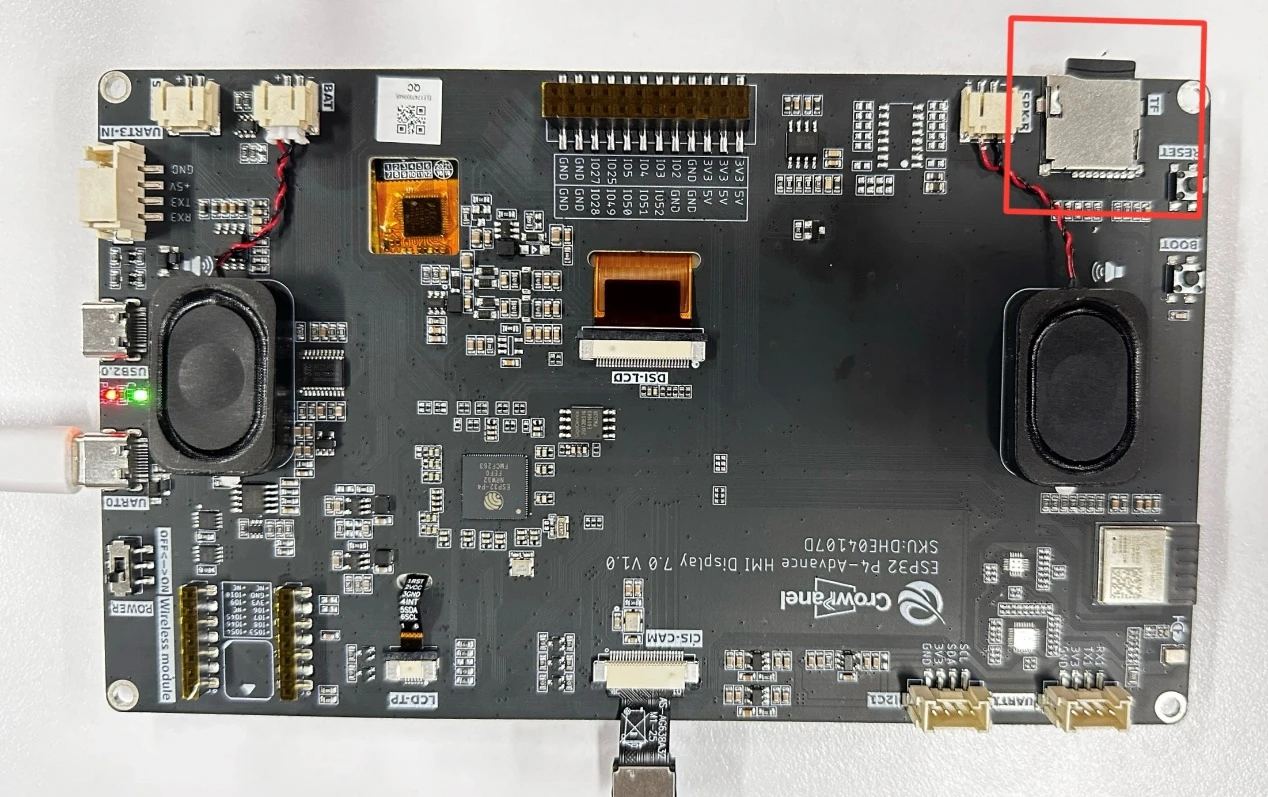
Hardware Used in This Lesson
SD card on the Advance-P4
Operation Effect Diagram
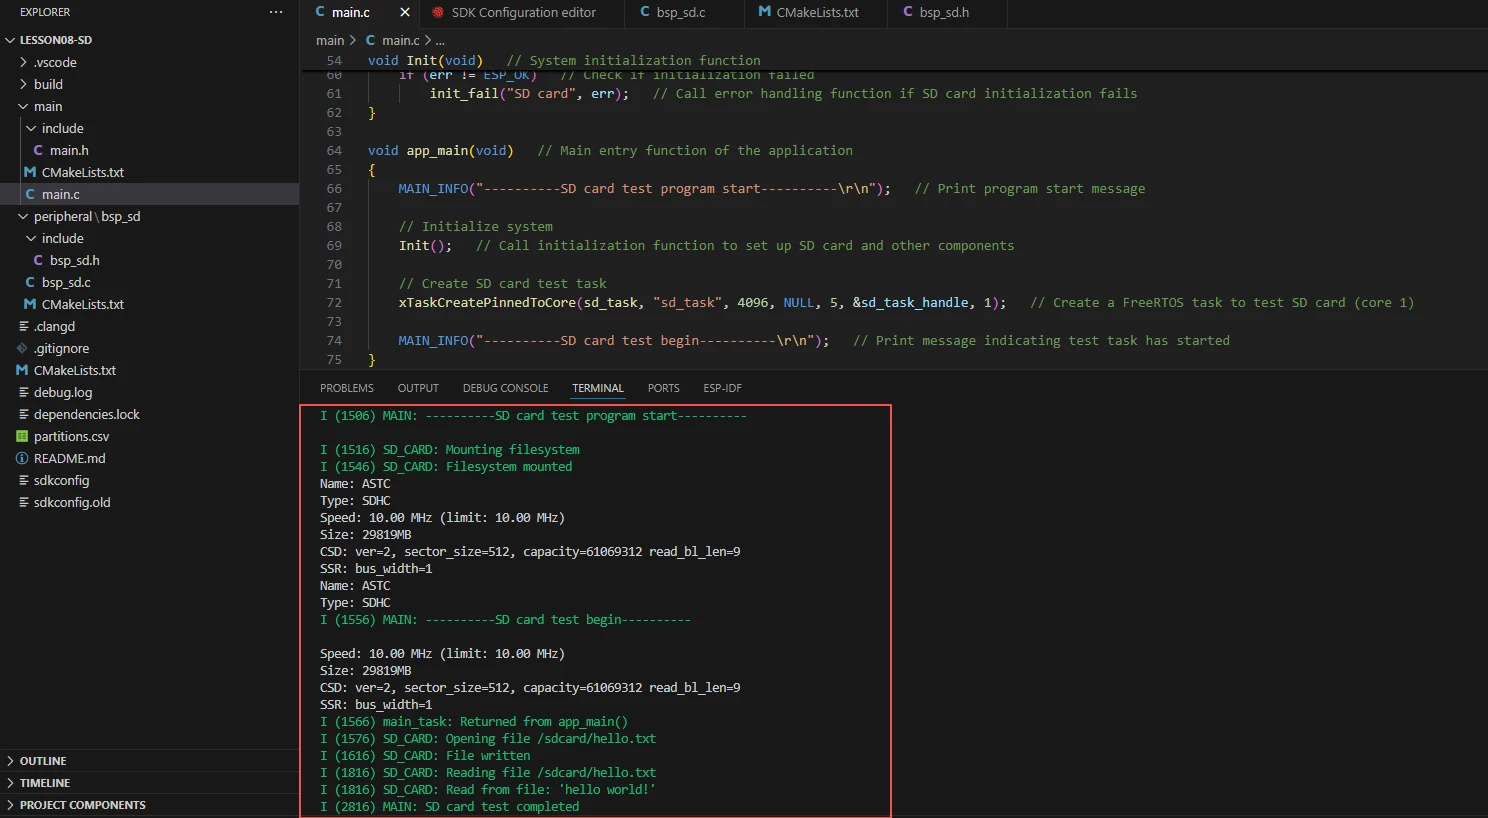
After running the code, you will be able to visually see that a file named "hello.txt" appears in the SD card, with the content "hello world!" already written in it.
Key Explanations
The focus of this lesson is how to use the "SD card", how to initialize it, and how to read and write files.
Here, we will prepare another new component "bsp_sd" for everyone. The main function of this component is to implement the aforementioned file read and write operations.
You only need to know when to call the interfaces we have written in it.
Next, let's focus on understanding the "bsp_sd" component.
First, click the Github code link below to download the code for this lesson.
GitHub Link
Then drag the code of this lesson into VS Code and open the project files.
After opening, you can see the framework of this project.
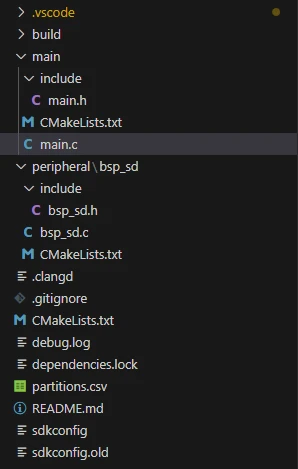
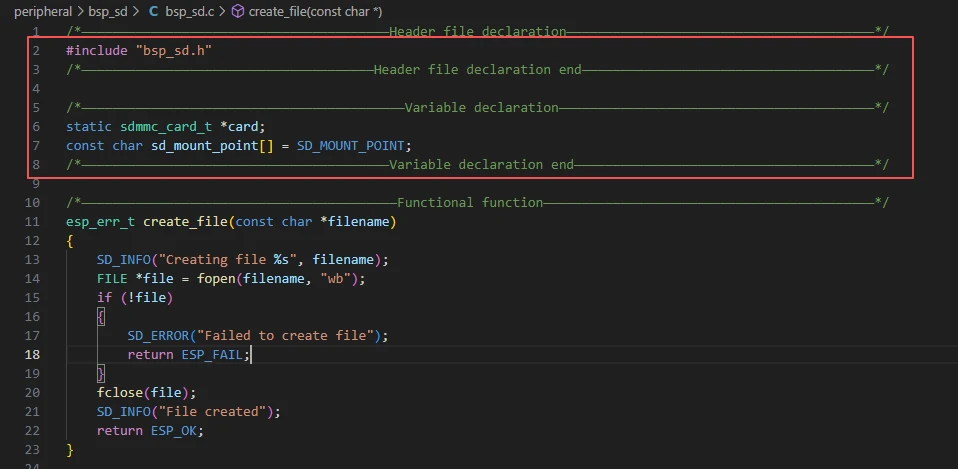
In the example of this course, a new folder named bsp_sd is created under the peripheral directory. Within the bsp_sd folder, a new include folder and a "CMakeLists.txt" file are created.
The bsp_sd folder contains the driver file "bsp_sd.c", and the include folder contains the header file "bsp_sd.h".
The "CMakeLists.txt" file integrates the driver into the build system, enabling the project to utilize the SD card read/write functionality implemented in "bsp_sd.c".
Code for SD Card File Reading and Writing
The code for SD card file reading and writing consists of two files: "bsp_sd.c" and "bsp_sd.h".
Next, we will first analyze the "bsp_sd.h" program.
"bsp_sd.h" is the header file of the file read-write module, and its main functions are as follows:
Declare the functions, macros, and variables implemented in "bsp_sd.c" for use by external programs.
Allow other .c files to call this module simply by adding the directive #include "bsp_sd.h".
In other words, it serves as an interface layer that exposes which functions and constants are available to the outside, while hiding the internal details of the module.
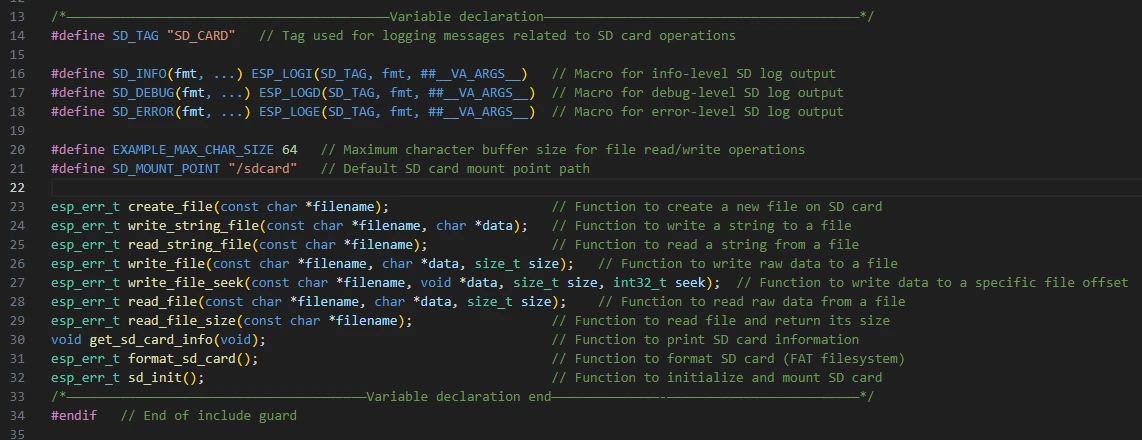
In this component, all the libraries we need to use are included in the "bsp_sd.h" file, enabling unified management.

Next, we declare the variables and functions we need to use. The specific implementation of these functions resides in "bsp_sd.c".
Concentrating these declarations in "bsp_sd.h" is for the convenience of calling and management. (We will learn about their specific roles when they are used in "bsp_sd.c".)
Now let's look at the specific functions of each function in "bsp_sd.c".
The "bsp_sd" component provides significant support for everyone to use file read-write interfaces in the future. By understanding the functions of these functions clearly, you can flexibly read from and write to the SD card file system.
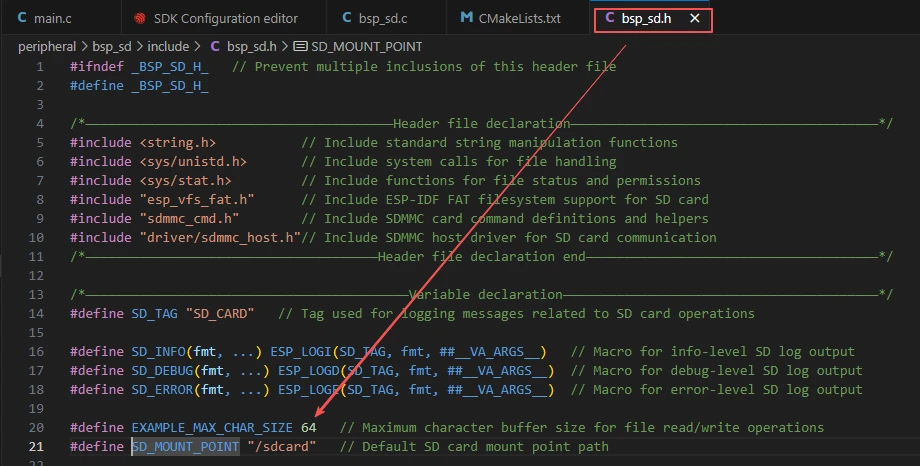
It includes the custom header file "bsp_sd.h", which defines function declarations, log macros, constants, and paths.
"card" stores information such as the status, capacity, and speed of the SD card device.
"sd_mount_point" is the file system mounting directory of the SD card.
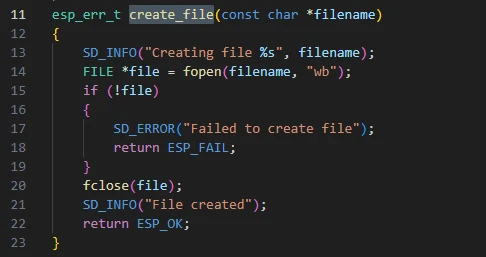
create_file:
Use fopen(filename, "wb") to create a file in binary write mode; Close the file immediately after successful creation;Return ESP_FAIL if opening fails.
Function: Ensure that an empty file exists on the SD card.
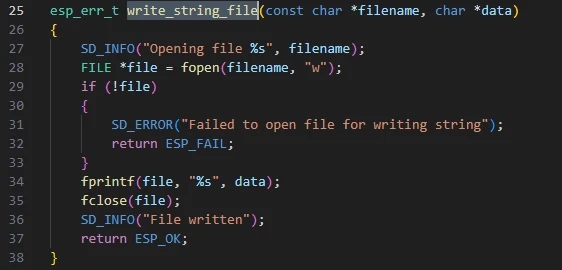
write_string_file:
Open the file in text write mode using fopen(filename, "w");
Write the string using fprintf(file, "%s", data);
Close the file after writing.
Function: Save a section of text (string) into a file on the SD card.
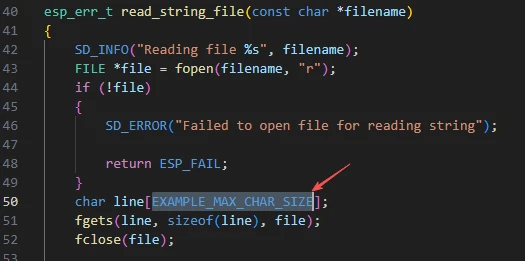
read_string_file:
Open the file for reading;
Use "fgets()" to read a line of text;
Check if there is a newline character "\n", and if so, replace it with a string terminator;
Print the read content.
Function: Read a line of text content from the file and output it to the "log".
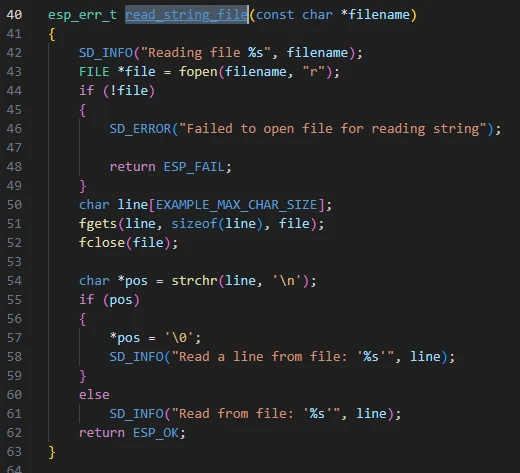
Note:
The maximum number of characters that can be read here is 64. If you need to read more characters, you will need to adjust the size.
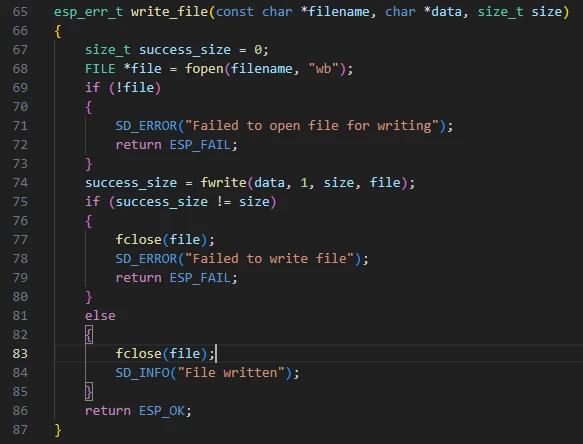
write_file:
Open the file in binary write mode ("wb");
Use "fwrite()" to write the "data" in memory to the file;
If the number of bytes written is not equal to "size", it indicates a write failure;
Finally, close the file.
Function: Suitable for writing binary data or image files.
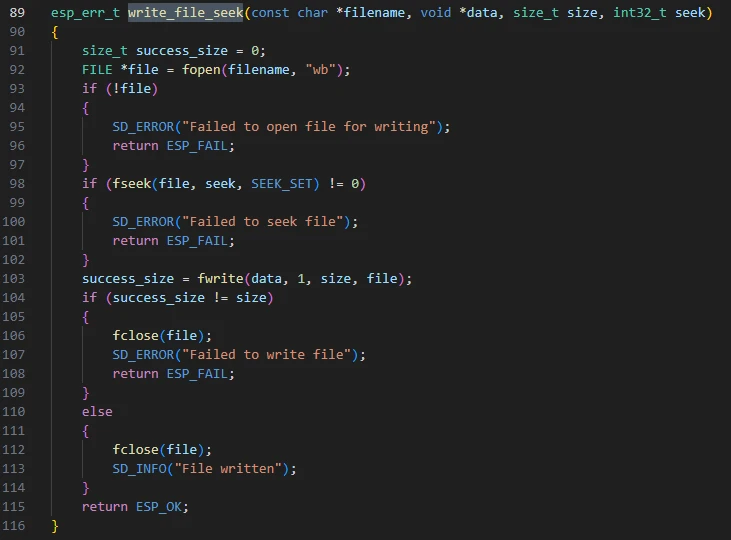
write_file_seek:
Open the file;
Call "fseek()" to move the file write pointer to the specified offset;
Then execute "fwrite()";
Return an error if the operation fails.
Function: Write data at a specific position in the file, commonly used for log appending or data block replacement.
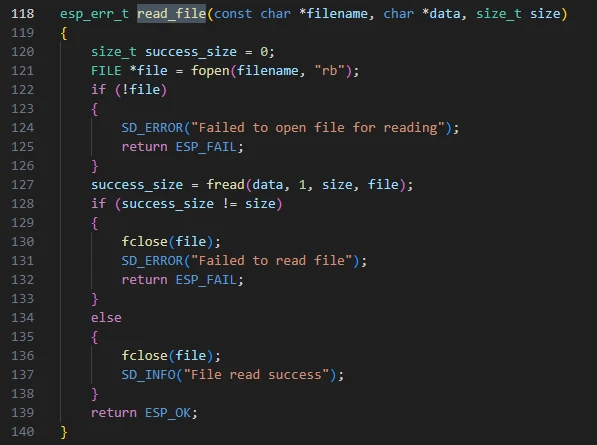
read_file:
Open the file;
Use "fread()" to read a fixed-size data from the file;
If the number of bytes read does not match the expected value, an error is reported;
Otherwise, close the file and return success.
Function: Read binary files or fixed-length data blocks.
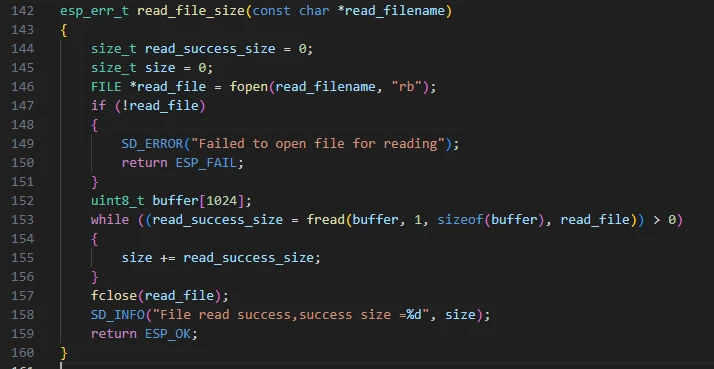
read_file_size:
Read all data blocks in the file in a loop;
Accumulate the "size" to get the total number of bytes of the file;
Output the total size of the file.
Function: Calculate the file size and verify the correctness of writing.
read_write_file:
Open the source file (for reading) and the target file (for writing);
Read 1024-byte content from the source file in blocks;
Write the content to the target file;
Check whether the number of written bytes is consistent with the number of read bytes;
Finally, close the files and output the message indicating successful copying.
Function: Implement file copying operation.

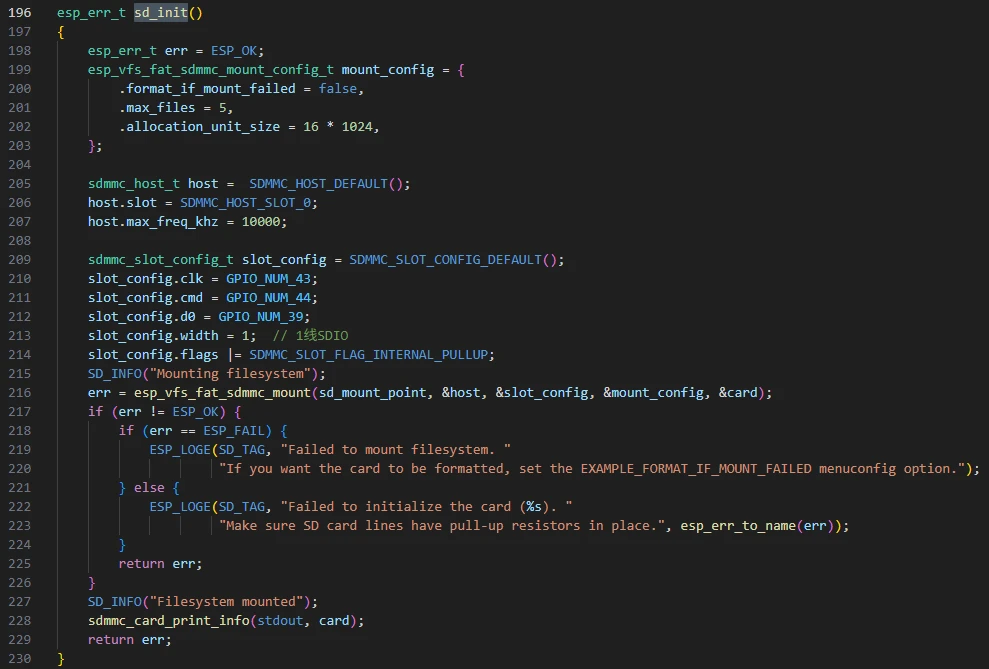
sd_init:
Create an "esp_vfs_fat_sdmmc_mount_config_t" configuration structure to set:
-
"format_if_mount_failed = false" → Do not automatically format;
-
"max_files = 5" → Maximum 5 files can be opened simultaneously;
-
"allocation_unit_size = 16 * 1024" → Each cluster size is 16KB;
Initialize "sdmmc_host_t" and "sdmmc_slot_config_t":
-
Set clock, command, and data line pins;
-
Set bus width (1-line mode);
-
Reduce the clock frequency to 10MHz to improve stability;
Call "esp_vfs_fat_sdmmc_mount()" to mount the SD card file system to "/sdcard";
If successful, print card information.
Function: Mount the SD card and establish the "FAT" file system.
get_sd_card_info:
Print detailed information such as the type, capacity, and speed of the SD card to the console.

format_sd_card:
Call "esp_vfs_fat_sdcard_format()" to format the "FAT" file system;
Output an error message if formatting fails.
Function: Clear the SD card file system and reformat it.

That concludes our introduction to the "bsp_sd" component. It's sufficient for everyone to understand how to call these interfaces.
If you need to call them, you must also configure the "CMakeLists.txt" file under the "bsp_sd" folder.
This file, placed in the "bsp_sd" folder, mainly functions to tell the build system (CMake) of "ESP-IDF" how to compile and register the "bsp_sd" component.
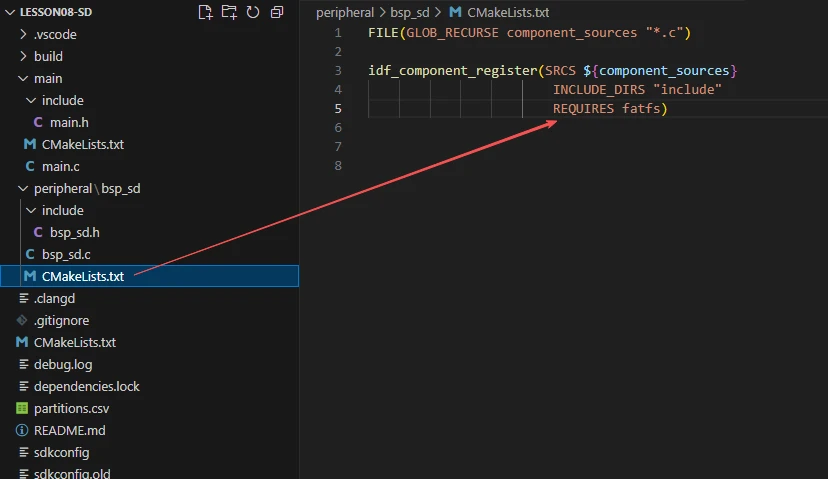
The reason why "fatfs" is involved here is that we have called it in "bsp_sd.h" (other libraries that are system libraries do not need to be added).

Main Function
The main folder is the core directory for program execution, containing the main function executable file "main.c".
Add the main folder to the "CMakeLists.txt" file of the build system.
This is the entry file of the entire application. In ESP-IDF, there is no int main(), and the program starts running from void app_main(void).
Let's first explain "main.c".
When the program runs, the general process is as follows:
Initialization Phase
sd_init() → Detects and mounts the SD card.
File Operation Phase
Users call encapsulated functions such as:
write_string_file() to write data;
read_string_file() for reading and verification;
Debug Log Output
All operations have "SD_INFO()" log output for debugging purposes.
Exception Handling
If file opening, reading, or writing fails, it will immediately return "ESP_FAIL" and print an error log.
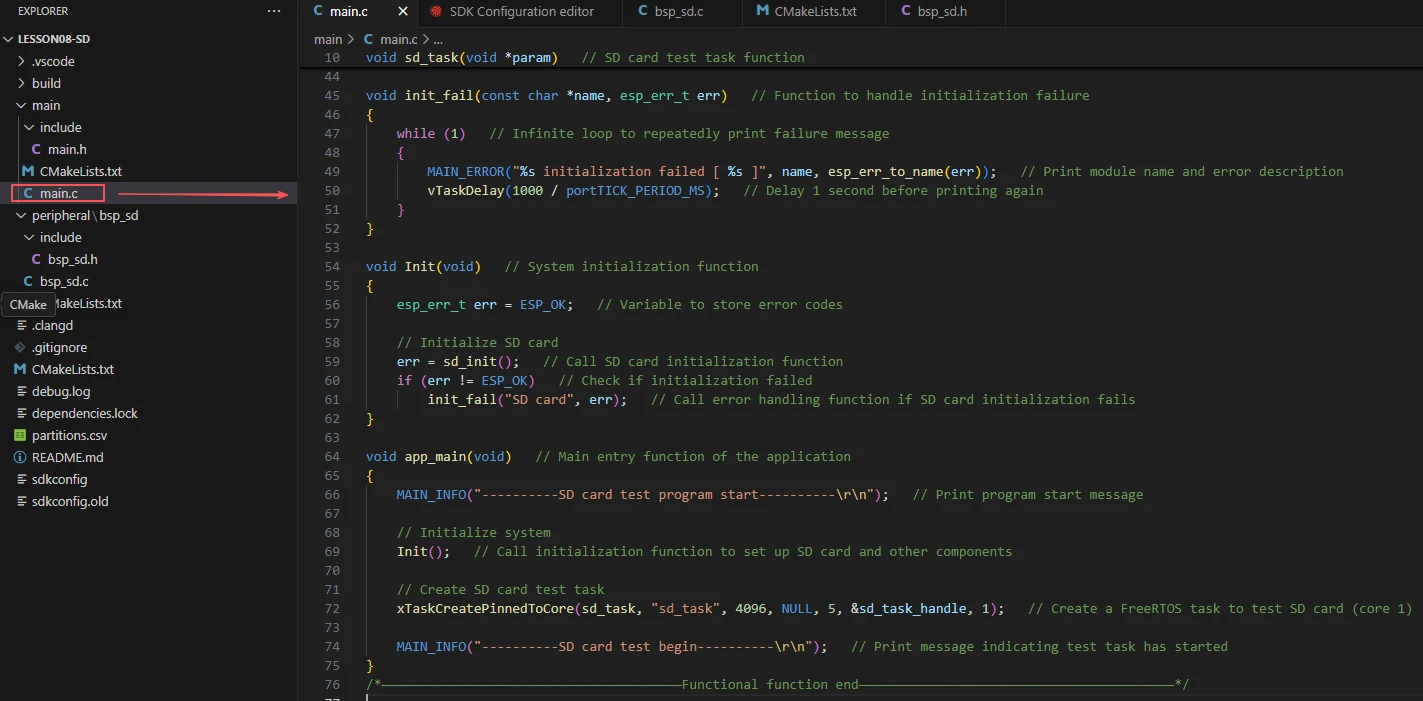
Next, let's explain the main code file "main.c".

First, it includes the custom main header file "main.h". This header file usually contains log macros, peripheral initialization declarations, SD card-related function declarations, and more.
In essence, including this file enables the current "main.c" to call system initialization functions and SD card functional functions.
Below is the content included in "main.h":
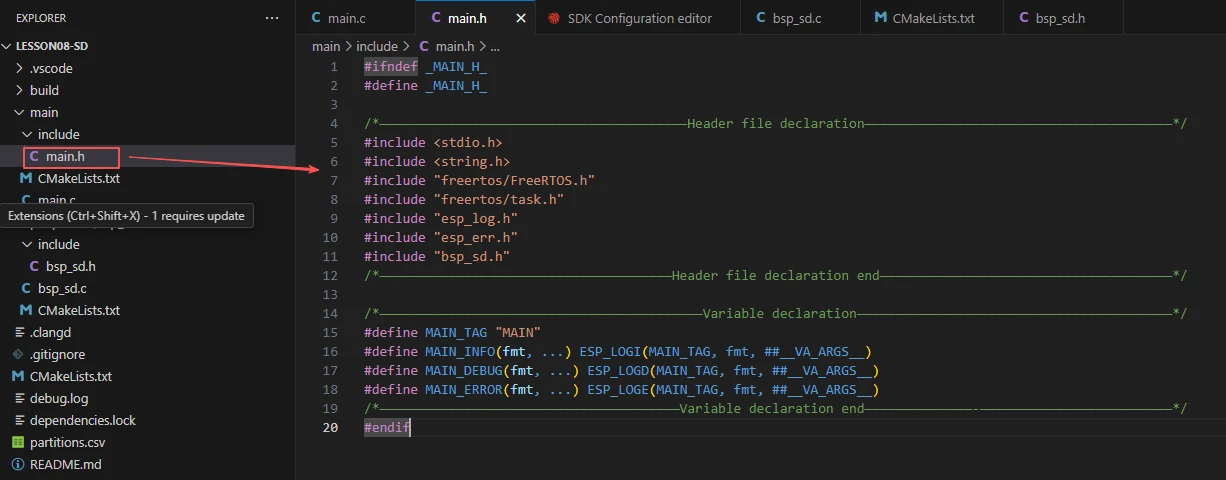
The following defines a FreeRTOS task handle.
It is used to record the created SD card test task "sd_task", facilitating system management.

The following is a FreeRTOS task function, whose main function is to repeatedly test the read and write functions of the SD card.
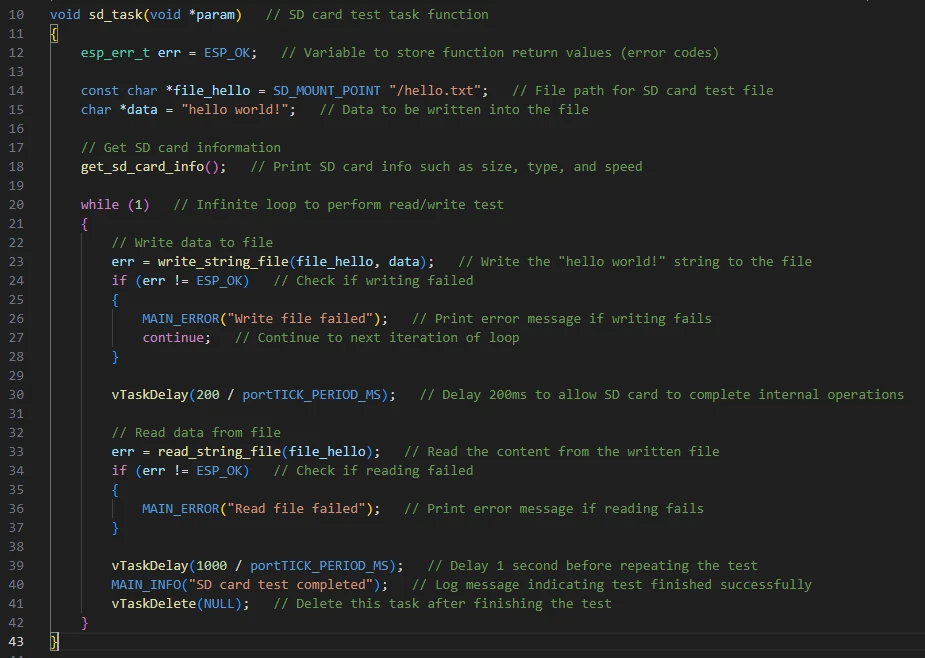
Among them:
"file_hello" is the file path (usually "/sdcard/hello.txt").
"data" is the string content to be written to the file.
Note:
If your file name is too long, the read and write operations will eventually fail. You can do the following:
Click "SDK Configuration Editor".
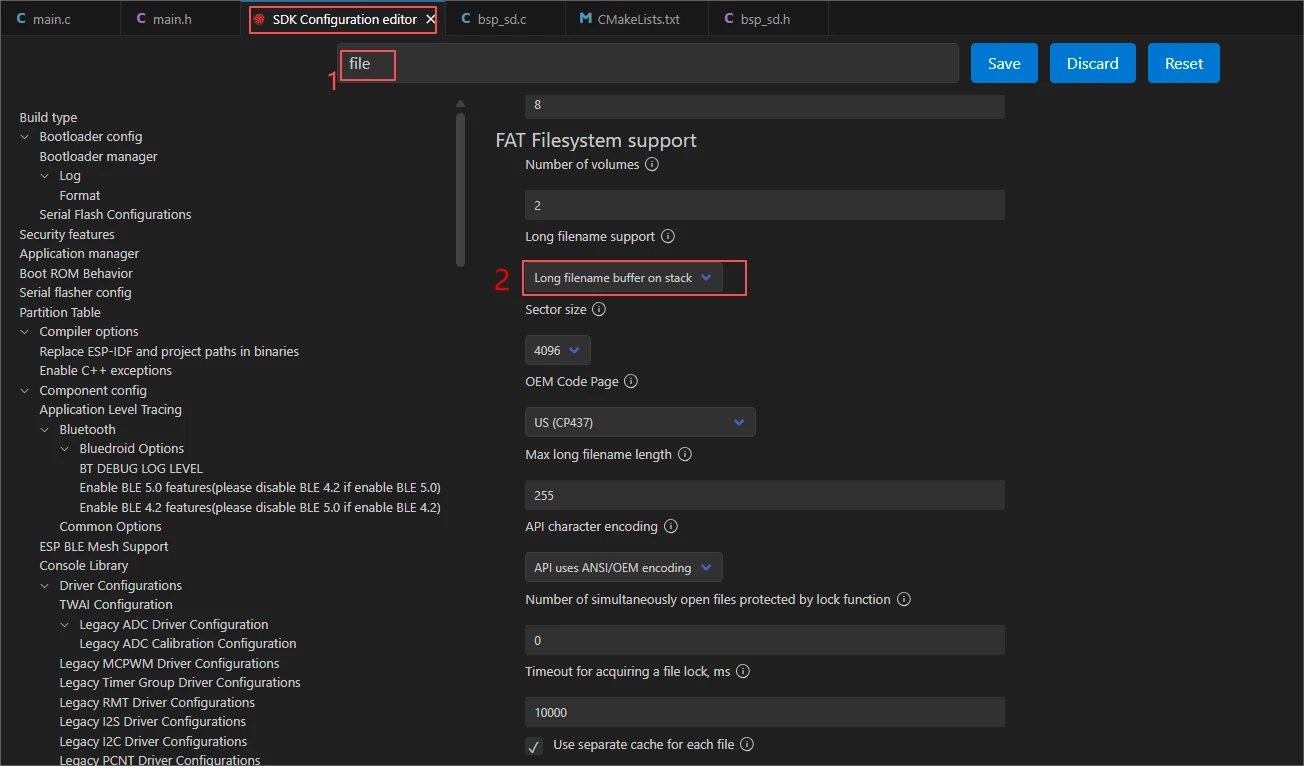
This way, you can adapt to longer file names.
Then, the subsequent operations in the "sd_task" function are as follows: first, obtain the SD card information, then write the data you want to write into the file with the specified path and name, and delay for 200ms. This delay is to wait for the write operation to stabilize and succeed, so that you can smoothly read out the content you wrote.

When the module initialization fails (such as the SD card not being inserted, wrong wiring, etc.), it will cyclically print error logs and block the program.
The function is to prevent the execution of tasks in an error state from continuing.
The code here calls "sd_init" from the "bsp_sd" component to initialize our SD card, which is a prerequisite for performing operations on the SD card.
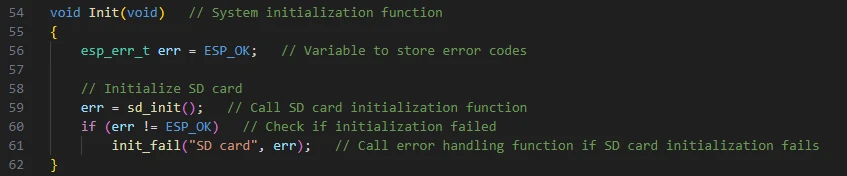
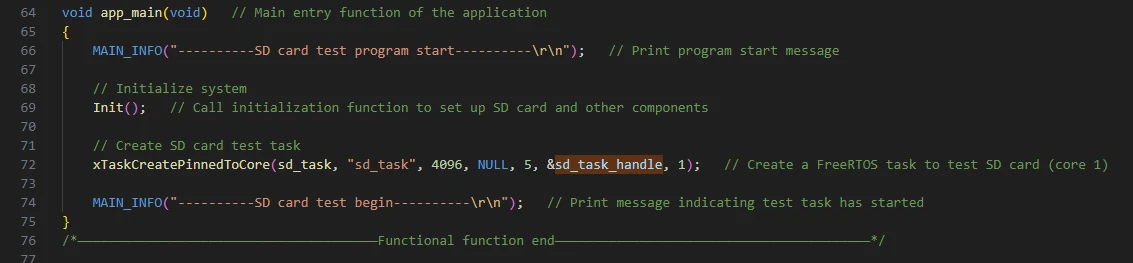
Then there is the main function app_main.
ESP-IDF projects start executing from app_main():
-
Print startup information;
-
Call Init() to complete SD card initialization;
-
Create a task with:
xTaskCreatePinnedToCore(sd_task, "sd_task", 4096, NULL, 5, &sd_task_handle, 1);
-
Name: sd_task
-
Stack size: 4096 bytes
-
Priority: 5
-
Runs on CPU core 1
-
Print "SD card test begin" to indicate that the test task has started.
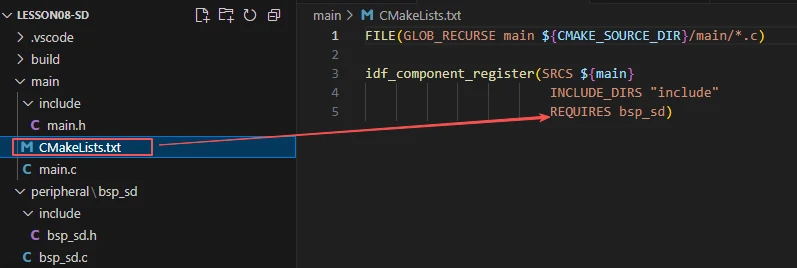
Finally, let's understand the "CMakeLists.txt" file in the "main" directory.
The role of this CMake configuration is::
-
Collect all ".c" source files in the "main/" directory as the component's source files;
-
Register the "main" component with the ESP-IDF build system and declare that it depends on the custom component "bsp_sd".
This way, during the build process, ESP-IDF knows to first build "bsp_sd" and then build "main".
Note: In subsequent courses, we will not create a new "CMakeLists.txt" file from scratch. Instead, we will make some minor modifications to this existing file to integrate other drivers into the main function.
Complete Code
Kindly click the link below to view the full code implementation.
GitHub Link
Programming Steps
Now the code is ready. Next, we need to flash it to the ESP32-P4 to observe the actual behavior.
First, connect the Advance-P4 device to your computer via a USB cable.

Then insert the SD card you will use into the SD card slot of the Advance-P4.
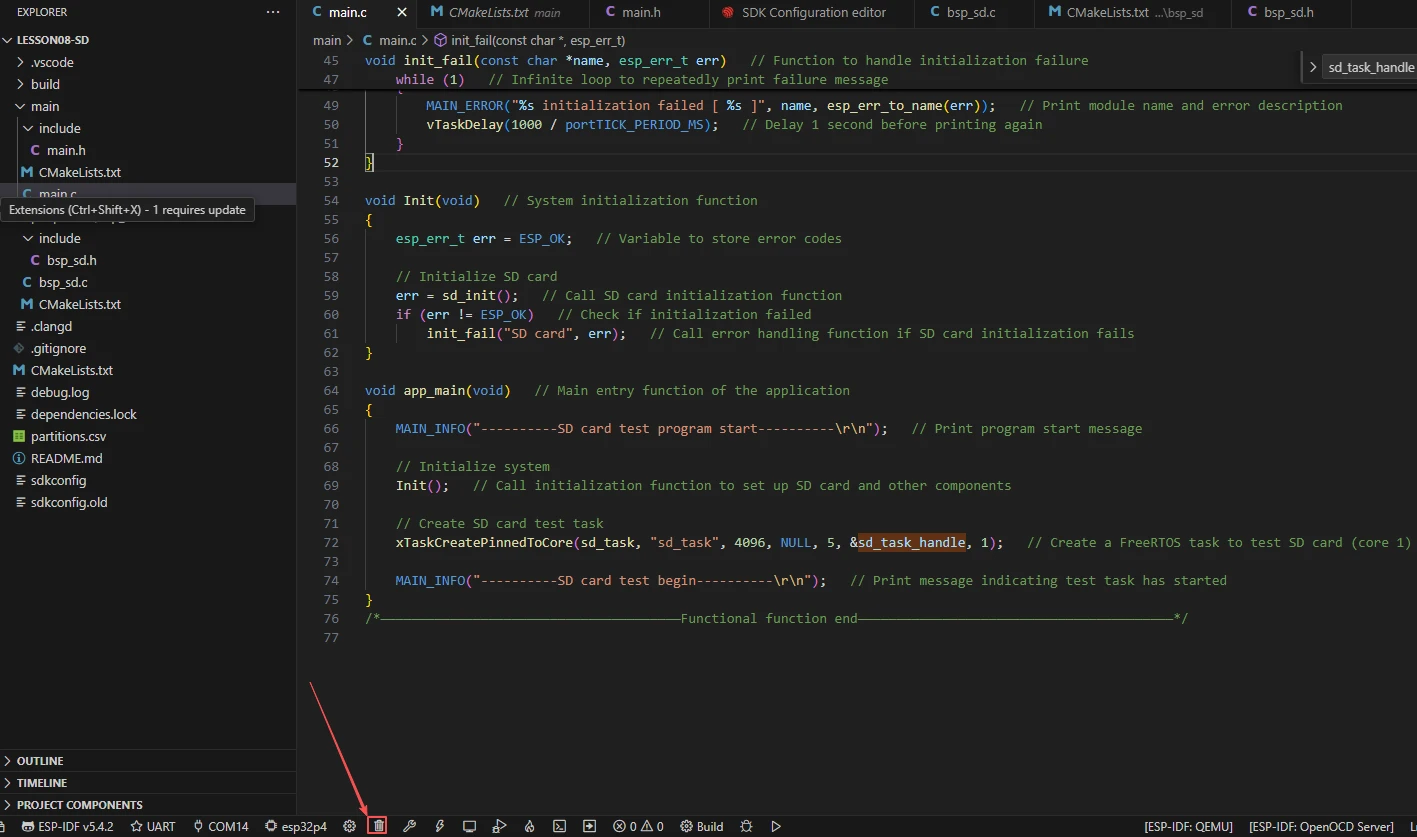
Before starting the flashing process, first delete all files generated during compilation to restore the project to an "unbuilt" initial state. (This ensures that subsequent compilations are not affected by your previous build residues.)
First, follow the steps from the first section to select the ESP-IDF version, code upload method, serial port number, and target chip.
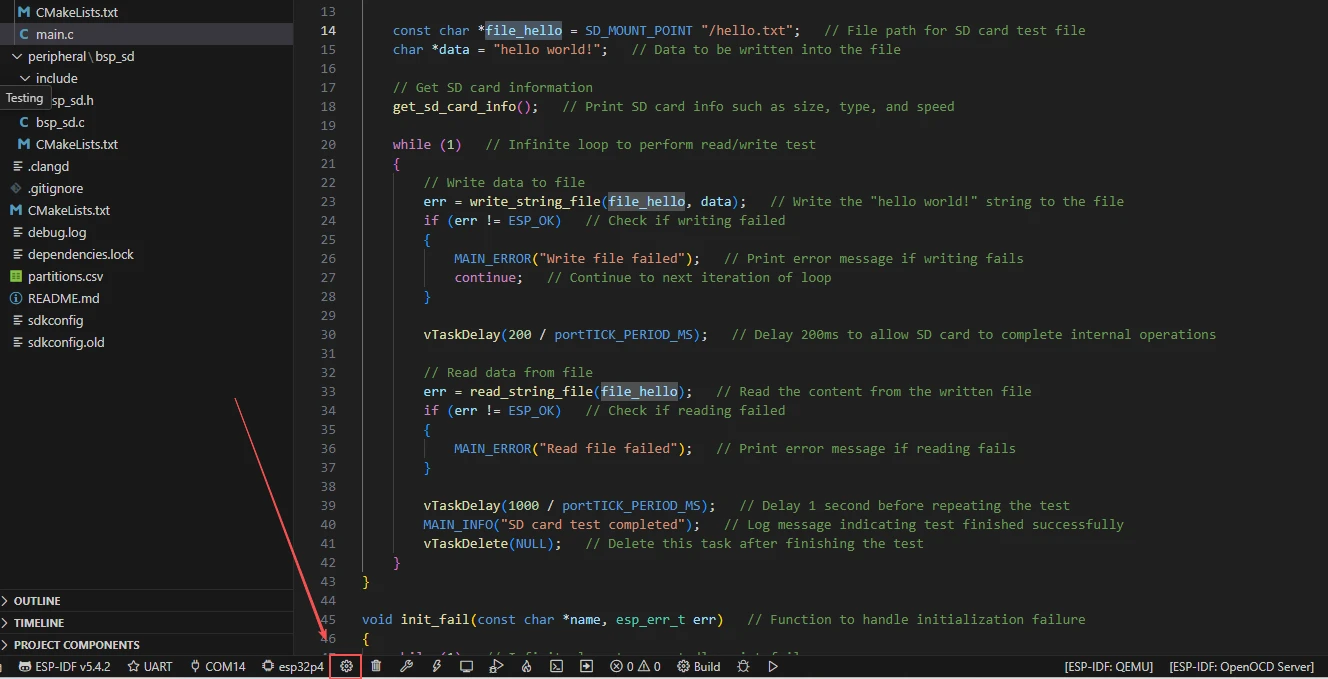
Next, we need to configure the SDK.
Click the icon shown in the figure.

Wait for a moment while it loads, and then you can proceed with the relevant SDK configurations.
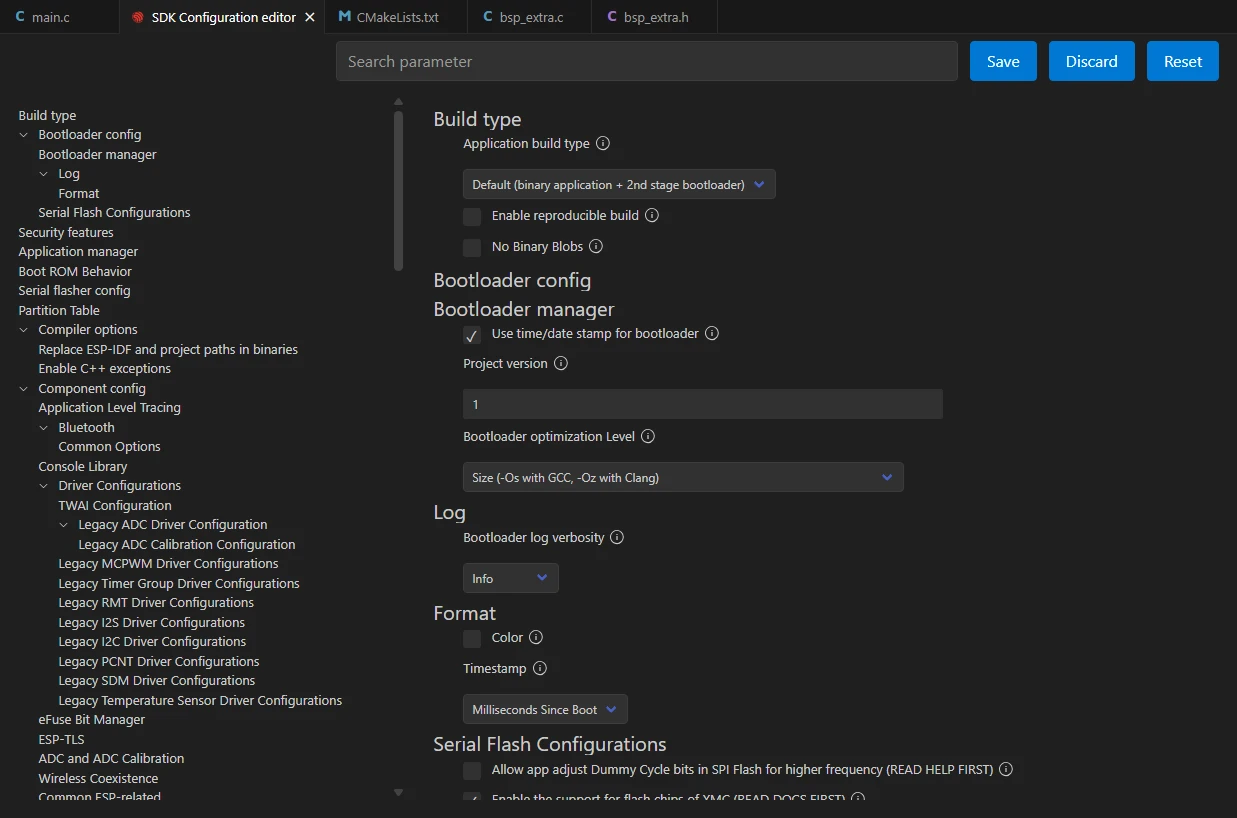
Subsequently, search for "flash" in the search box(Ensure your flash configuration matches mine).

After completing the configuration, remember to save your settings.
Then we can compile and flash the code (as detailed in the first lesson).
Here we'd like to introduce a very convenient feature: there's a single button that can execute compilation, uploading, and opening the monitor all at once. (This works on the premise that the entire code is error-free.)

After waiting for a while, the code compilation and upload will be completed, and the monitor will open automatically.
Once the code runs, you will be able to visually see that a file named "hello.txt" appears in the SD card, with the content "hello world!" already written inside.