EM Shield
Introduction
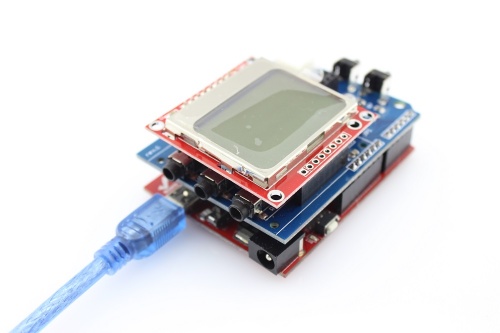
Energy Monitor Shield is an Arduino-compatible expansion card designed for building energy monitoring system with LCD screen and an interface for connecting the wireless transceiver nRF24L01 +.
Model: (Discontinued)
Feature
- Connect up to three sensors AC (30-100A).
- Support for LCD Screen Nokia LCD5110
- Turn off the LCD backlight with a jumper
- Two buttons to control (operate one analog pin)
- Interface to connect the transceiver to 2.4G nRF24L01 +
- GROVE-compatible connector: I2C
- Fully compatible with Ethernet Shield (Wiznet 5100 + SD)
Layout and schematics
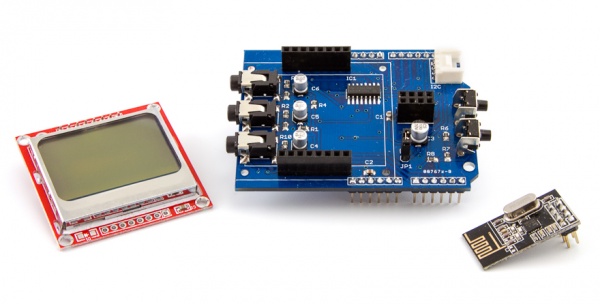
The left side of EM Shield are three connectors for current sensors, right - connector for LCD-screen.
Jumper JP1 is used to enable / disable real-backlight LCD-screen.
In the upper right corner - I2C-connector.
On the right are two buttons (labeled S1 and S2).
In the center of the board (just to the right LCD-screen) - connector for nRF24L01 +.
Basic functionality
In the basic version (without using Ethernet Shield) may organize monitoring of energy consumption in three different circuits using current sensors.
Information about the current level of consumption can be displayed on the LCD screen.
Device Management can be organized using two buttons on the Shield.
The obtained data can be transmitted by the transceiver nRF24L01 +.
Expansion Capabilities
Additionally EM Shield can connect any device using i2c Grove-compatible connector (sensors, displays, etc.). EM Shield was designed to be fully compatible with the Ethernet Shield (Wiznet 5100 + SD) - so you can use these two Schild together to create even more advanced device monitoring electricity (logging on SD-card and presenting data on a web page).
Interfaces
- A0, A1, A2 - involved for connecting sensors AC
- A4 (SDA), A5 (SCL) - displayed on the connector "I2C" (the other two pin connector - VCC and GND for sensor supply)
- Interface for connecting RF-module nRF24L01+:
- D11 - MOSI
- D12 - MISO
- D13 - SCK
- D8 - RF_CE
- D7 - RF_CSN
- D2 - RF_IRQ
- Interface for connecting LCD5110:
- D11 - MOSI
- D13 - SCK
- D5 - LCD_D/C
- D6 - LCD_RST
- D3 - LCD_CS
- A3 - Buttons
Libraries
Necessary libraries
To use EM Shield requires the following libraries:
- Working with the transceiver nRF24L01+ - RF24
- Using the display LCD 51110 (supporting SPI) - LCD5110_Graph_SPI
- Work with current sensors - EmonLib
Requires the libraries that are used when working RF24 and LCD-display:
- SPI
Features using libraries
Library has used examples of them just to understand how they work.
Initialization RF-module as follows:
Initialize LCD-display is as follows:
Usage
1.Hardware connection
Plug the EM Shield into the Arduino/Crowduino

2.Download the library File:LCD5110 Library
3.Unzip it into the libraries file of Arduino IDE by the path: ..\arduino-1.0\libraries.
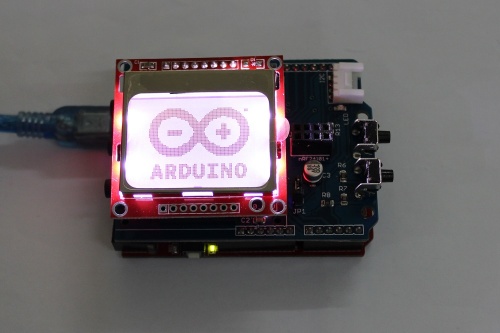
4.Open the code directly by the path:File -> Example ->LCD5110_Graph_SPI->LCD5110_Graph_Demo.
#include <SPI.h>
#include <LCD5110_Graph_SPI.h>

LCD5110 myGLCD(5,6,3);

extern unsigned char SmallFont[];
extern unsigned char TinyFont[];
extern uint8_t arduino_logo[];
extern uint8_t The_End[];
extern uint8_t pacman1[];
extern uint8_t pacman2[];
extern uint8_t pacman3[];
extern uint8_t pill[];

float y;
uint8_t* bm;
int pacy;

void setup()
{
  myGLCD.InitLCD();
  myGLCD.setFont(SmallFont);
  randomSeed(analogRead(7));
}

void loop()
{
  myGLCD.clrScr();
  myGLCD.drawBitmap(0, 0, arduino_logo, 84, 48);
  myGLCD.update();

  delay(2000);

  myGLCD.clrScr();
  myGLCD.print("LCD5110_Graph", CENTER, 0);
  myGLCD.print("DEMO", CENTER, 20);
  myGLCD.drawRect(28, 18, 56, 28);
  for (int i=0; i<6; i++)
  {
    myGLCD.drawLine(57, 18+(i*2), 83-(i*3), 18+(i*2));
    myGLCD.drawLine((i*3), 28-(i*2), 28, 28-(i*2));
  }
  myGLCD.setFont(TinyFont);
  myGLCD.print("(C)2013 by", CENTER, 36);
  myGLCD.print("Henning Karlsen", CENTER, 42);
  myGLCD.update();

  delay(5000);

  myGLCD.clrScr();
  for (int i=0; i<48; i+=2)
  {
    myGLCD.drawLine(0, i, 83, 47-i);
    myGLCD.update();
  }
  for (int i=83; i>=0; i-=2)
  {
    myGLCD.drawLine(i, 0, 83-i, 47);
    myGLCD.update();
  }

  delay(2000);

  myGLCD.clrScr();
  myGLCD.drawRect(0, 0, 83, 47);
  for (int i=0; i<48; i+=4)
  {
    myGLCD.drawLine(0, i, i*1.75, 47);
    myGLCD.update();
  }
  for (int i=0; i<48; i+=4)
  {
    myGLCD.drawLine(83, 47-i, 83-(i*1.75), 0);
    myGLCD.update();
  }

  delay(2000);

  myGLCD.clrScr();
  for (int i=0; i<8; i++)
  {
    myGLCD.drawRoundRect(i*3, i*3, 83-(i*3), 47-(i*3));
    myGLCD.update();
  }

  delay(2000);

  myGLCD.clrScr();
  for (int i=0; i<17; i++)
  {
    myGLCD.drawCircle(41, 23, i*3);
    myGLCD.update();
  }

  delay(2000);

  myGLCD.clrScr();
  myGLCD.drawRect(0, 0, 83, 47);
  myGLCD.drawLine(0, 23, 84, 23);
  myGLCD.drawLine(41, 0, 41, 47);
  for (int c=0; c<4; c++)
  {
    for (int i=0; i<84; i++)
    {
      y=i*0.017453292519943295769236907684886;
      myGLCD.invPixel(i, (sin(y*6)*20)+23);
      myGLCD.update();
      delay(20);
    }
  }

  delay(2000);

  for (int pc=0; pc<3; pc++)
  {
    pacy=random(0, 28);

    for (int i=-20; i<84; i++)
    {
      myGLCD.clrScr();
      for (int p=4; p>((i+20)/20); p--)
        myGLCD.drawBitmap(p*20-8, pacy+7, pill, 5, 5);
      switch(((i+20)/3) % 4)
      {
        case 0: bm=pacman1;
                break;
        case 1: bm=pacman2;
                break;
        case 2: bm=pacman3;
                break;
        case 3: bm=pacman2;
                break;
      }
      myGLCD.drawBitmap(i, pacy, bm, 20, 20);
      myGLCD.update();
      delay(25);
    }
  }

  for (int i=0; i<25; i++)
  {
    myGLCD.clrScr();
    myGLCD.drawBitmap(0, i-24, The_End, 84, 24);
    myGLCD.update();
    delay(100);
  }
  myGLCD.setFont(SmallFont);
  myGLCD.print("Runtime (ms):", CENTER, 32);
  myGLCD.printNumI(millis(), CENTER, 40);
  myGLCD.update();
  for (int i=0; i<5; i++)
  {
    myGLCD.invert(true);
    delay(1000);
    myGLCD.invert(false);
    delay(1000);
  }
}
5.You can see some information display on the LCD. 
Version Tracker
| Revision | Description | Release |
|---|---|---|
| 0.9 | Prototype | 10.09.2013 |
| 0.9b | Not produced | 20.10.2013 |
| 1.0 | Public version | 01.04.2014 |
Questions and Answers
- Blog EM Shield RU
- Ask a question by e-mail support@devicter.ru
How to buy
This product can be purchased:
China (shipping worldwide)
Seeed store
Russia
Devicter store
Licensing
This documentation is licensed under the Creative Commons Attribution-ShareAlike License 3.0 Source code and libraries are
licensed under GPL/LGPL, see source code files for details.

