2.1 ESPHOME Lesson04 Adjust Brightness in LVGL Interface
Lesson04---Adjust Screen Brightness with LVGL Interface
1. Course Introduction
In the previous lesson, we have already mastered how to write code on the ESPHome platform to adjust the screen brightness. In this lesson, based on the previous one, we will add a refined LVGL interface to control and display the screen brightness, making the interaction stronger. This is also a learning tutorial to help us gain a deeper understanding of LVGL.
2. Learning Objectives
Learn how to use LVGL to create a screen interface
Learn how to integrate LVGL widgets with the product
3. Project Demonstration
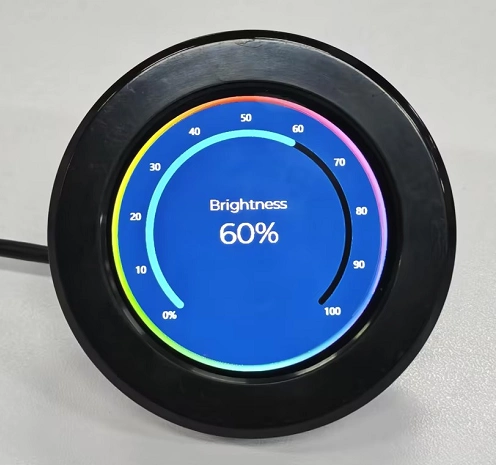
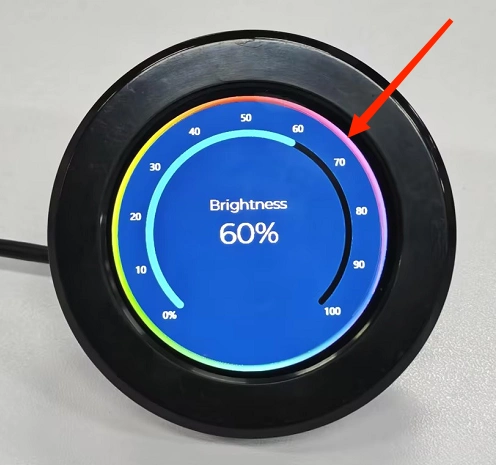
You can rotate the knob to adjust the screen brightness. The current brightness value will be displayed on the screen in real time, and the slider on the screen will also change in real time as you rotate it.
(Rotate clockwise to increase screen brightness, rotate counterclockwise to decrease screen brightness)
4. Example Code Download Link and Key Code Explanation
Click the GitHub link below to download the complete code:
Next, we will explain the key parts of this code and how to write code on the ESPHome platform to connect the LVGL interface with the product’s rotation effect.
In the following code explanation, some related configurations were already explained in detail in the previous lesson, so they will not be repeated here. We will only explain the new code content, that is, how to connect the LVGL interface with the product rotation, so that rotating the knob adjusts the slider on the screen.
(Since the functionality of this lesson is based on the screen brightness adjustment feature from Lesson 3 of ESPHome, if you encounter any code you do not understand, please review Lesson 3 of ESPHome.)
(1) Adjust Brightness with the Knob and Synchronize with the LVGL Interface
First, complete the encoder hardware configuration, which was also explained in detail in the previous lesson.
Next, we will explain the important parts related to this lesson, focusing on how the brightness adjustment is synchronized to the LVGL interface after rotating the knob.
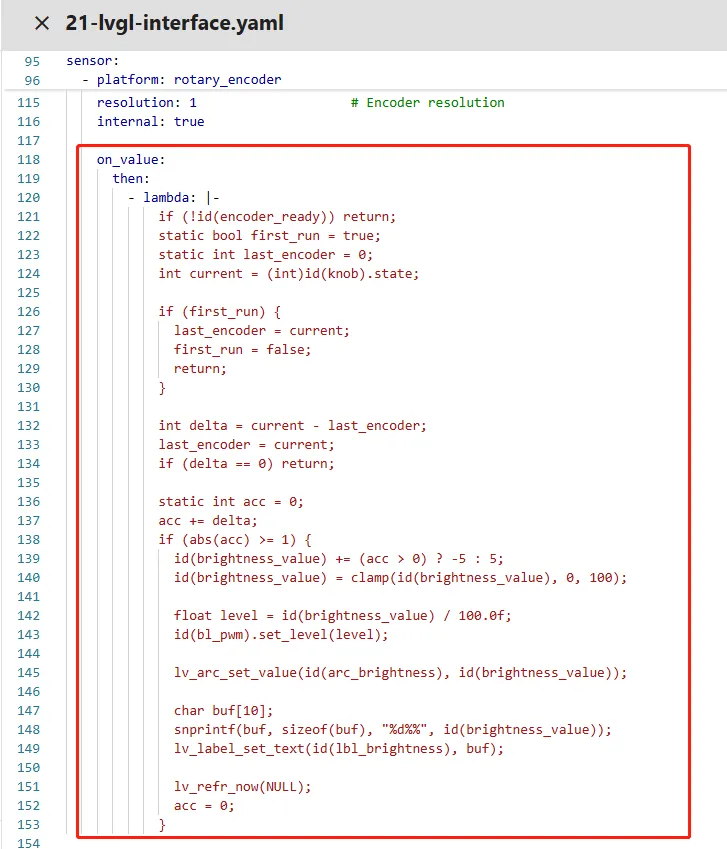
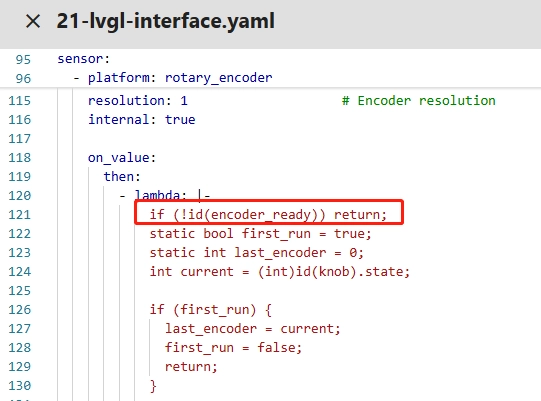
When the value of the rotary encoder changes, this code is triggered for execution. First, it performs the first layer of protection through if (!id(encoder_ready)) return; by checking the status of the global flag encoder_ready. This flag is set to false during device initialization at startup and will only be set to true after the display, backlight, and other hardware are fully ready. This step prevents abnormal brightness adjustment logic caused by false trigger signals from the encoder during the unstable startup phase.
Then two key static variables are defined: first_run (boolean, marking whether this logic is executed for the first time) and last_encoder (integer, recording the previous encoder value), and the current real-time encoder value current is obtained. The static keyword ensures that these two variables are not reinitialized each time the code executes but retain their previous values, providing a reference for subsequent rotation difference calculations.
Then the first execution calibration logic is entered: if first_run is true, it means this is the first time the encoder triggers this logic. At this time, last_encoder is initialized to the current encoder value current, and first_run is set to false before exiting. This eliminates errors in the first difference calculation caused by a non-zero initial encoder value at startup and ensures that subsequent differences are generated by valid rotations.
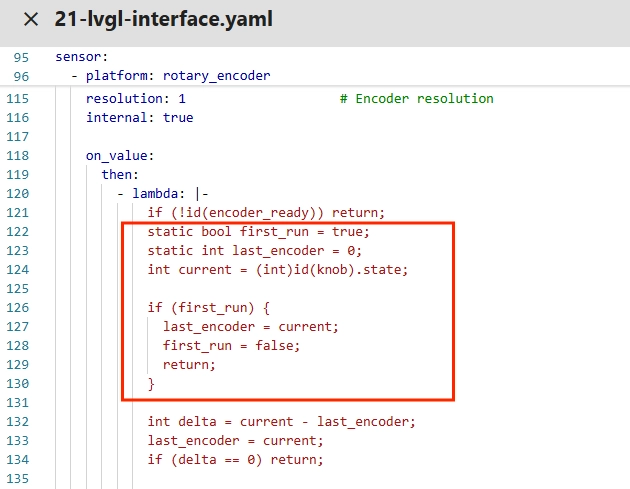
After calibration, the difference delta between the current value and the previous value is calculated (a positive value represents clockwise rotation, a negative value represents counterclockwise rotation, and the absolute value represents the number of steps). Then last_encoder is immediately updated to the current value to prepare for the next calculation. If delta is 0 (meaning there is no actual encoder rotation, only signal jitter), it exits directly to reduce unnecessary calculations.

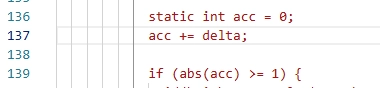
Next, a static accumulator acc is introduced for a second layer of debounce. The current delta is accumulated into acc. Only when the absolute value of acc is greater than or equal to 1 (ensuring that the encoder rotation signal is stable and filtering out single minor fluctuations) will the core brightness adjustment logic be executed.
During brightness adjustment, the ternary operator (acc > 0) ? -5 : 5 is used to determine the rotation direction: if acc is positive (clockwise rotation), the brightness value brightness_value decreases by 5%; if acc is negative (counterclockwise rotation), it increases by 5%. At the same time, the clamp function is called to strictly limit the brightness value within 0–100 to avoid invalid values below 0 or above 100%.

The global integer brightness value brightness_value (0–100) is divided by the floating-point 100.0f to convert it into the 0.0–1.0 floating-point duty cycle required by the ESP32 LEDC PWM output and assigned to level. Then the set_level method of the backlight PWM output component gpio_3_backlight_pwm is called to pass in the duty cycle and apply it immediately, thereby completing the actual hardware backlight brightness adjustment. The larger the duty cycle, the brighter the backlight.

Then the core native API of the LVGL arc component, lv_arc_set_value, is called. This function is specifically used to set the current display value of the arc progress bar. The first parameter passes in the arc component ID arc_brightness defined in YAML, and the second parameter directly passes in the current integer brightness value. LVGL will automatically adjust the length of the colored progress segment in the arc and the position of the end knob according to the passed brightness value. The arc will precisely display the corresponding proportional progress based on the brightness value, achieving a direct mapping from numerical value to arc visualization.

To make the brightness value more intuitive, a 10-character buffer buf is defined. Using the safe C string formatting function snprintf, the integer brightness value is formatted into a string with a percentage sign (for example, 50 becomes “50%”), and the formatted string is stored in the buffer. Then the LVGL label component API lv_label_set_text is called to pass the buffer string to the center brightness text label lbl_brightness and update the label display content.

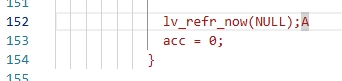
Then lv_refr_now(NULL) is called to force LVGL to immediately refresh all associated screens, skipping the default screen update cycle so that the changes in arc progress and percentage text are displayed on the screen in real time without delay, ensuring immediate feedback. Finally, the accumulator acc is reset to 0 to wait for the next encoder rotation difference accumulation, ensuring that after each valid adjustment, the accumulator returns to its initial state and does not affect subsequent difference calculations.
As the key function connecting the brightness value with the arc display, lv_arc_set_value does not require concern about underlying drawing details. As long as the passed brightness value is within the preset 0–100 range of the arc component, it can achieve precise and automatic linkage between the value and arc progress. It is a fundamental and core instruction when using the LVGL arc component for data visualization for the first time.
Lambda Usage Notes:
-
When writing this code in an ESPHome Lambda, you must follow core syntax rules: Lambda is a C++ code snippet embedded in YAML. You must use id(xxx) to call all components and global variables defined in YAML and cannot directly write the ID.
-
Every execution statement must end with a semicolon ;
-
At the end, lambda: must be followed by |- and the code must maintain consistent indentation (YAML identifies code block scope by indentation). There is no need to wrap multi-line code with {}, nor manually include C standard library header files. You can directly use functions such as snprintf.
-
When defining a character buffer, reserve extra space to prevent overflow. Avoid executing time-consuming operations in Lambda to prevent blocking the ESP32 main loop. LVGL native APIs can be directly called without additional initialization.
(2) Import Resources
As shown in our demonstration image, the refined background image is uploaded using the method we will describe next and is referenced in the code.

Before starting, you can click the link below to download the resources we provide.
Next, we will teach you how to upload the resources you want to use so that they can be used on the ESPHome platform.
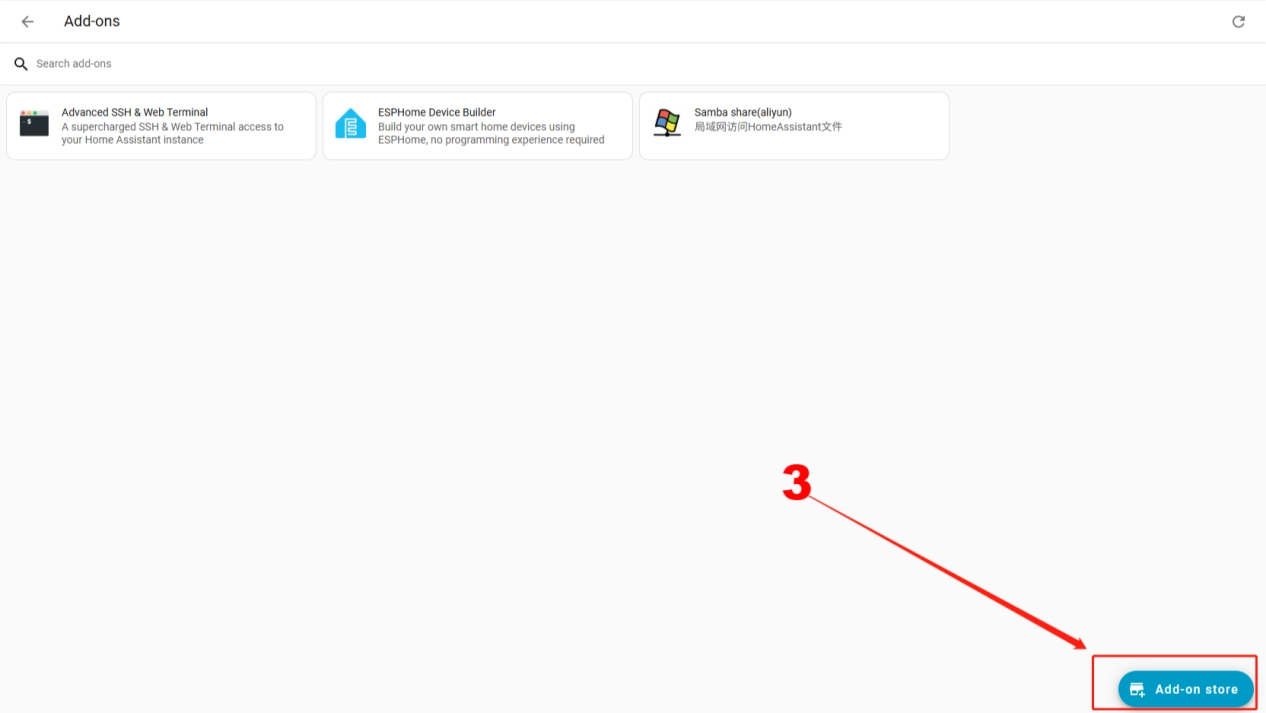
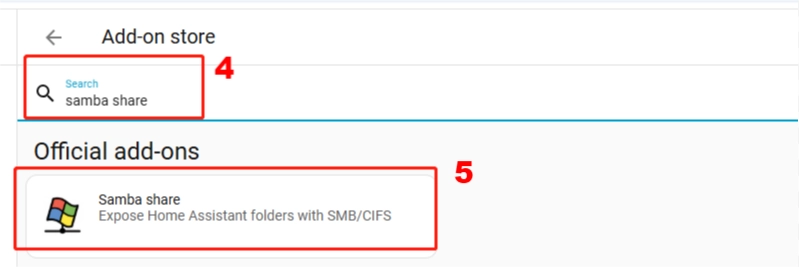
First, download the Samba Share tool. We need this tool to conveniently upload the image resources we want to use.
Follow the steps below one by one to complete the download.
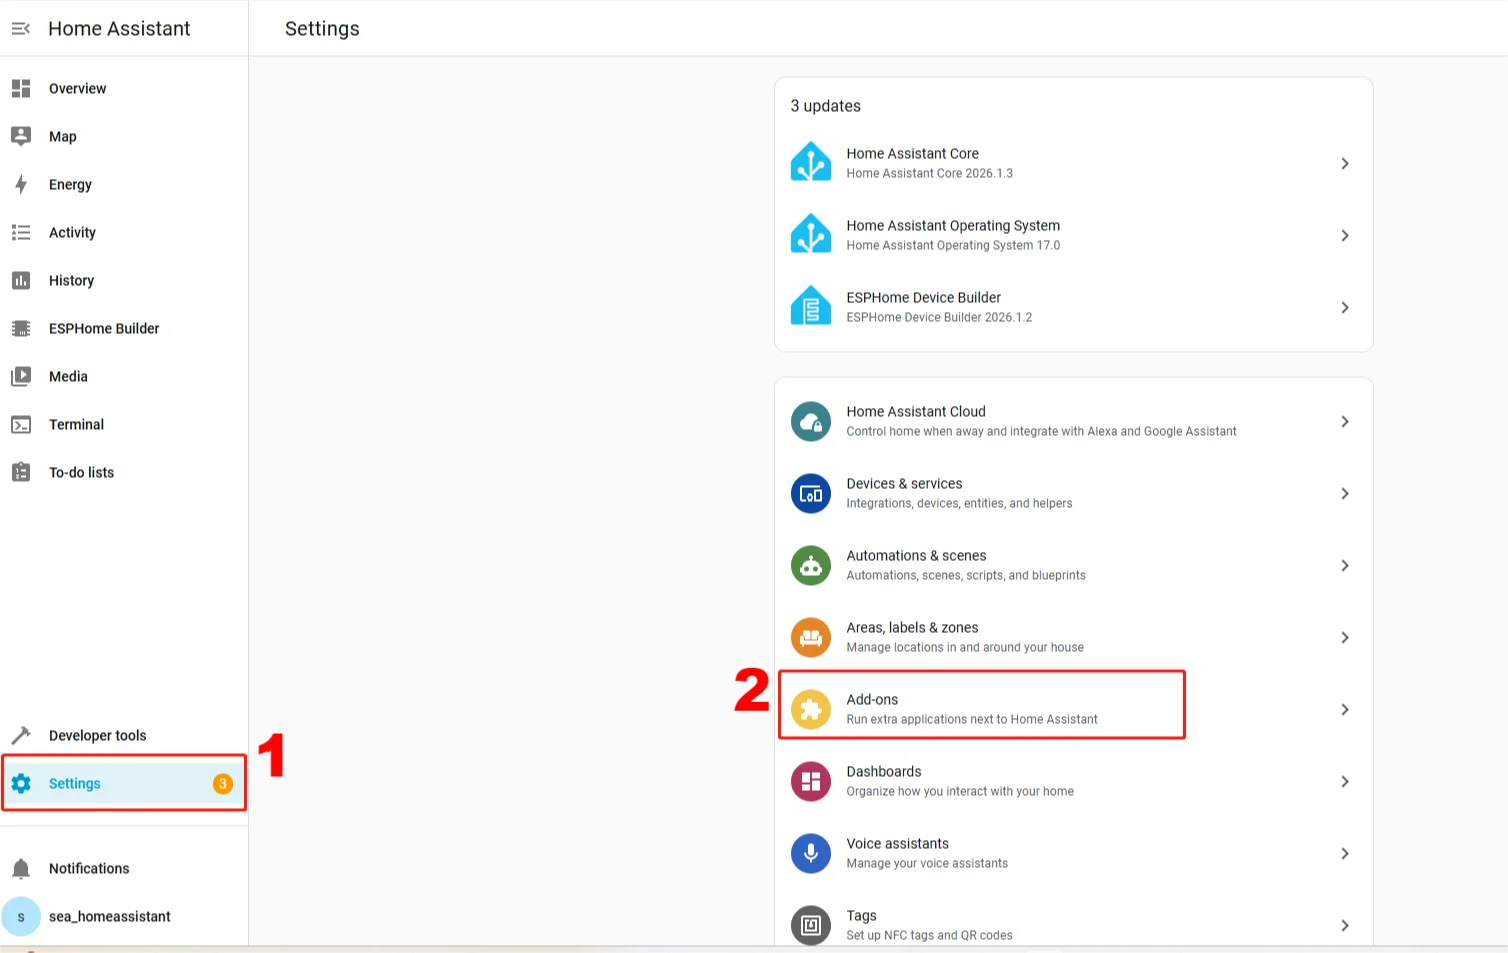

After the download is complete, configure your account on the tool page. Enter the username and password used for your Home Assistant.
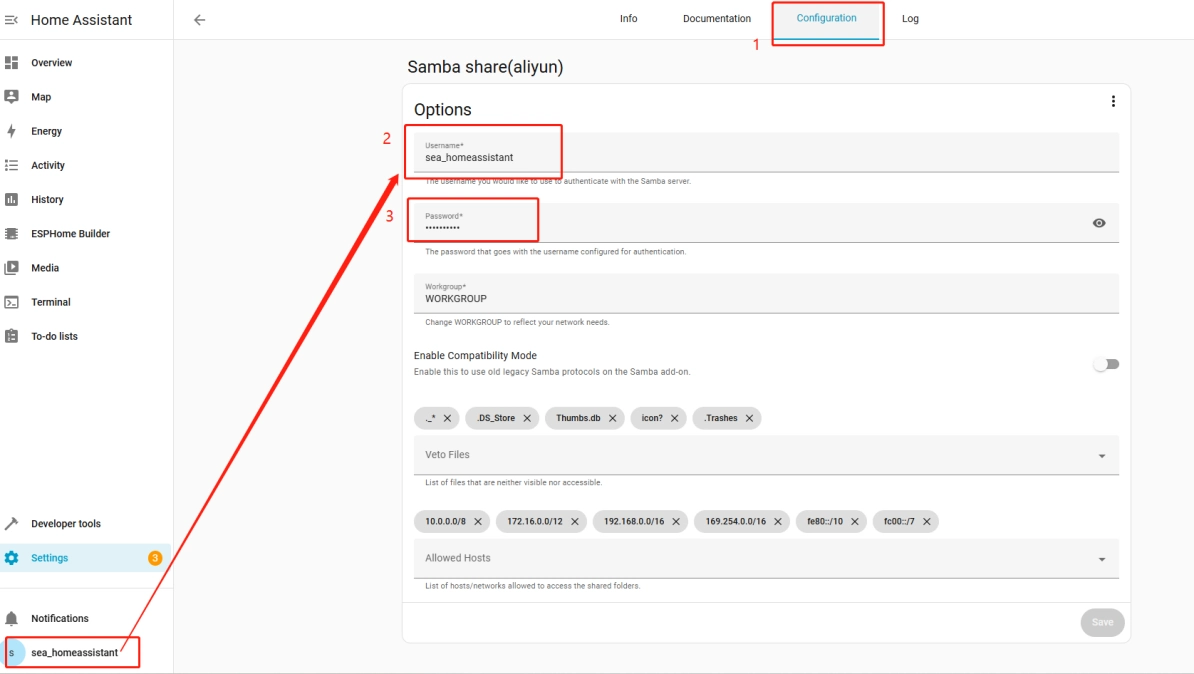
After completing the configuration, remember to click Save in the lower right corner.
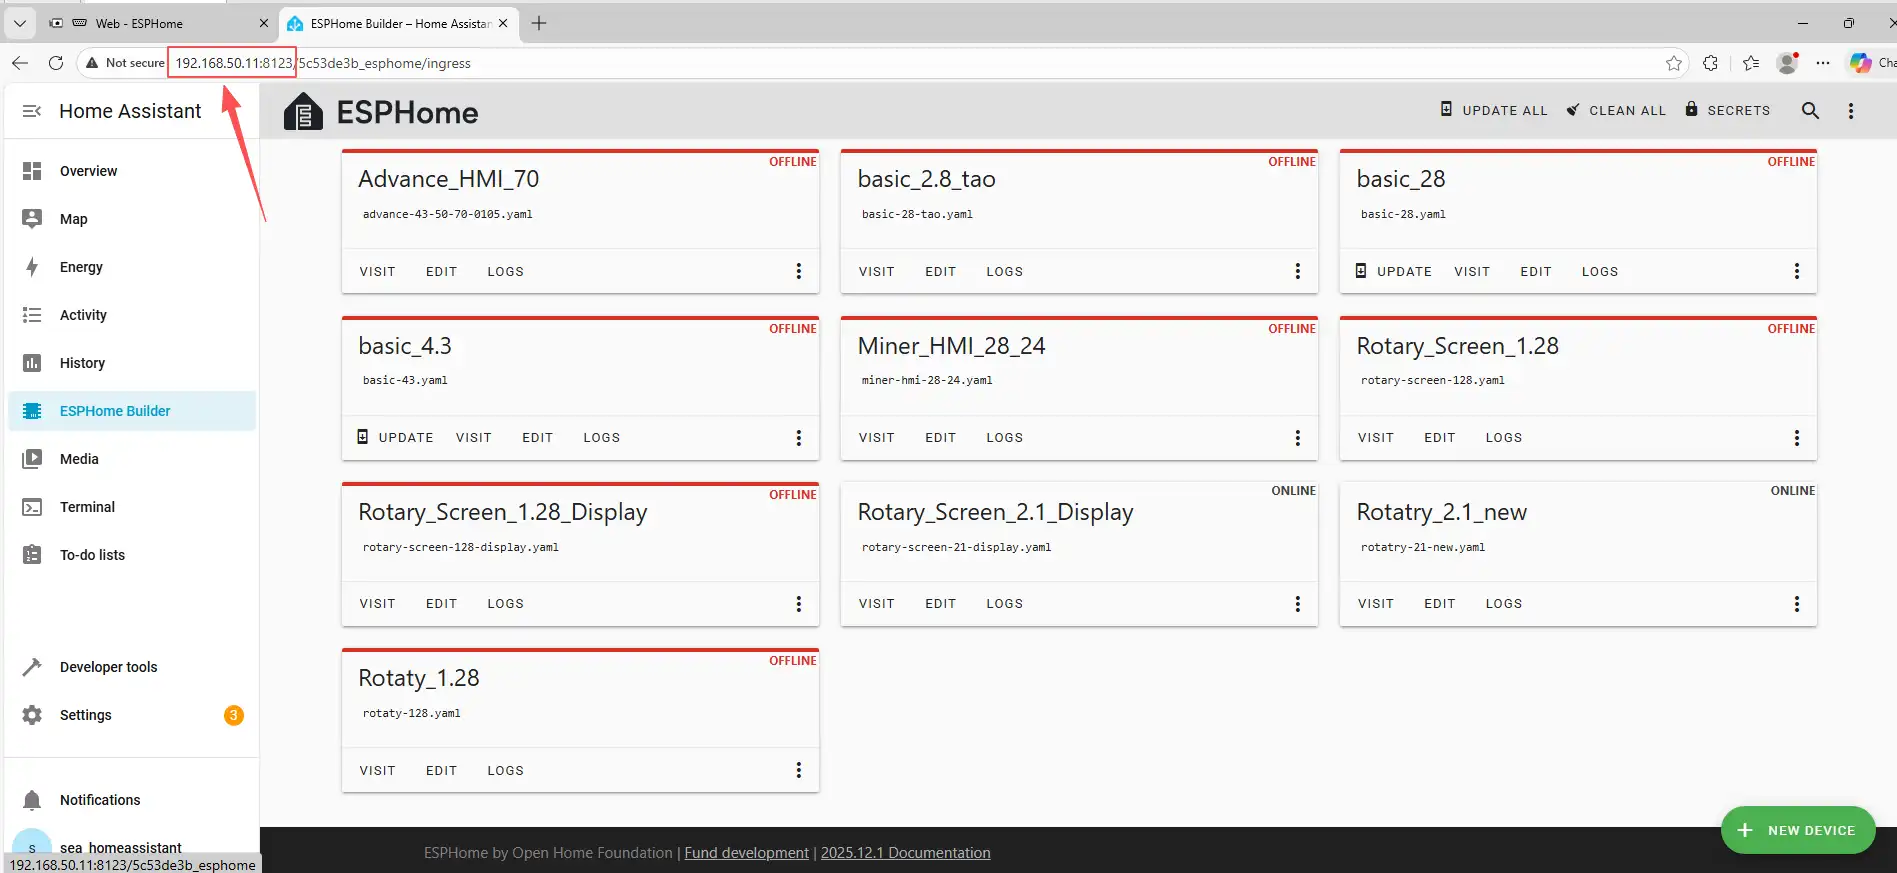
Then, in your computer’s file system, open a file explorer window and enter + your Home Assistant IP address.
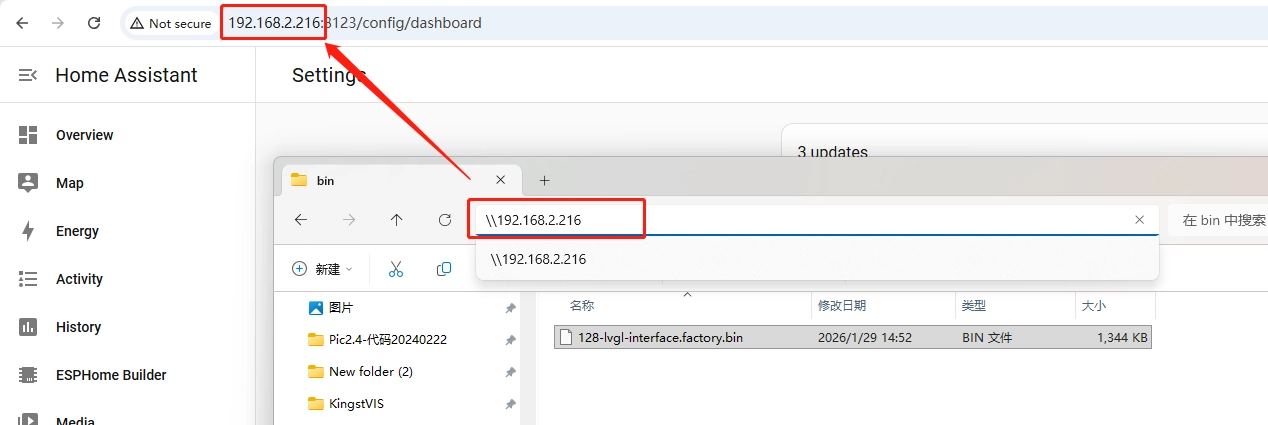
After entering, you will arrive at the current ESPHome file management interface.
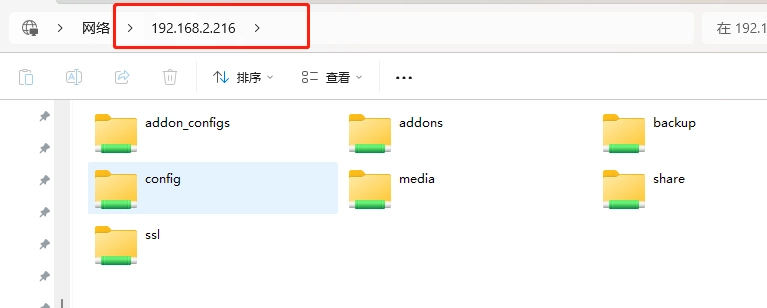
First enter the config folder, then enter the esphome folder.
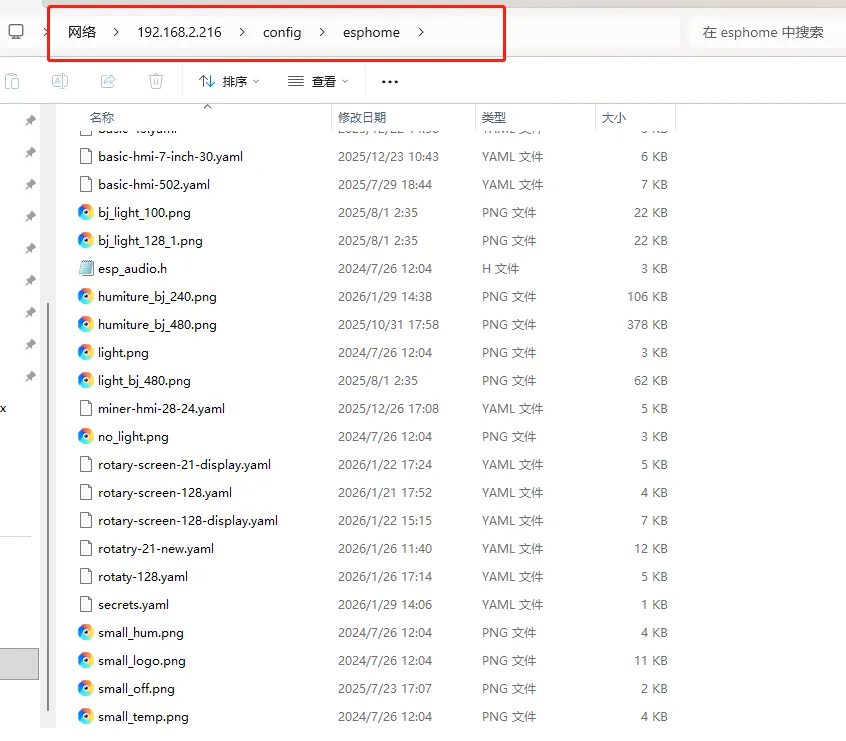
You can place the resources you need to use here. The resource names in your code must match the names of the files you place here.

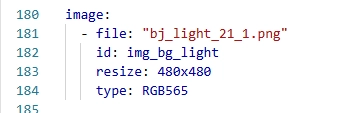
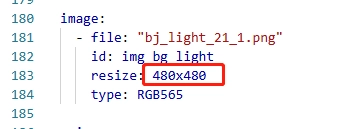
Note: Here we are using the CrowPanel 2.1inch-HMI ESP32 Rotary Display, and the resolution of the resource images we use is 480x480.
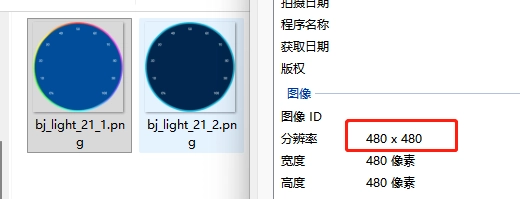
Therefore, please keep it consistent in the code as well.
In this way, when your code is compiled, it will find the resources you placed and display them on the screen.
(4) LVGL Configuration
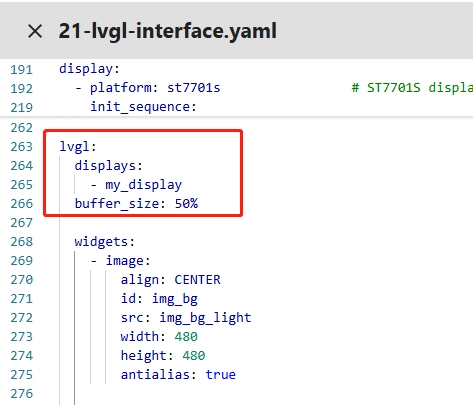
This code is the core configuration of LVGL (Lightweight Embedded Graphics Library) in ESPHome. Its purpose is to build a visually clear and interaction-synchronized brightness adjustment interface on a 480x480 ST7701S display. From basic display binding to specific widget styles, positions, and initial states, everything is defined in detail. Below, we will break it down part by part to thoroughly explain the meaning and function of each parameter.
This LVGL configuration first completes the core environment setup: through displays: - my_display, the LVGL graphics library is bound to the previously defined my_display driver to ensure that the graphical interface outputs to the physical screen; buffer_size: 50% is a key memory configuration, meaning that 50% of the available device memory is allocated as the LVGL graphics buffer. A 480x480 high-resolution screen requires sufficient buffer space to store image data. This configuration ensures smooth interface refresh while preventing excessive memory usage that could cause device crashes.
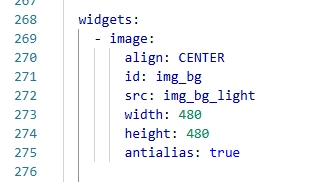
Then, all visual elements on the interface are defined through widgets, following a layered layout concept, configuring controls sequentially from bottom to top.
Background image widget: As the bottom layer of the interface, the image type widget is centered on the screen through align: CENTER. id: img_bg is the unique identifier of this widget. src: img_bg_light specifies the previously defined background image resource img_bg_light. width: 480 and height: 480 match the screen resolution to ensure full-screen display. antialias: true enables anti-aliasing to smooth the image edges and avoid jagged artifacts.
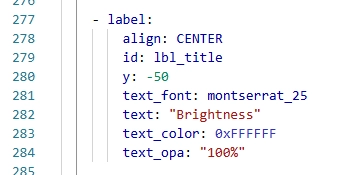
Title label widget: The label type widget is used to display the title “Brightness”. It is also set to align: CENTER. y: -50 means it is vertically offset upward by 50 pixels relative to the screen center to avoid overlapping with the core control below. text_font: montserrat_25 specifies the 25-point Montserrat font. text: "Brightness" is the displayed content. text_color: 0xFFFFFF sets it to white (hexadecimal color code corresponding to full RGB white). text_opa: "100%" means the text is fully opaque, ensuring the title is clearly visible.

Brightness arc progress bar widget: This is the core interactive widget of the interface (arc type). id: arc_brightness is its identifier (the encoder updates progress through this ID when adjusting brightness). It is centered with align: CENTER and aligned to the vertical midpoint with y: 0. width: 360 and height: 360 define the arc size, smaller than the screen to leave margins. rotation: 0 means no additional rotation. start_angle: 135 and end_angle: 45 are key angle configurations. In LVGL, arc angles use the right horizontal direction as 0° and increase clockwise. 135° corresponds to the lower-left area, and 45° corresponds to the lower-right area. Together they form a 270° semi-ring covering the lower central area of the screen, matching visual habits. min_value: 0 and max_value: 100 match the brightness range (0%–100%), and value: 50 sets the initial brightness to 50%. In the base arc style, arc_color: 0x1A1A1A is the gray background color (unfilled portion), arc_width: 12 sets the arc thickness, and arc_rounded: true makes both ends rounded for better aesthetics. The indicator represents the filled brightness progress, with arc_color: 0x00D2FF set to bright blue. The width and rounded style match the base arc for visual consistency. The knob is the small circle at the end of the arc, with bg_color: 0xFFFFFF set to white, bg_opa: "100%" fully opaque, and width: 15, height: 15, radius: 7 forming a near-circular knob to clearly mark the current brightness position.


Brightness percentage label widget: Another label widget is used to display percentage values such as “50%”. It is centered with align: CENTER and aligned with y: 0 to overlap with the center of the arc progress bar, displaying inside the arc. text_font: montserrat_50 uses a larger 50-point font to ensure the value is prominent. text: "50%" is the initial display content. text_color: 0xFFFFFF is white, and text_opa: "100%" is fully opaque, ensuring the value is clearly readable against the arc background. When the encoder adjusts brightness later, the display content will be updated in real time through this widget’s ID.

The overall design logic of the configuration follows “bottom background + middle interactive control + top text prompt”. All widgets are aligned relative to the screen center. Their positions and sizes are adapted to ensure both visual aesthetics and high synchronization between brightness value display (percentage text) and visualization (arc progress bar). Each widget has a unique ID, enabling precise updates to corresponding elements when the encoder adjusts brightness.
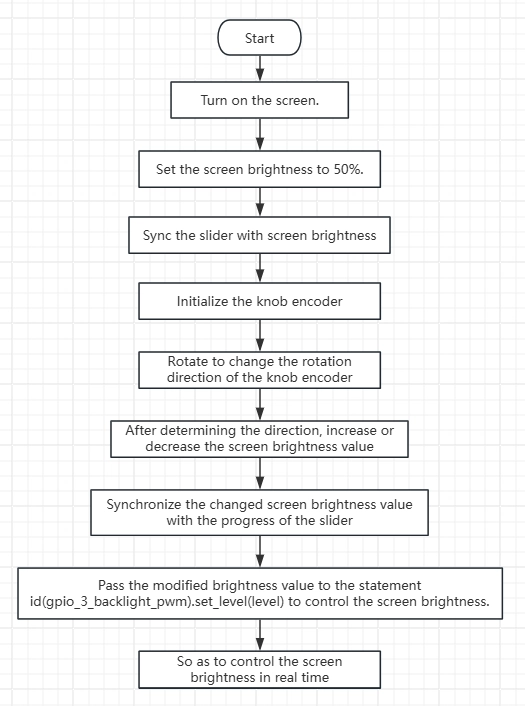
5. Code Logic Flowchart
6. Flashing Steps
Next, we will teach you how to use ESPHome to write code, including the complete operation process. Please follow us step by step.
Here we emphasize again:
The following devices need to be on the same LAN:
① Your computer
② Crowpanel HMI ESP32 Rotary Display
③ Raspberry Pi with the Home Assistant system
Here, the Raspberry Pi with the Home Assistant system acts as the server in our project. Each time you access the IP address of the Raspberry Pi with the Home Assistant system, you are entering Home Assistant.
Only after entering this page can you perform the following operations.
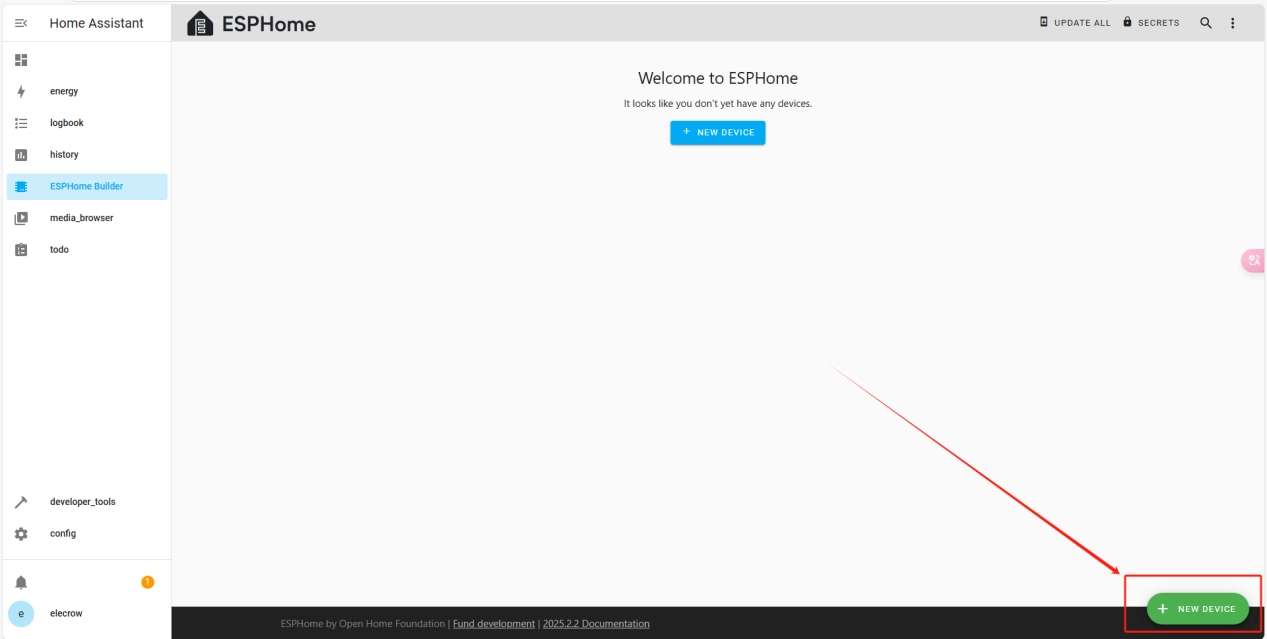
The following operations assume that you have completed the installation steps in Lesson 1 and have arrived at the main ESPHome page.
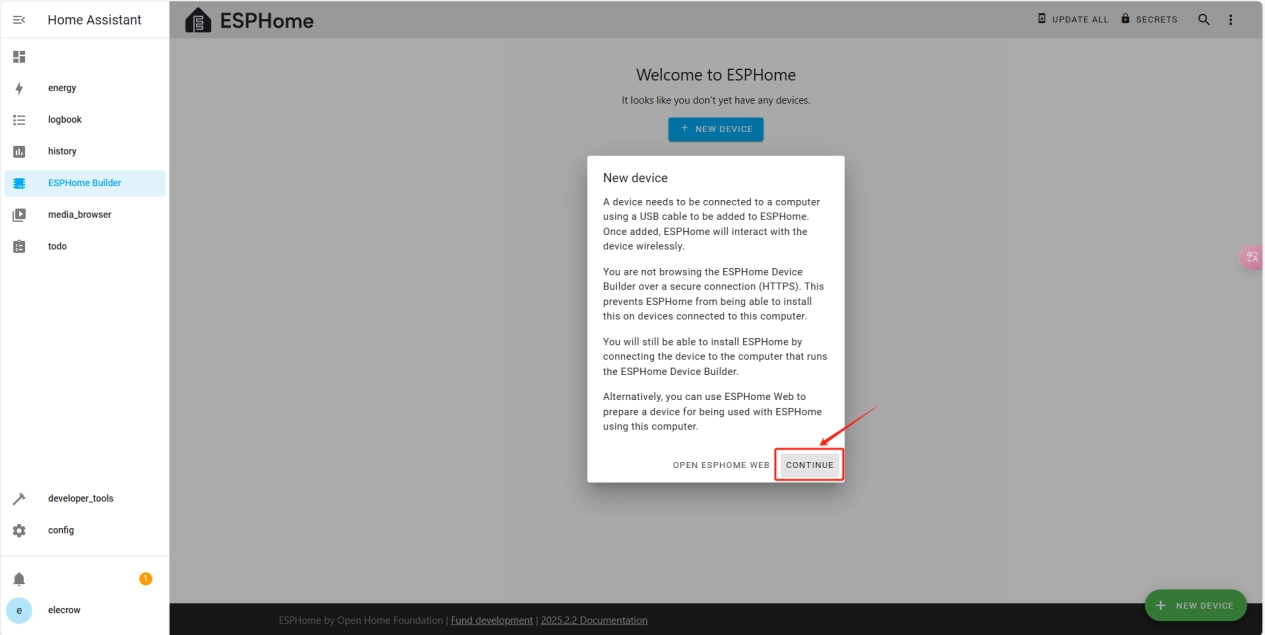
Once the installation is complete, we can start adding devices. Click on + New Device -> Continue.
Click “New Device Setup”.

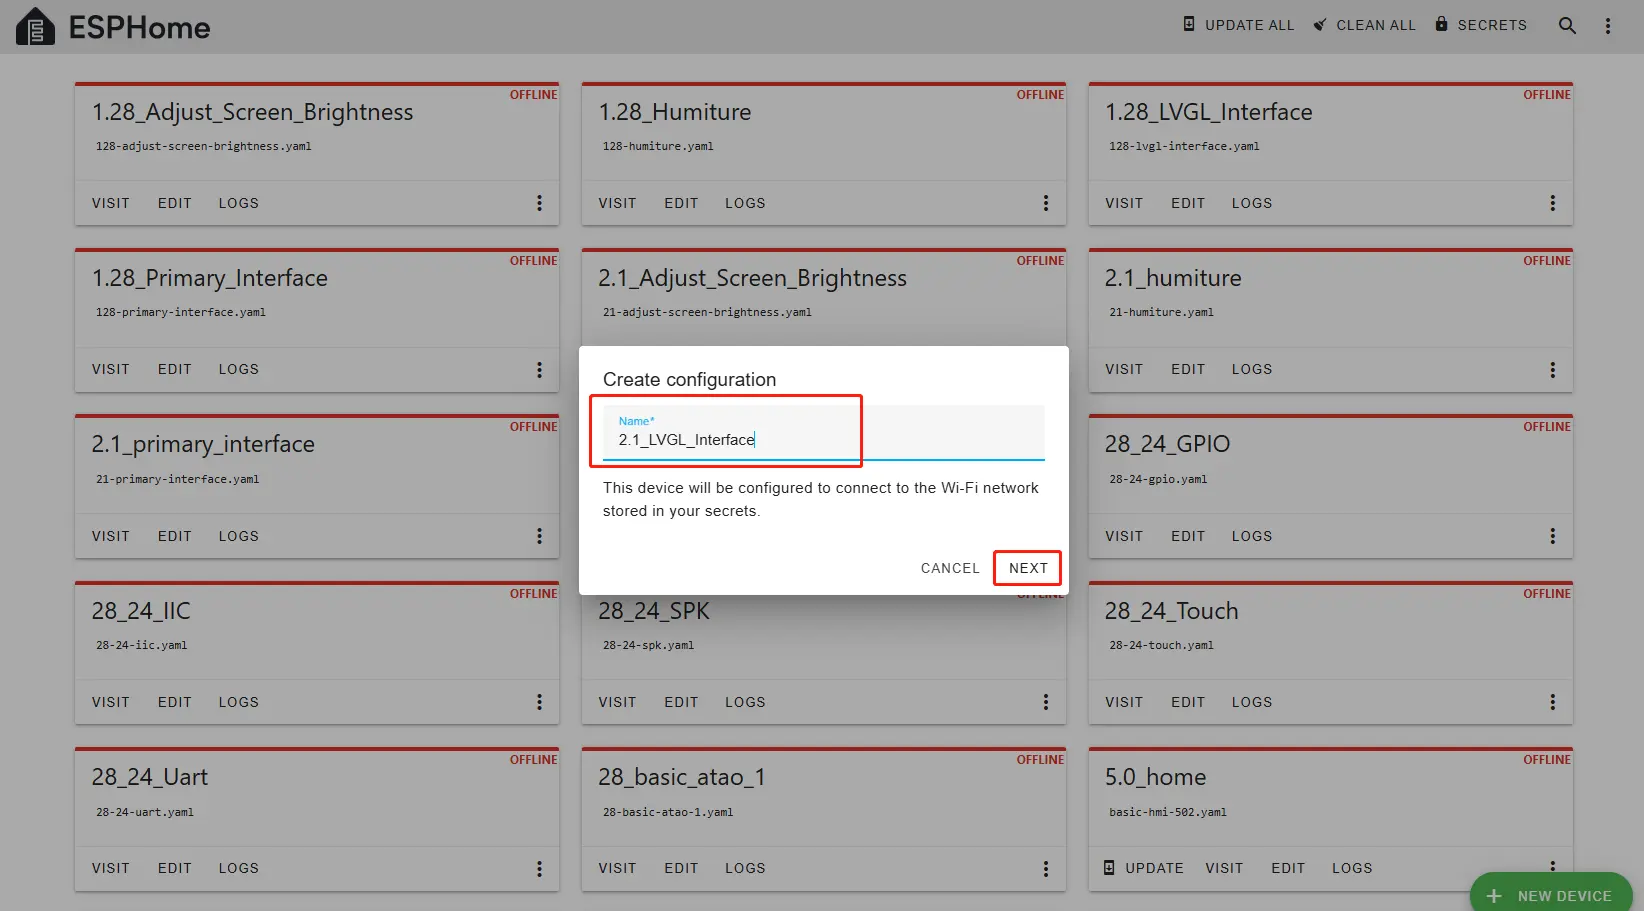
Enter a name and click Next.
(You can use any custom name. Do not include any strange symbols such as @, #, etc.)
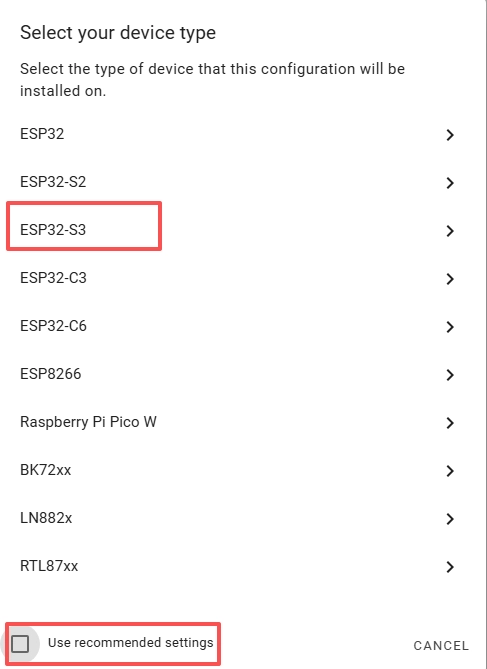
Here, do not check "Use recommended settings."
Select the main chip of the CrowPanel 2.1inch-HMI ESP32 Rotary Display, ESP32-S3.
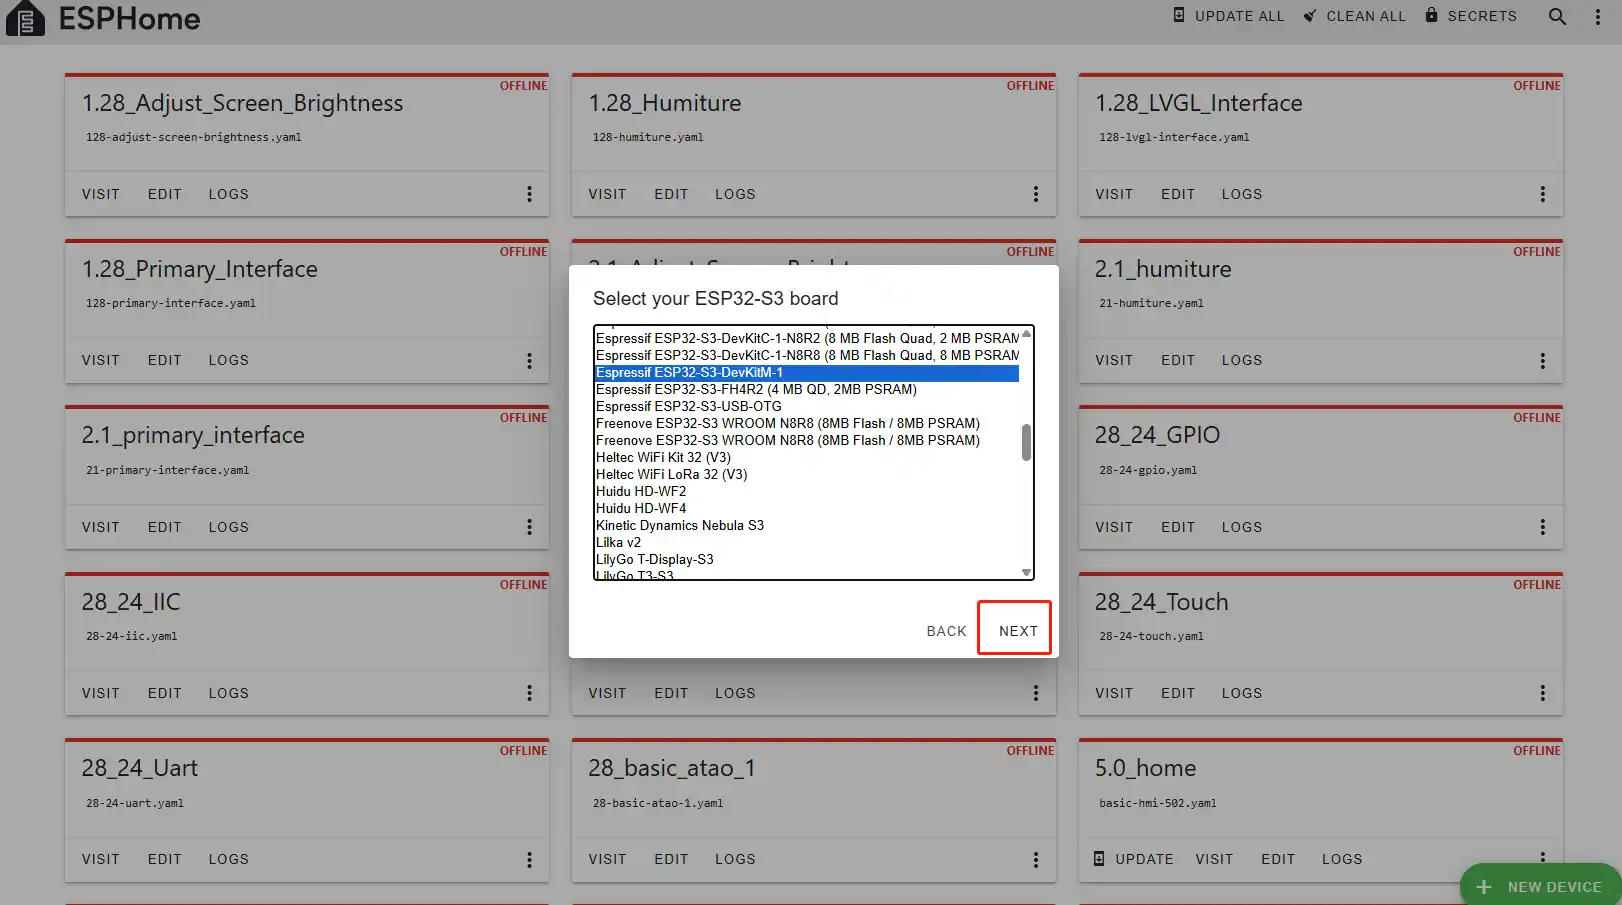
Next, choose any option (since we will replace it in the code later).
Here, click "SKIP".
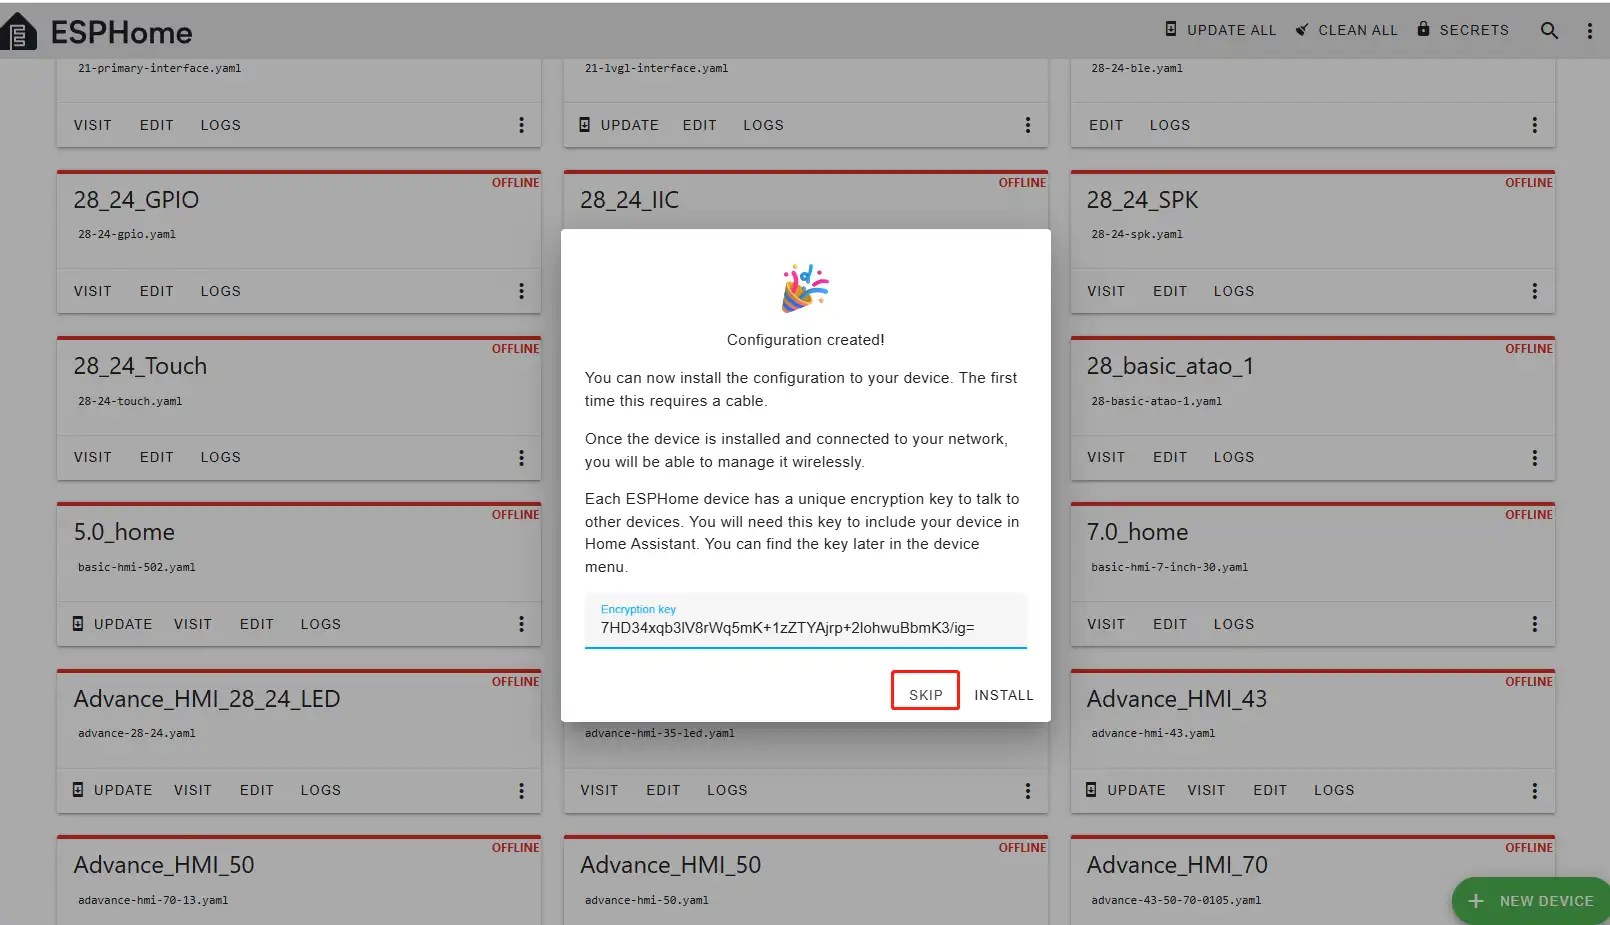
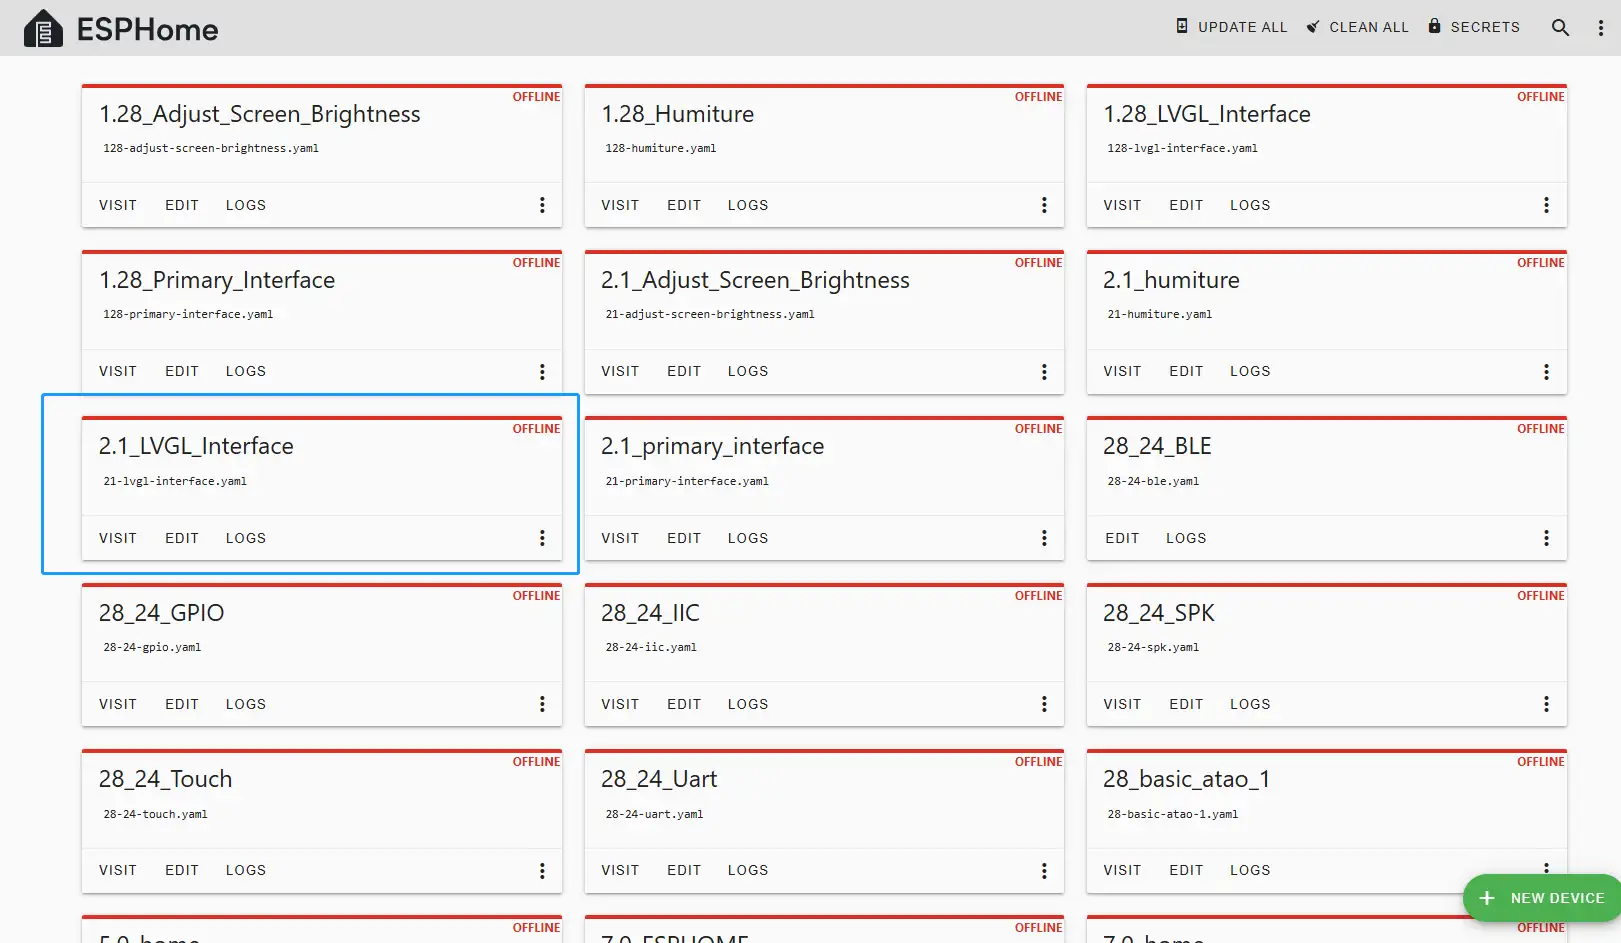
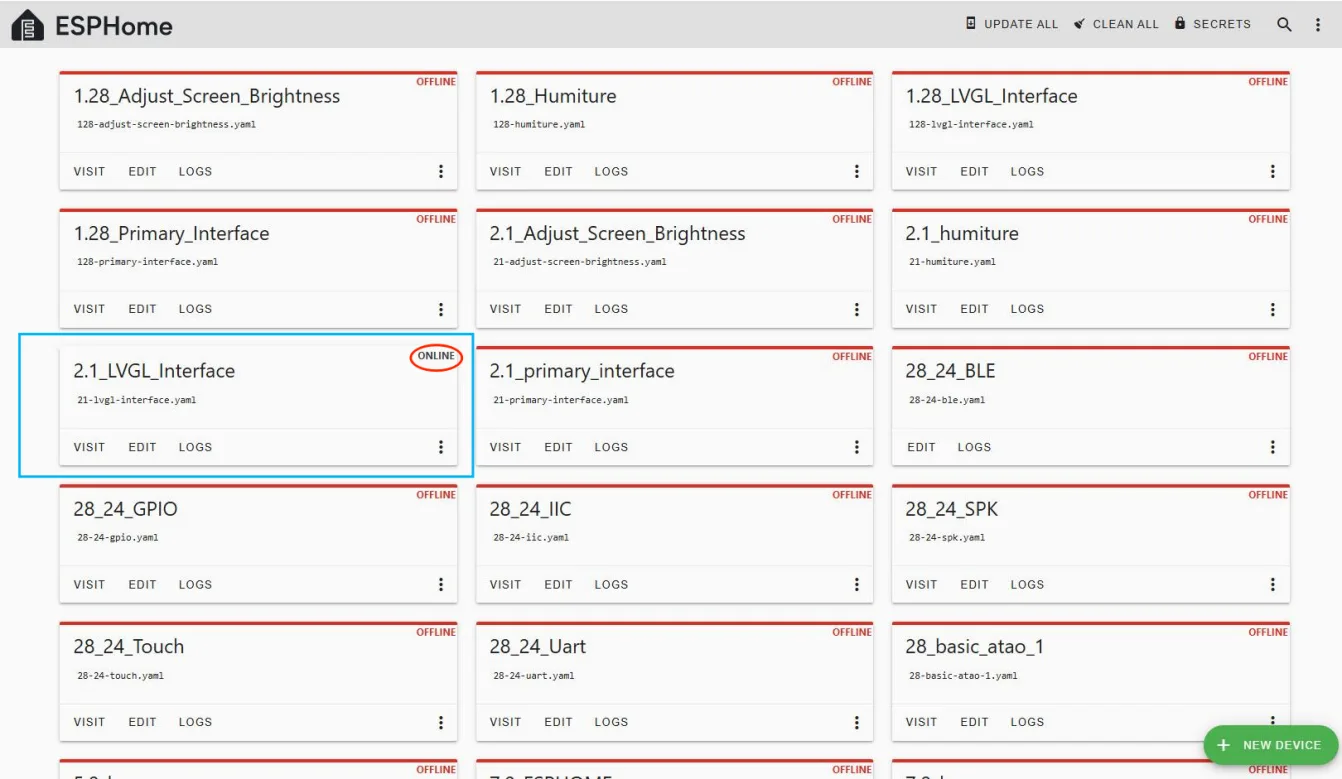
Then return to the main interface, find the 2.1_LVGL_Interface you just created, click "EDIT", and enter the code editor.

This code is automatically generated based on the previous steps. Next, we will replace parts of it to help optimize the code for more efficient operation.
Automatically generated code:
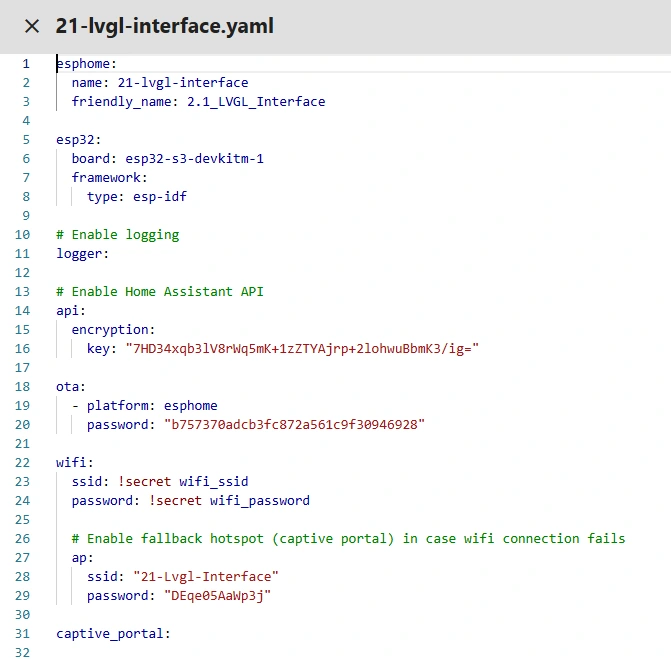
This is the complete code. You can click the code link below to obtain it.
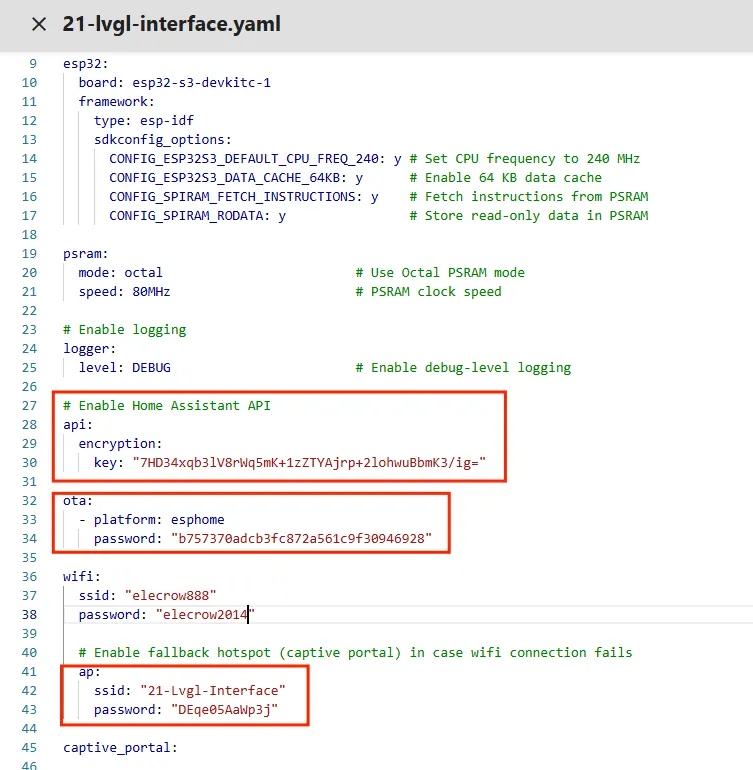
Next, you can replace the relevant content in esphome and ESP32 as needed. And add the item "PSRAM".
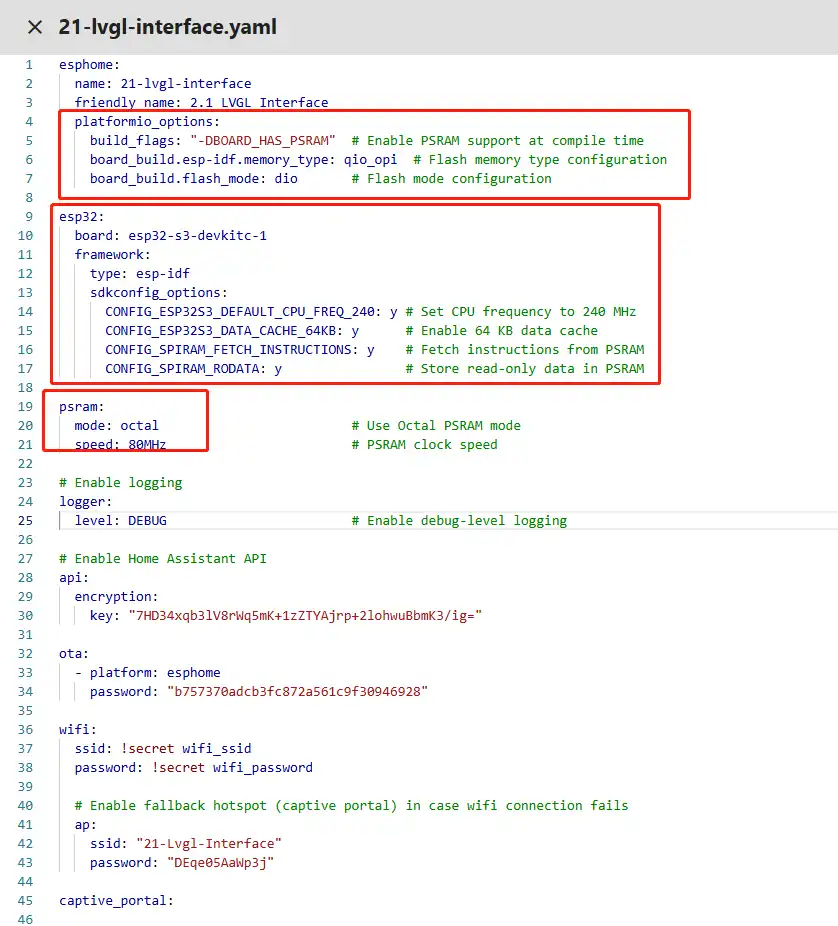
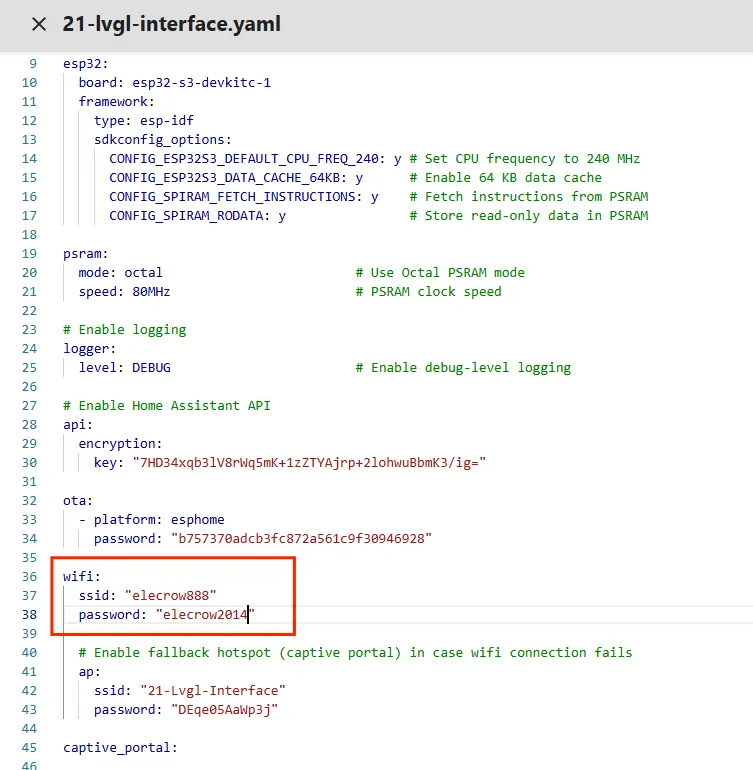
Then, based on your existing code, follow the format shown in the figure to add or replace these codes.
(Other configurations remain unchanged)
Remember to replace your own Wi-Fi name and password.
Note: This Wi-Fi connection must be in the same local network as your computer and Raspberry Pi!
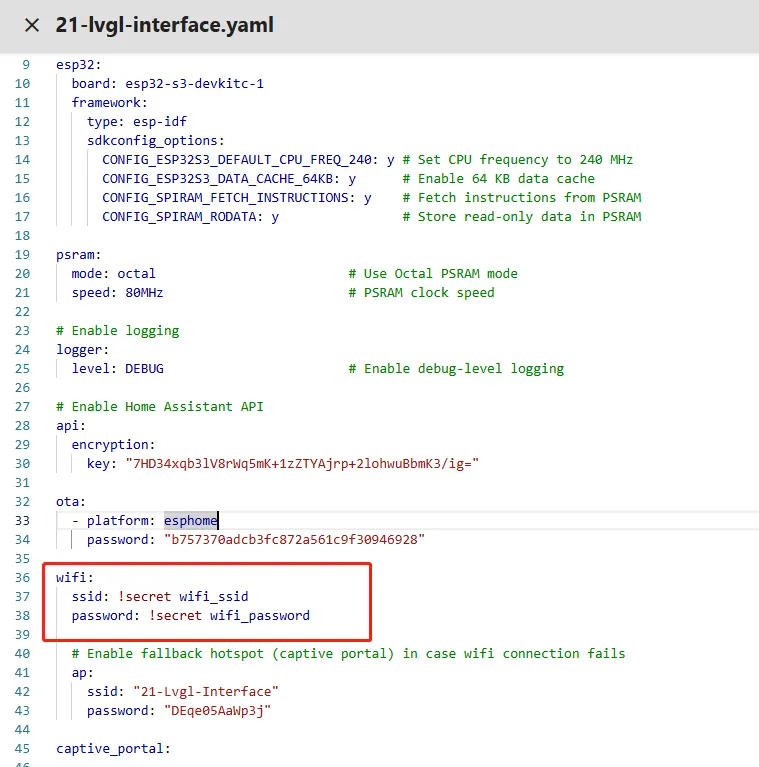
Here, our Wi-Fi account and password are set on the ESPHome main page.
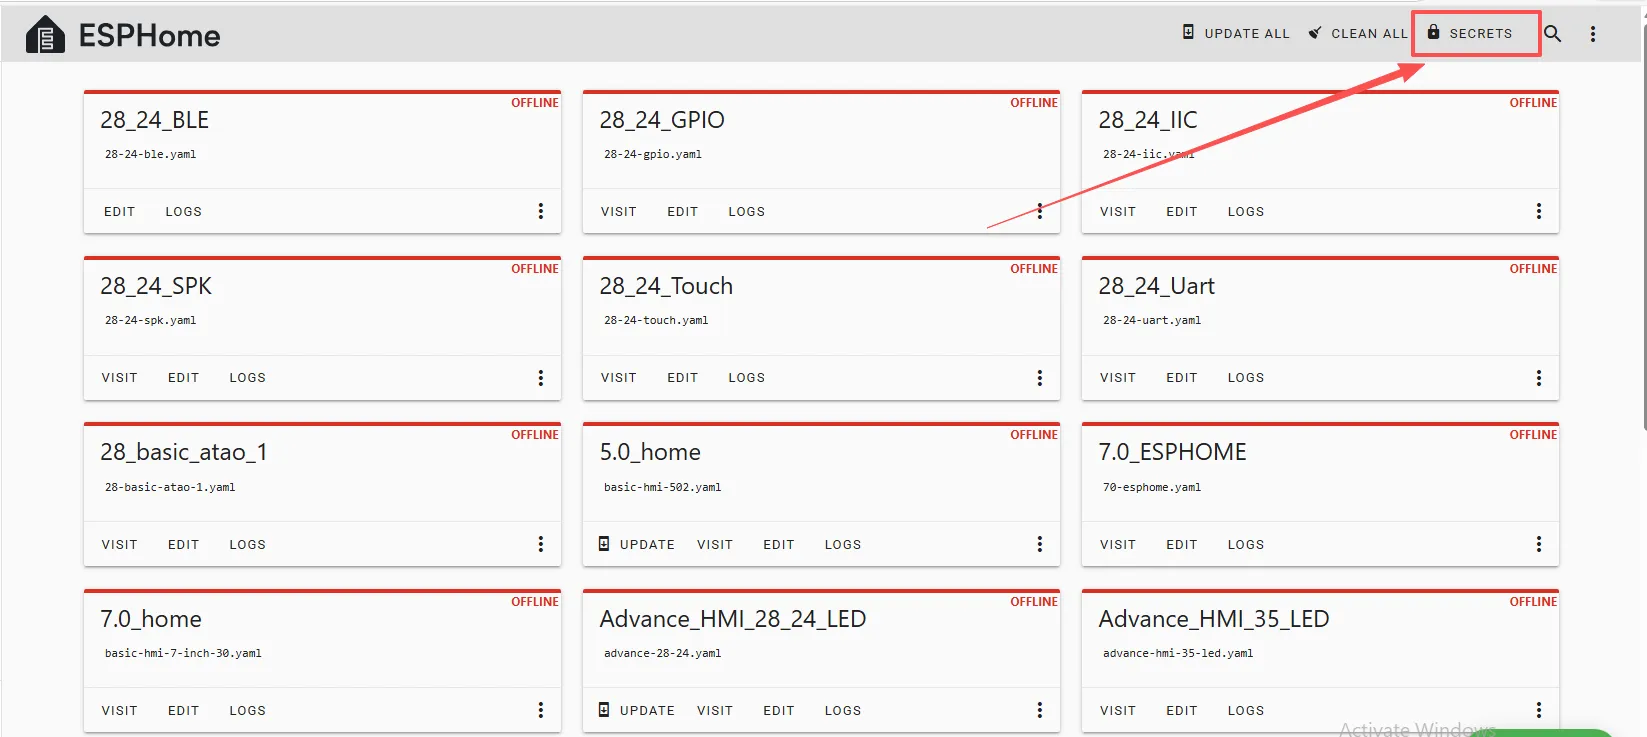
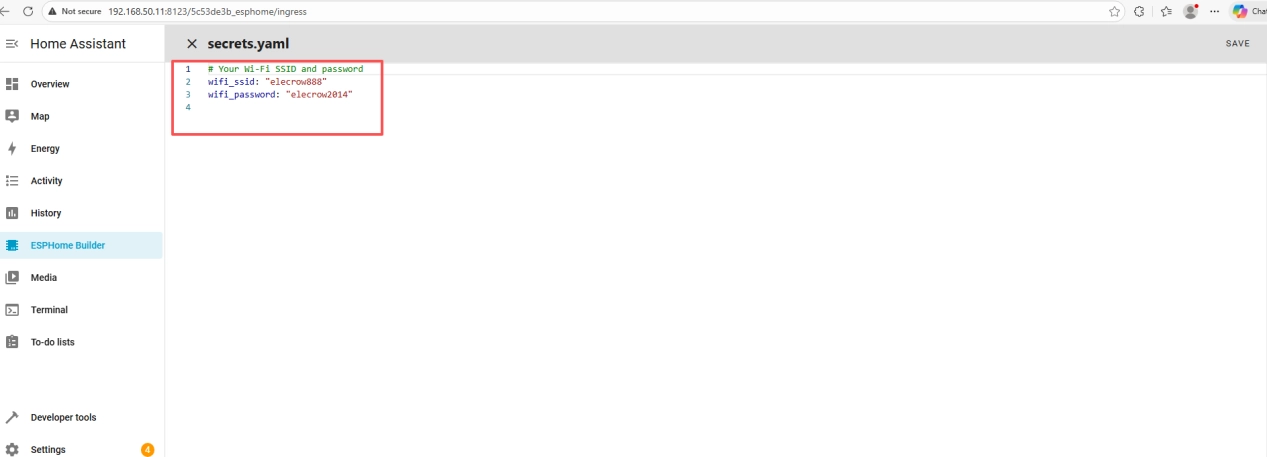
So we can write it like this in the code, meaning we are using the Wi-Fi named "elecrow888".
Of course, you can also directly write your Wi-Fi account and password in detail in the code.
Note: These items are exclusive to the device you created. They cannot be the same as mine. Keep the ones you originally created.
You can copy the other functional code from mine.
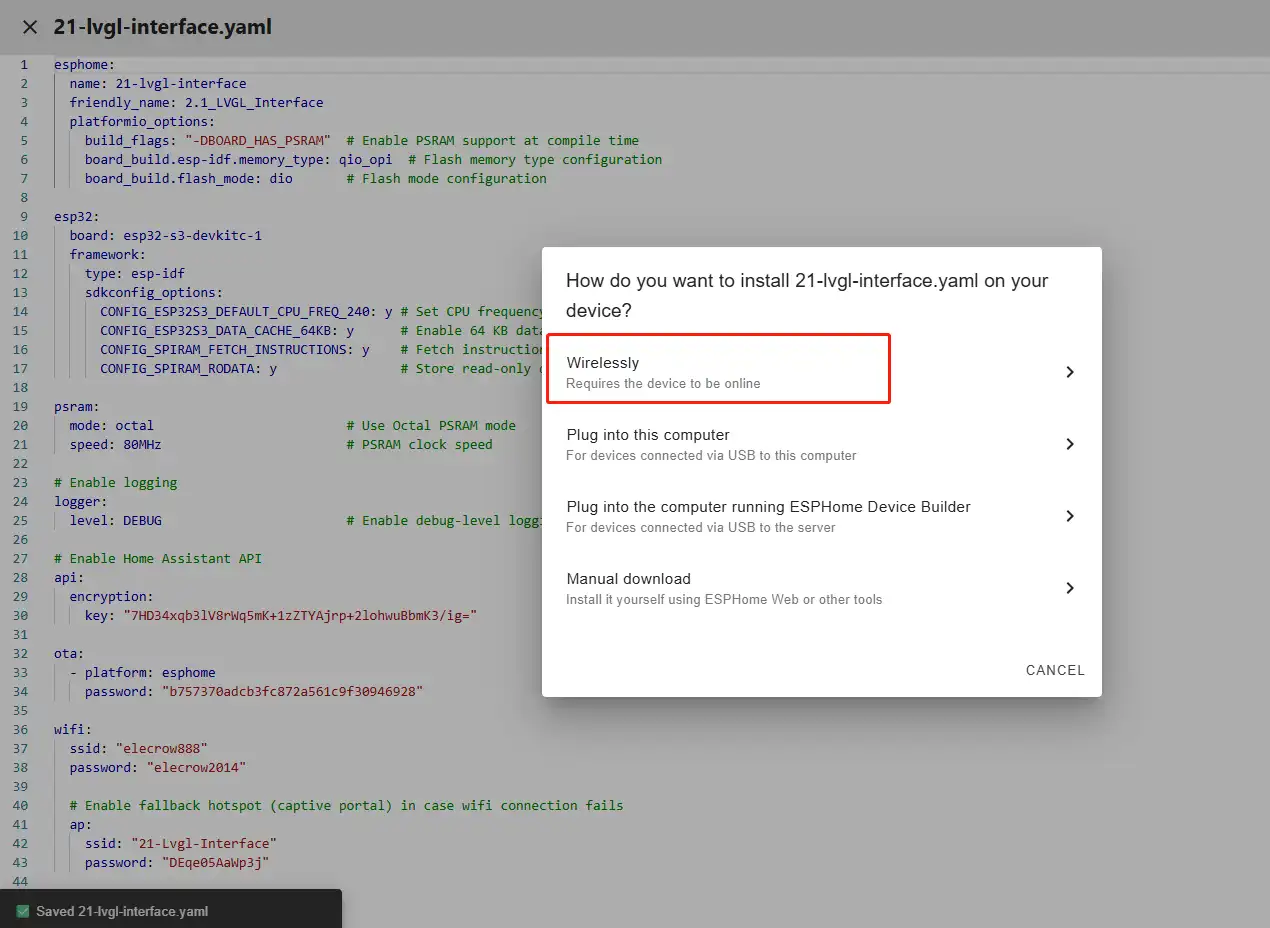
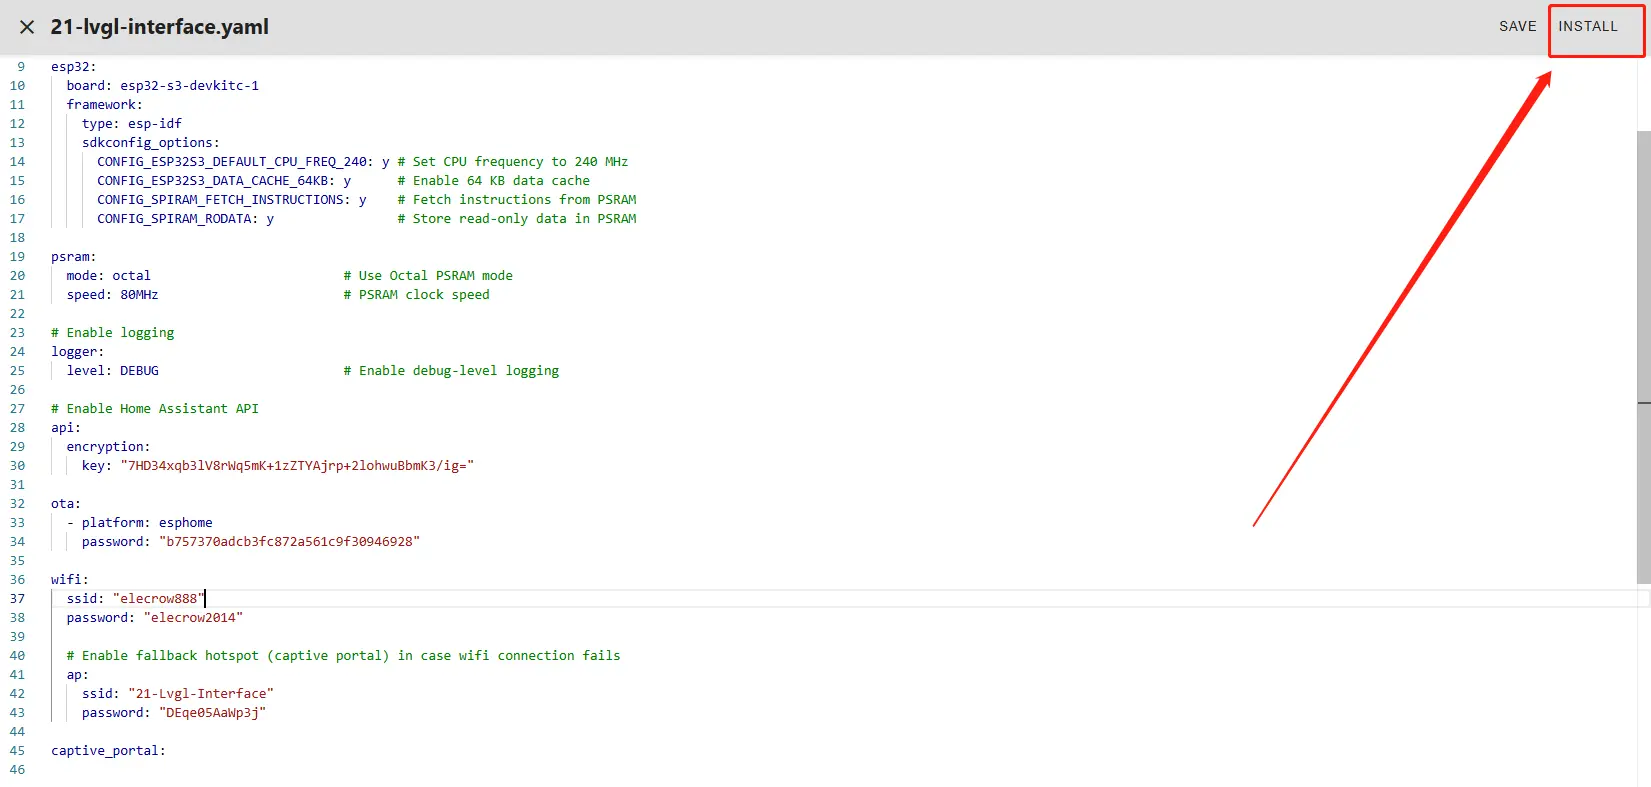
Once the code replacement is complete, click "INSTALL" in the top right corner.
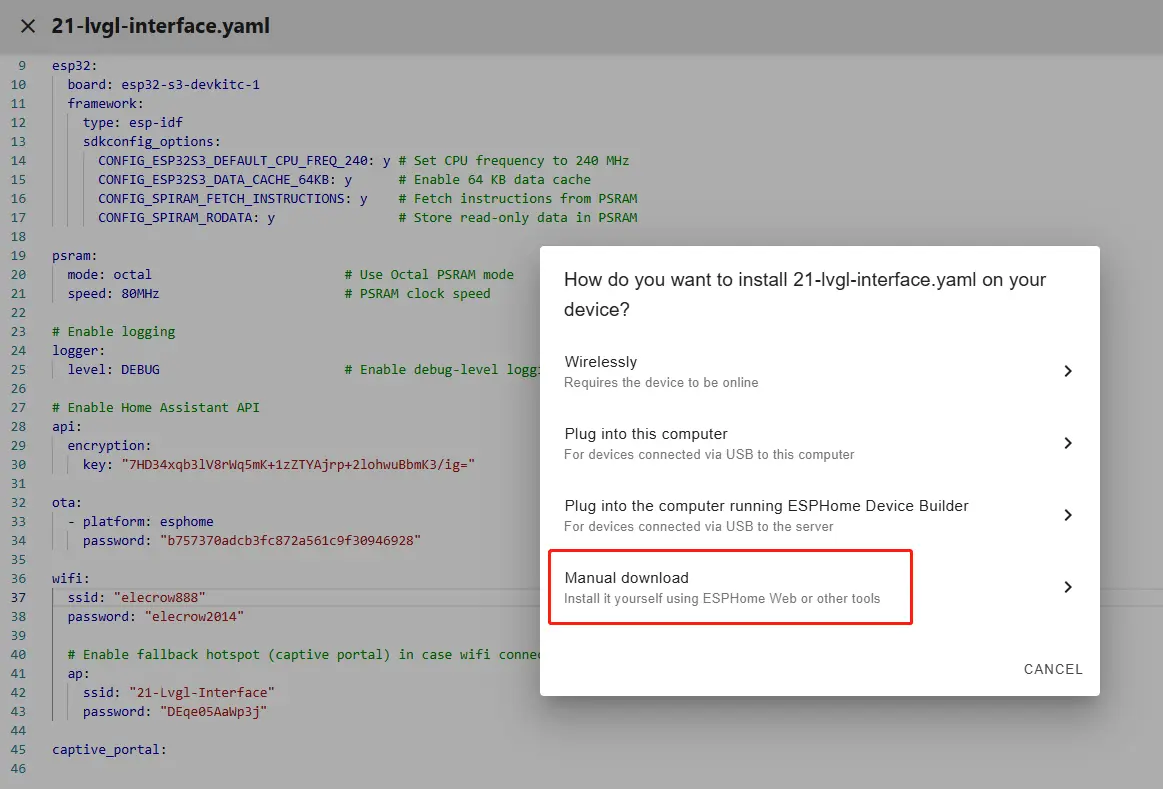
Select "Manual download".
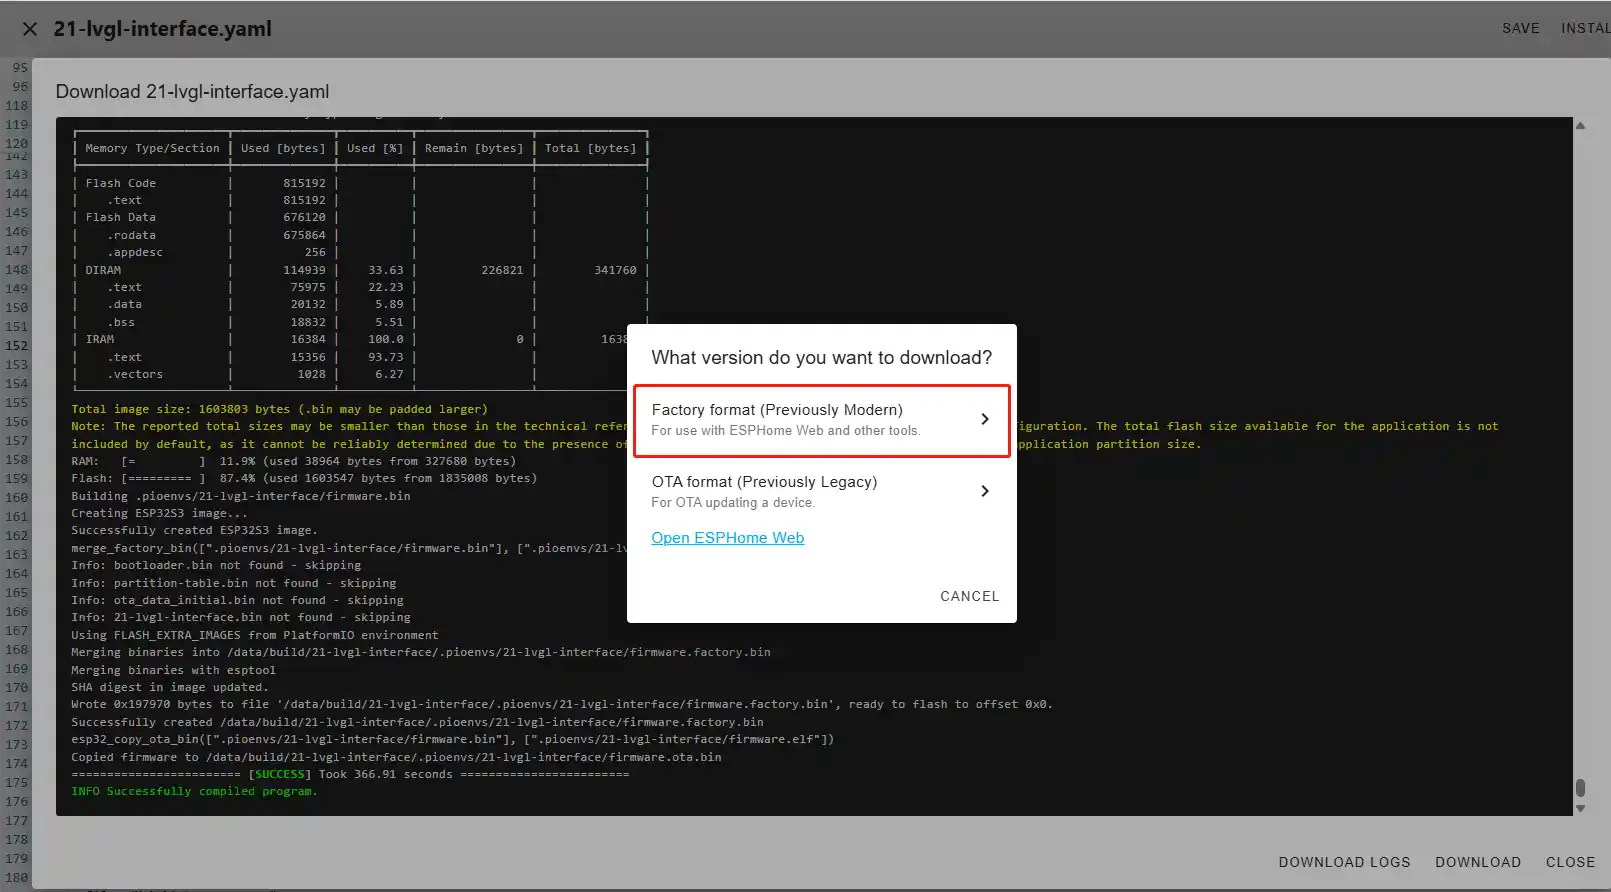
Wait for a few minutes until the installation is complete.
Then select "Factory format".
Once the download is complete, you will see the .bin file.
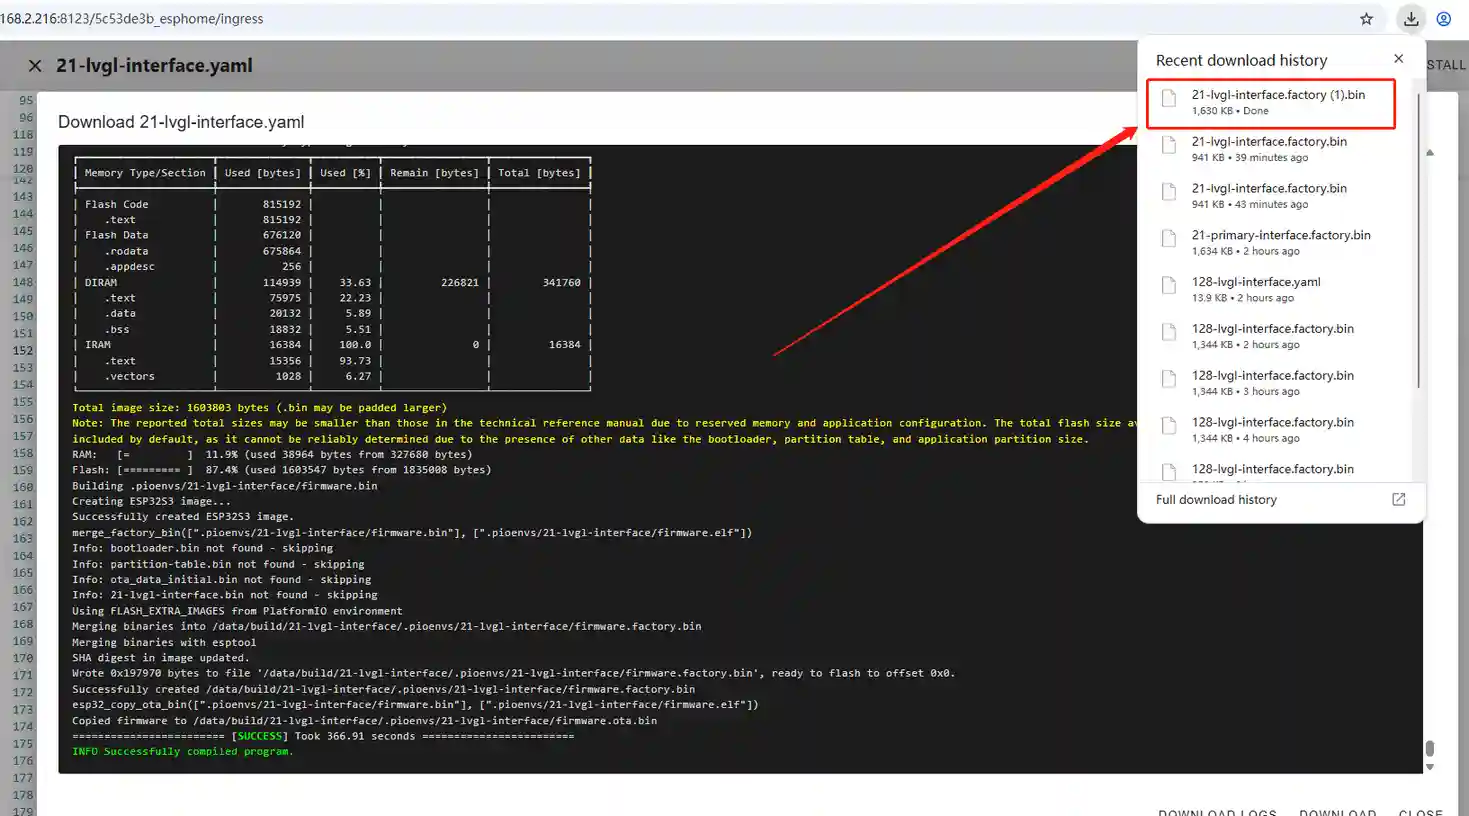
Remember the path of this .bin file.
Open the following website: https://web.esphome.io/?dashboard_wizard
After opening this website, you will arrive at this interface:
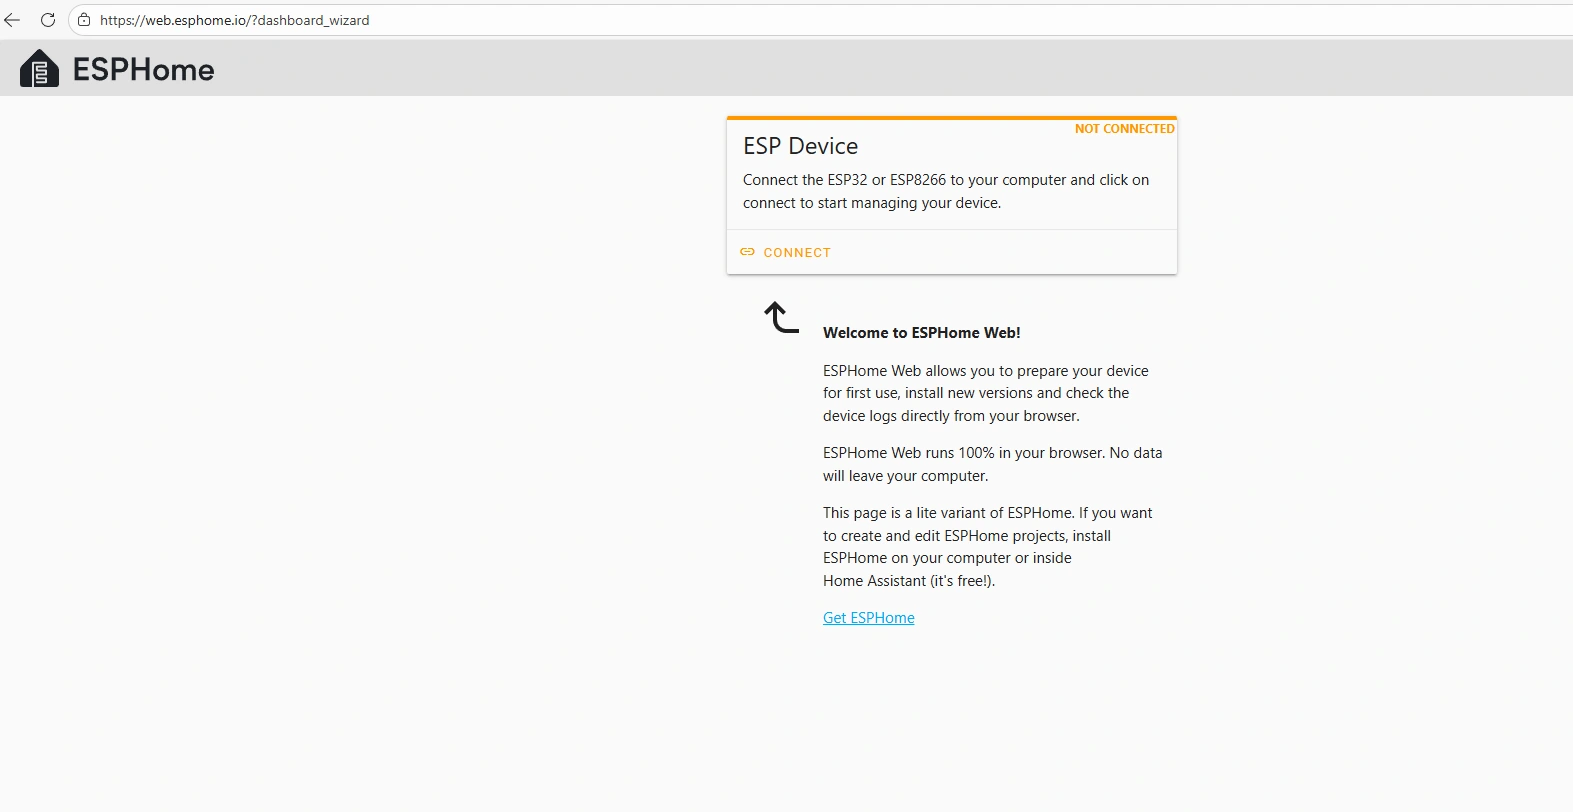
Next, we will flash this .bin file into the CrowPanel 2.1inch-HMI ESP32 Rotary Display.
Connect the CrowPanel 2.1inch-HMI ESP32 Rotary Display to your computer.
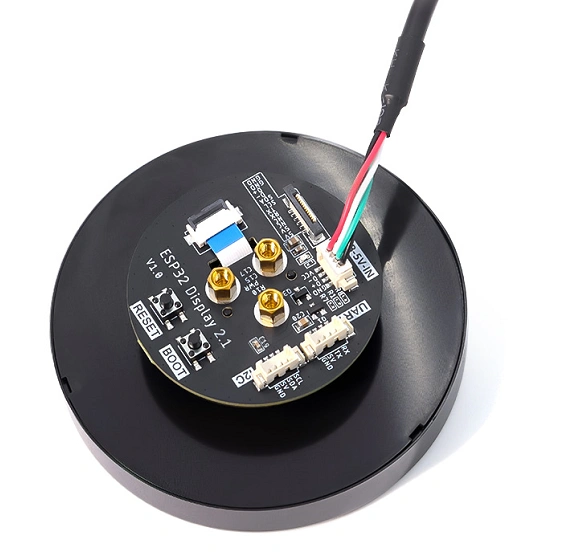
Click "Connect".

Select the COM port and connect it.

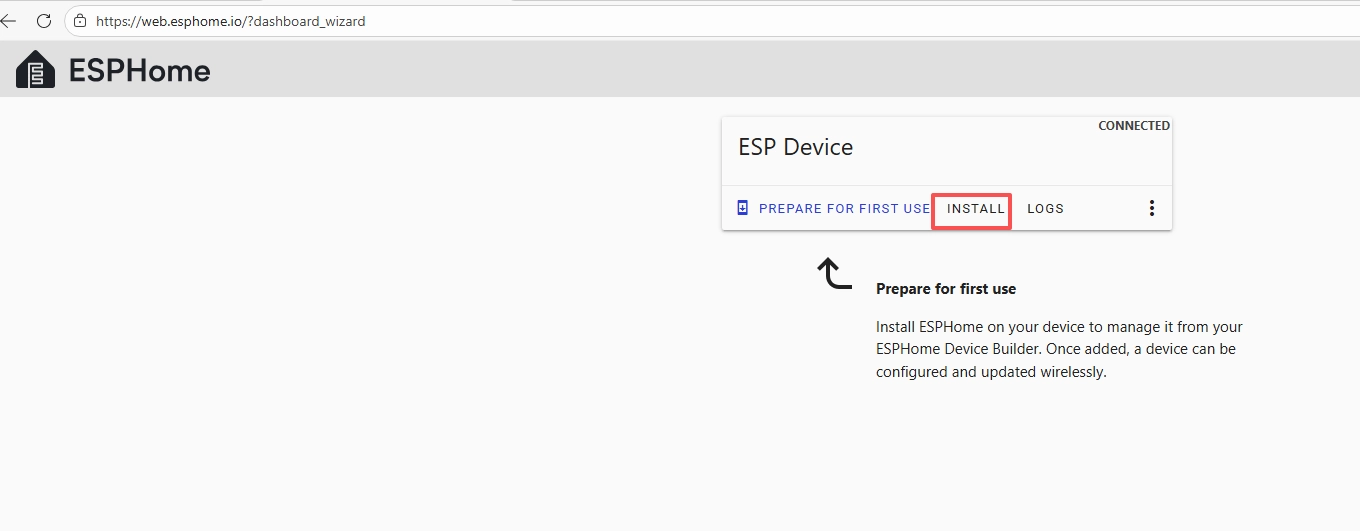
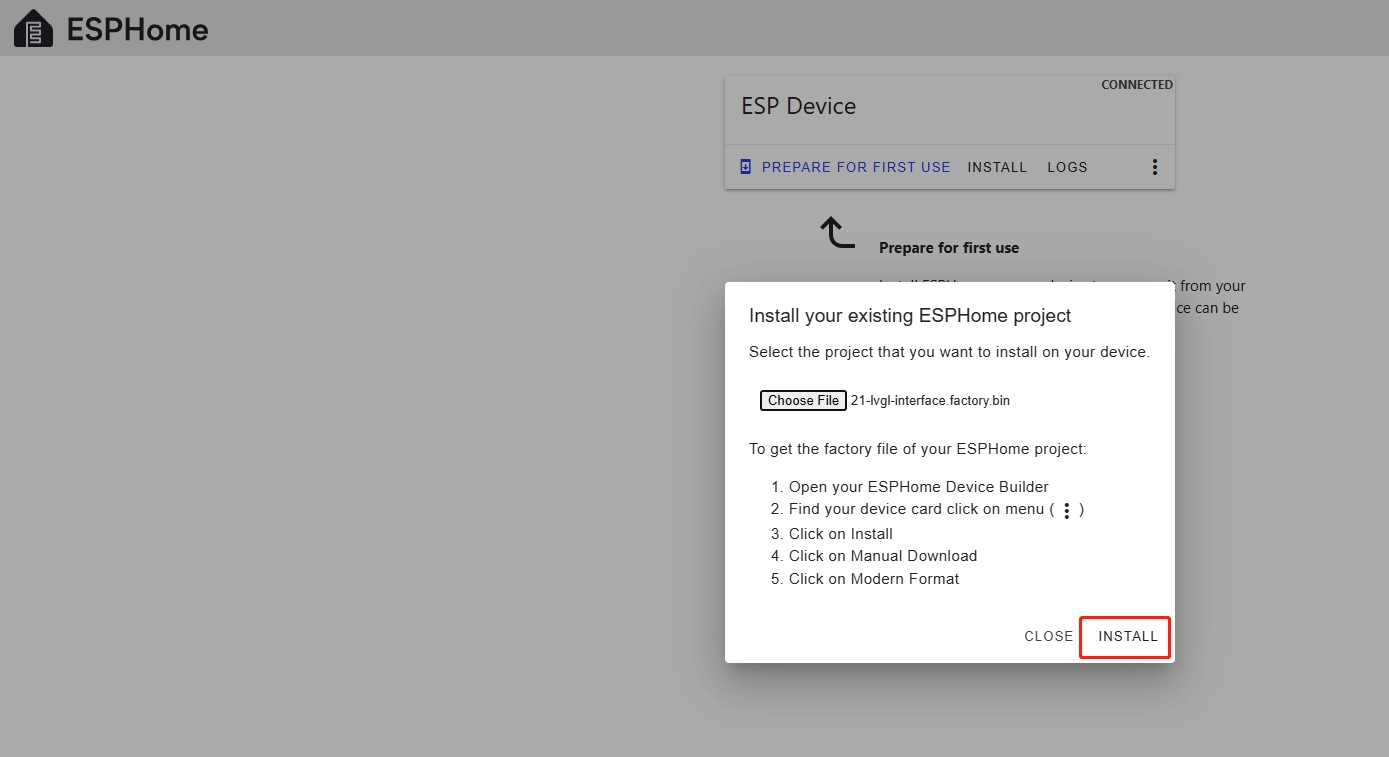
After connecting the CrowPanel 2.1inch-HMI ESP32 Rotary Display, click "Install".
Add the .bin file you just downloaded, then click "Install".
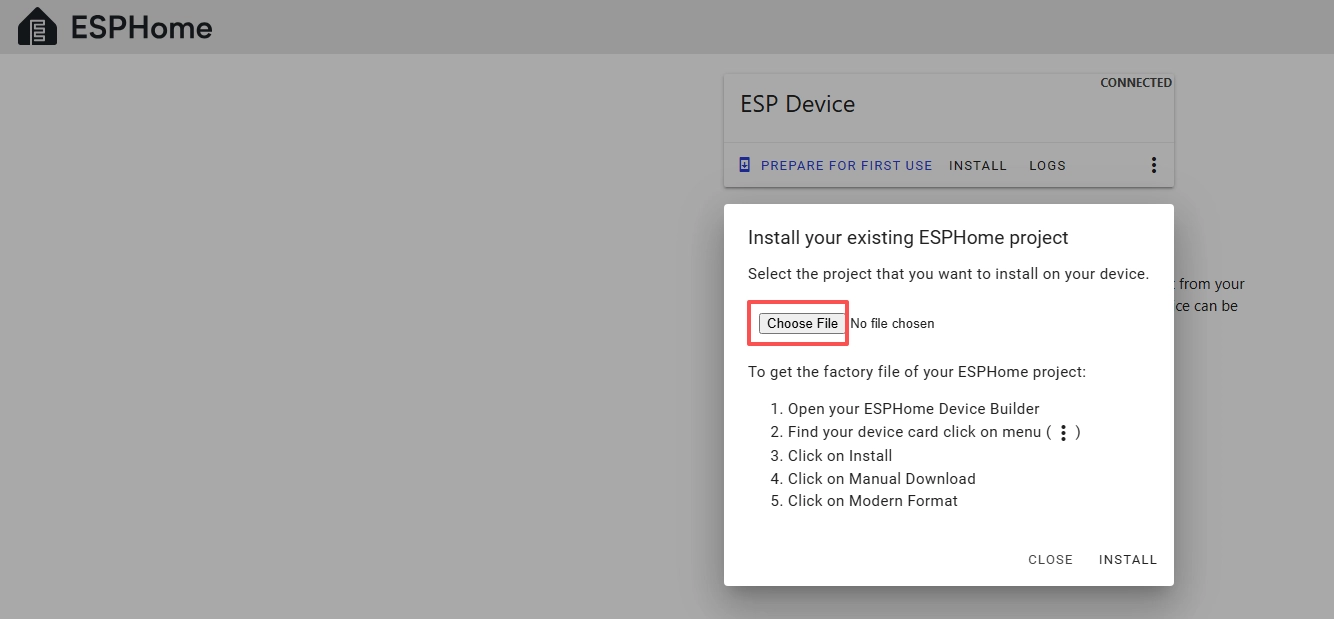
Then select the .bin file that you just downloaded.
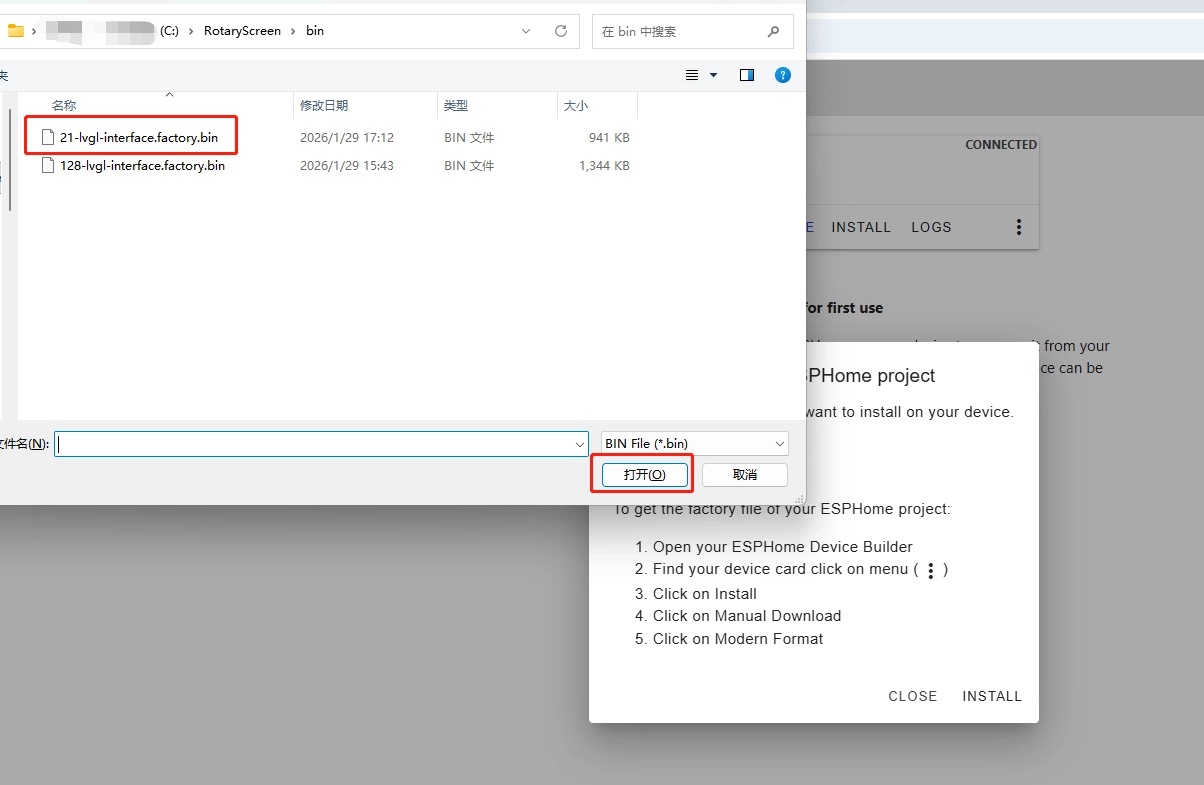
Click "INSTALL".
Wait for a few minutes.

After the installation is complete, click "Close".

After successfully flashing the .bin file, return to the ESPHome page in Home Assistant.
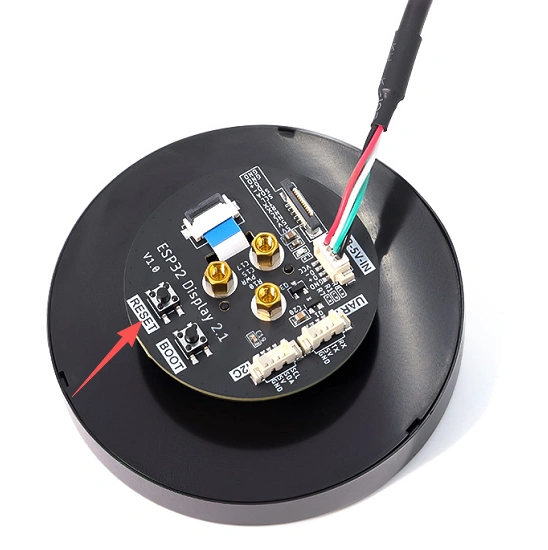
Press the RESET button on the CrowPanel 2.1inch-HMI ESP32 Rotary Display.
Restart the ESP32 display, and you should see the device you created earlier show as ONLINE in the top right corner.
If you have also added the functional code we provided, you will see the current screen brightness value displayed on the screen. You can try rotating the knob, and the brightness value will be displayed in real time, while the slider on the screen will also change in real time as you rotate it.
(Rotate clockwise to increase screen brightness, rotate counterclockwise to decrease screen brightness)

After it shows ONLINE here, if you make any modifications to the code later and want to upload the code again, you can use the Wireless upload method, which will be much more convenient.