CrowPanel ESP32 E-Paper 4.2-inch Arduino Tutorial
Overall
This tutorial will demonstrate how to use ESP32 E-Paper Display as a price tags and update price images through WiFi and Bluetooth. And how to obtain weather information and display it on ESP32 E-paper display. In addition, there are simple examples to illustrate how to use the various interfaces on the board.
Get Started with Arduino IDE
Please click the card below to learn how to install Arduino IDE, and install ESP32 board in the Arduino IDE.
Please install the ESP32 version as 2.0.14.

Demo 1 Update Pictures Wireless
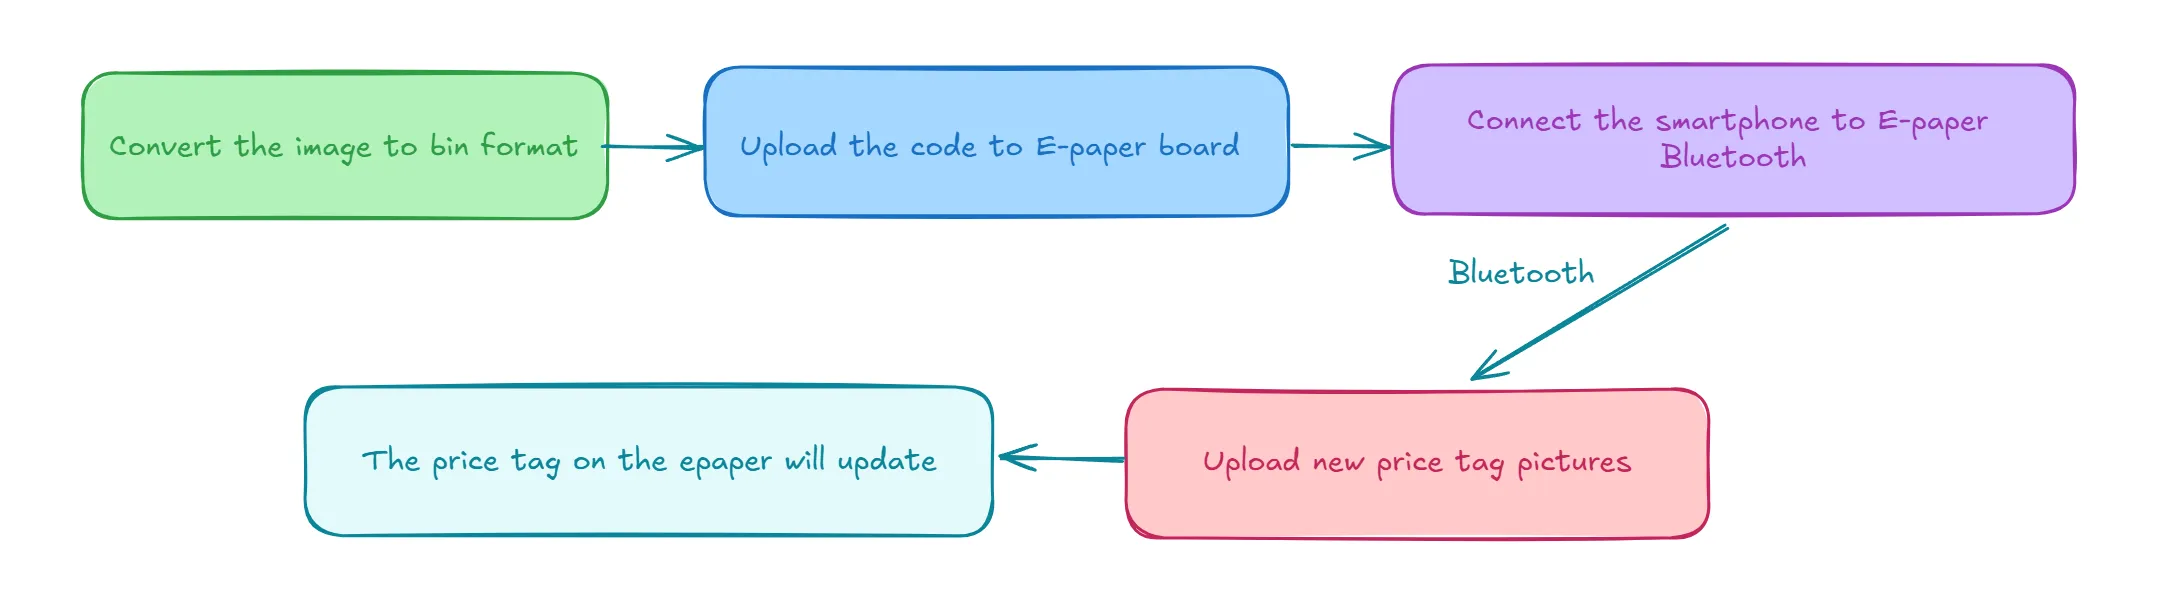
This demo will introduce how to wireless update a single price tag through WiFi and Bluetooth.
Update via WiFi
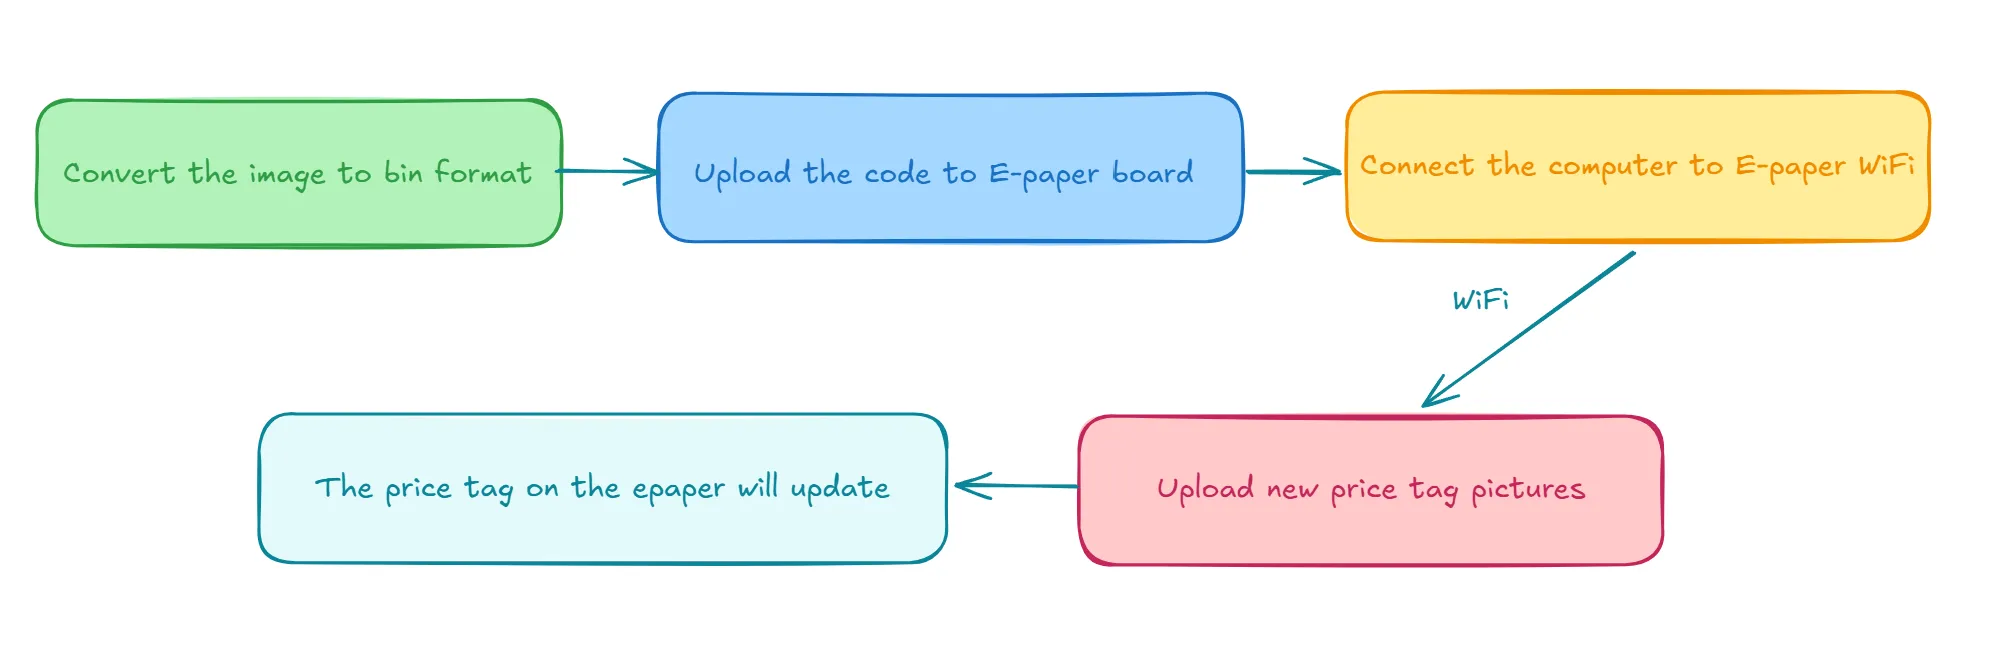
Convert the image format
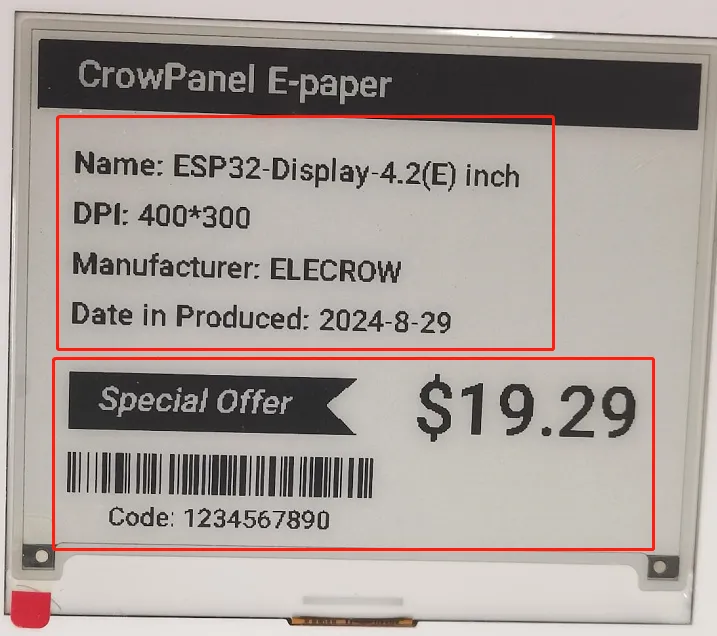
First, let's take a look at the price tag we design in this example, which is divided into three parts(all are images). The top bar is a fixed. The description and the price is variable. The parts we need to update are the description and price.
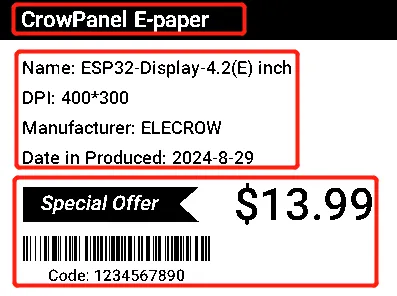
For the fixed top bar, we can convert it to C array and put them in the code.
For the variable description and price, we need to convert them to bin file and upload them to the board through WiFi.
-
 the price tag pictures.
- the image modulo tool Image2Lcd and open it.
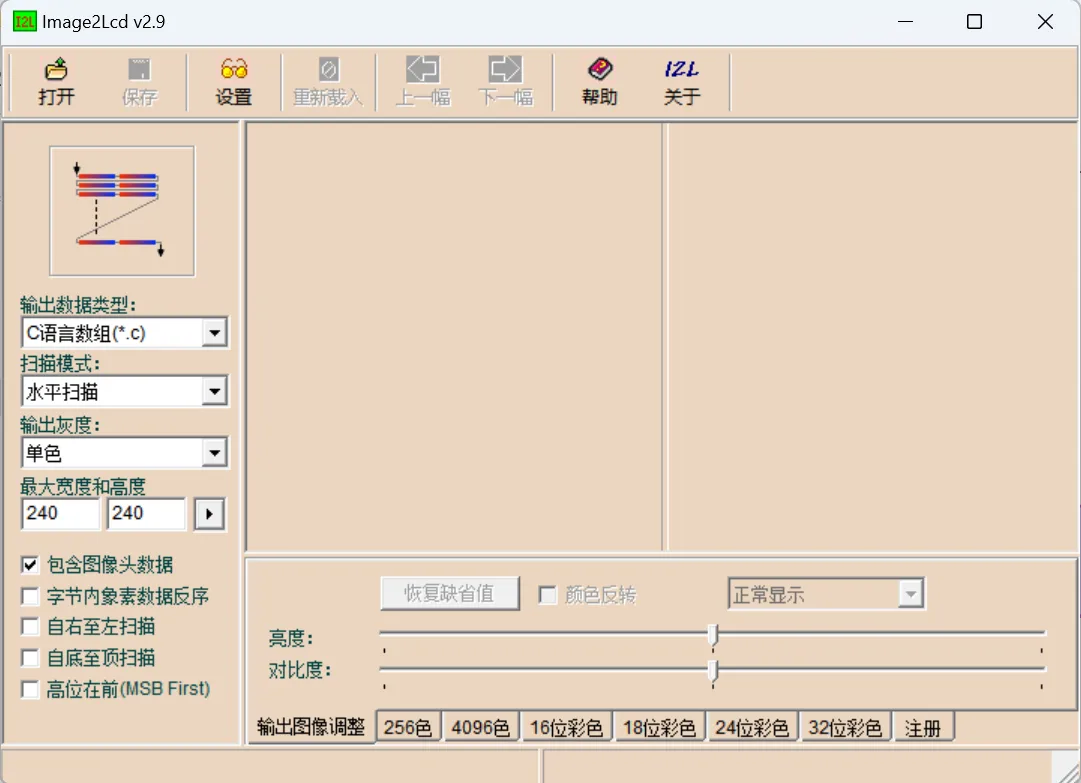
-
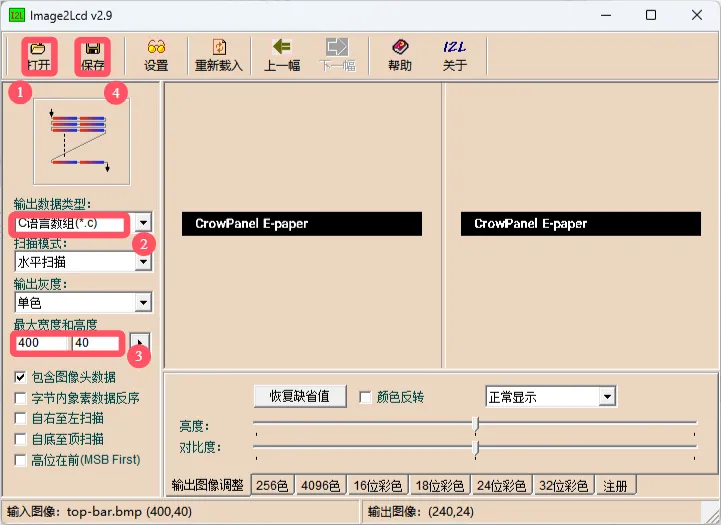
Click open and select top-bar.bmp, convert it to array format.
- Open file
- Output date type: C language array by default
- The biggest width and height: Consistent with the width and height of the image. Note that it must be a multiple of 8, otherwise it cannot be displayed properly. After setting the width and height, click the arrow next to it to confirm.
- One of the notes in the picture is that you should uncheck the "Include Image Header Data" option below the maximum width and height.
- Save the file
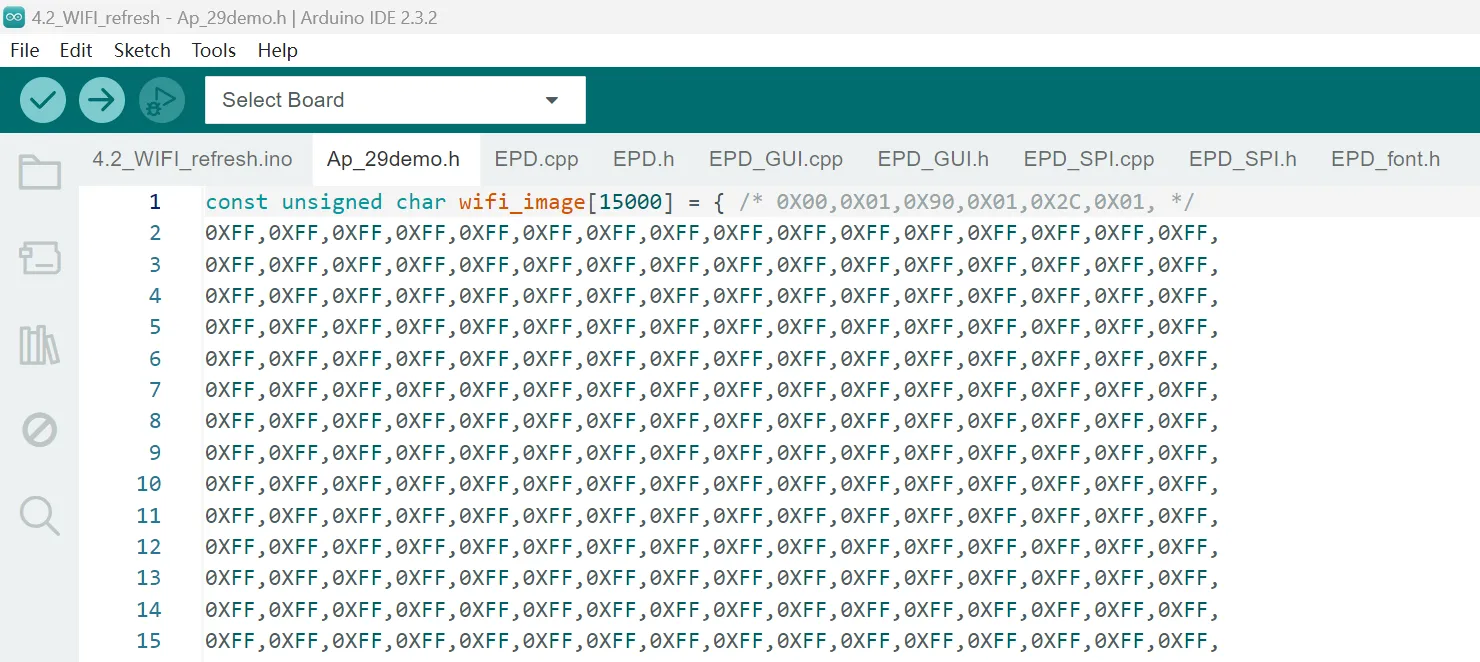
You can put this array in a suitable header file, and I have placed it in Ap_29demo. h here.
-
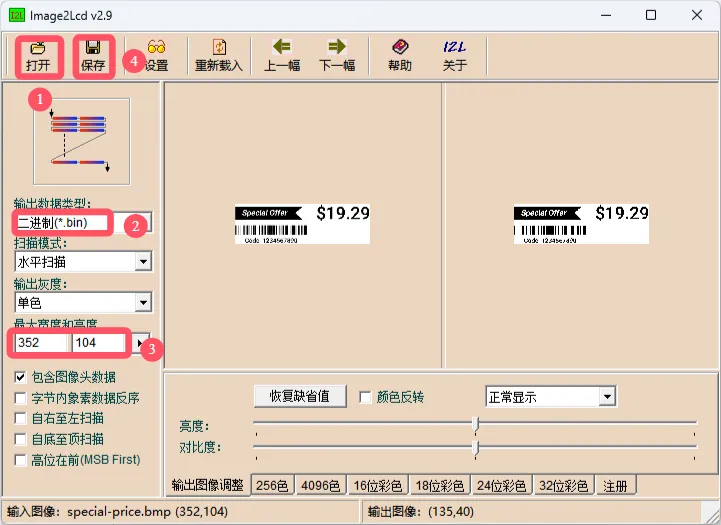
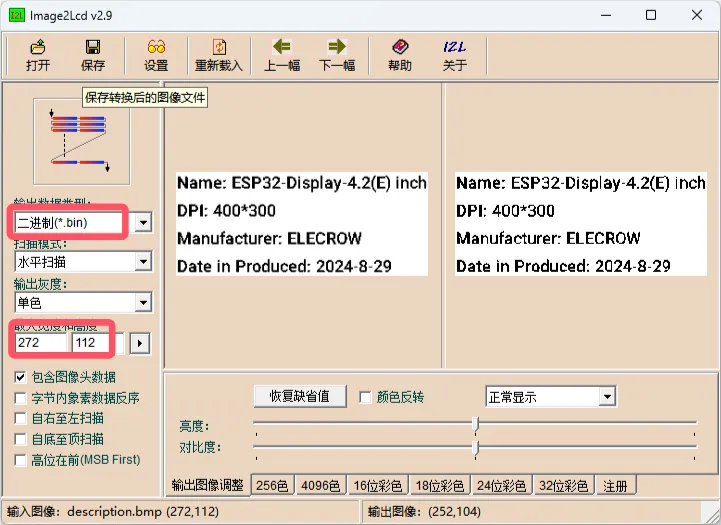
Convert the description pictures and price tag pictures to bin files. These bin files will be used to update prices over WiFi.
- Open the file
- The output type select .bin file
- The width and height should consistent with the width and height of the image. Note that it must be a multiple of 8, otherwise it cannot be displayed properly. After setting the width and height, click the arrow next to it to confirm.
- One of the notes in the picture is that you should uncheck the "Include Image Header Data" option below the maximum width and height.
- Save the file
Code Explanation
Click on the link below to download the WIFI_refresh code folder.
Code link:
Function Overview
Connect the ESP32 to an electronic ink screen, activate an unpassworded WiFi hotspot, set up a web upload service. Users can upload black-and-white image bin files of specified size through the browser.
The ESP32 automatically identifies the file size and determines whether it is a text image or a price image. It then saves it to the flash memory and displays it at a fixed position on the electronic paper screen in real time. Once the display is completed, the screen enters power-saving sleep mode, and the image remains intact even after power loss.
Add necessary libraries
#include <Arduino.h>           // Include the Arduino core library
#include "EPD.h"               // Include the EPD library for controlling the electronic ink screen (E-Paper Display)
#include "EPD_GUI.h"           // Include the EPD_GUI library for graphical user interface (GUI) operations
#include "Ap_29demo.h"         // Include the Ap_29demo library, which may be a custom application library
#include <WiFi.h>              // Include the WiFi library for Wi-Fi functionality
#include <WebServer.h>         // Include the WebServer library for creating a web server
#include "FS.h"                // Include the file system library for file operations
#include "SPIFFS.h"            // Include the SPIFFS library for the SPIFFS file system
Define the file variable fsUploadFile Used for accessing files, txt_size and pre_size correspond to the size of the BIN file(Exported in the above steps) for the text label and price label to be transmitted.
The image resolution requirement is smaller than the screen resolution and both width and height are multiples of 8.
Note: The size here can be defined based on the size of the images to be transmitted later, otherwise it will cause image transfer failure. --- Make sure that the file size set in the code is consistent with the actual size of the BIN file you want to transfer.
Image buffer
This line of code defines an unsigned 8-bit integer array named "Image_BW" with a length of 15000 bytes. It is specifically used as a full-screen cache area to store the "complete black-and-white image data" of the electronic paper display. All the images and text to be displayed will first be drawn onto this cache area, and then uniformly refreshed onto the screen.
Web service interaction with WiFi
First, create a WebServer instance named "server" that runs on the standard HTTP port 80 as the core object for ESP32 to handle browser requests, file uploads, etc. The WiFi hotspot name AP_SSID is defined as "E_Paper_42_Config" using a const char* type constant, which is used to set the wireless network name that ESP32 broadcasts upon startup, making it easier for user devices to search and connect to. Then, a string variable HTML_UPLOAD is used to store a complete HTML form code. This form submits data using the POST method and supports binary stream file uploads. After submission, it points to the /ok interface. The page only displays a file selection box and an upload button, which is a user-operated file upload interface. Finally, a string variable HTML_OK is defined to represent the response page after successful upload, which only displays a simple "OK" prompt text. This four lines of configuration together establish the foundation for WiFi connection and web page upload interaction between the user and the device.
WebServer server(80);          // Create a web server instance on port 80

const char *AP_SSID = "E_Paper_42_Config"; // Define WiFi hotspot name (SSID)

String HTML_UPLOAD = "<form method=\"post\" action=\"/ok\" enctype=\"multipart/form-data\">\
<input type=\"file\" name=\"msg\">\
<input type=\"submit\" value=\"Upload\">\
</form>";                     // HTML page for uploading a file

String HTML_OK = "<!DOCTYPE html><html><body><h1>OK</h1></body></html>"; // HTML response after upload success
refresh_epd function
refresh_epd() is the core execution function responsible for fully displaying an image on the electronic paper screen. It first performs a hardware reset and driver initialization on the electronic paper screen to ensure it is in a stable state capable of normal operation.
Then, it creates a drawing canvas that matches the screen size and fills the entire canvas with a white background color.
Next, it draws the built-in background bar at a fixed position at the top of the canvas. Based on the two flags flag_txt and flag_pre, it determines whether text images and price images have been uploaded.
If there are corresponding images, it draws the text image and price image at the preset fixed coordinates on the screen. After the drawing is completed, it quickly refreshes the entire canvas content and displays it on the physical electronic paper screen. Finally, it puts the screen into a low-power sleep mode to achieve power saving while maintaining the display of the image.
void refresh_epd()
{
  EPD_RESET();                // Reset the E-paper display hardware
  delay(50);                  // Short delay for stability
  EPD_Init();                 // Initialize the display controller
  delay(50);                  // Wait for initialization

  Paint_NewImage(Image_BW, EPD_W, EPD_H, 0, WHITE); // Create a new canvas
  EPD_Full(WHITE);           // Fill the canvas with white color

  // Draw fixed top background image
  EPD_ShowPicture(0, 0, EPD_W, 40, background_top, WHITE);

  if (flag_txt)              // If text image exists
    EPD_ShowPicture(20, 60, 272, 112, txt_formerly, WHITE); // Draw text image

  if (flag_pre)              // If price image exists
    EPD_ShowPicture(20, 190, 352, 104, price_formerly, WHITE); // Draw price image

  EPD_Display_Fast(Image_BW); // Refresh the display with buffer content

  delay(100);                // Short delay after display update
  EPD_Sleep();               // Put display into low-power sleep mode
}
handle_root and handle_upload
This code contains two web server request handling functions, handle_root() which is responsible for returning a status code of 200 and the pre-defined HTML file upload form page to the browser when the user accesses the device's root path, providing a user interface for uploading images; while handle_upload() is the core function for handling file uploads.
It obtains the server's file upload object and processes the upload process in three stages: at the beginning of the upload, it determines whether it is a text image or a price image based on the total size of the file, and creates corresponding flash files for writing; during the upload process, it continuously writes the received file data in fragments to the flash; after the upload is completed, it closes the file, reads the file content back into the corresponding image buffer, sets the valid flag for the text or price image to 1, then calls the screen refresh function to display the newly uploaded image on the electronic paper, and finally returns the HTML page for successful upload to the browser, while outputting the relevant debugging information through the serial port.
void handle_root()
{
  server.send(200, "text/html", HTML_UPLOAD); // Send upload page to browser
}

// ======================== File upload handler ========================
void handle_upload()
{
  HTTPUpload &upload = server.upload(); // Get upload object from server

  if (upload.status == UPLOAD_FILE_START) // When upload starts
  {
    Serial.println("Upload Start"); // Print debug info

    if (upload.totalSize == txt_size) // Check if it's text image
      filename = "/txt.bin";         // Assign filename for text
    else
      filename = "/pre.bin";         // Otherwise assign price filename

    fsUploadFile = SPIFFS.open(filename, FILE_WRITE); // Open file for writing
  }

  else if (upload.status == UPLOAD_FILE_WRITE) // When receiving a chunk
  {
    fsUploadFile.write(upload.buf, upload.currentSize); // Write chunk to file
  }

  else if (upload.status == UPLOAD_FILE_END) // When upload is finished
  {
    fsUploadFile.close(); // Close file after writing

    Serial.println("Upload End"); // Print debug info
    Serial.printf("File: %s\n", filename.c_str()); // Print file name
    Serial.printf("Size: %d\n", upload.totalSize); // Print file size

    File file = SPIFFS.open(filename, FILE_READ); // Re-open file for reading

    if (upload.totalSize == txt_size) // If text image
    {
      file.read(txt_formerly, txt_size); // Load into buffer
      flag_txt = 1;                      // Set text flag
      Serial.println("txt OK");          // Debug info
    }
    else
    {
      file.read(price_formerly, pre_size); // Load into price buffer
      flag_pre = 1;                        // Set price flag
      Serial.println("price OK");          // Debug info
    }

    file.close(); // Close file after reading

    refresh_epd(); // Update display with new content

    server.send(200, "text/html", HTML_OK); // Send success page to browser
  }
}
setup
setup() is the system initialization function executed first and only once after the ESP32 powers on. It undertakes all the preparatory work for the entire device's startup:
Firstly, it initializes the serial communication at a baud rate of 115200 to facilitate the output of debugging information; then, it configures GPIO41 and GPIO7 as output mode and outputs a high level to provide hardware power supply for the electronic paper display;
subsequently, it initializes the GPIO for the electronic paper, clears the screen, performs hardware reset and initializes the driver chip to ensure the screen is in a normal working state;
then, it creates a full-screen canvas and fills it with white, draws a fixed background image at the top of the canvas, and quickly refreshes the display to complete the display of the default startup interface; subsequently, it puts the electronic paper into a low-power sleep mode to save power;
then, it initializes the SPIFFS flash file system of the ESP32. If the initialization fails, it automatically performs the formatting operation and restarts the device to ensure the file storage function is available;
next, it sets WiFi to the AP hotspot mode, starts a password-free hotspot with the name E_Paper_42_Config, and prints the IP address of the hotspot through the serial port for users to connect and access;
finally, it configures the access route of the Web server, maps the root path to the file upload page, the /ok path to the file upload processing function, starts the HTTP server, completes the initialization of all hardware, screen, storage, network and services, and makes the device enter a state where it waits for users to connect to WiFi, access the web page and upload images.
void setup()
{
  Serial.begin(115200); // Initialize serial communication

  pinMode(41, OUTPUT);  // Set GPIO41 as output (power control)
  digitalWrite(41, HIGH); // Turn on power

  pinMode(7, OUTPUT);   // Set GPIO7 as output
  digitalWrite(7, HIGH); // Enable display power

  EPD_GPIOInit();       // Initialize display GPIO pins
  EPD_Clear();          // Clear screen
  delay(500);           // Wait for stability

  EPD_RESET();          // Reset display
  delay(100);
  EPD_Init();           // Initialize display controller

  Paint_NewImage(Image_BW, EPD_W, EPD_H, 0, WHITE); // Create canvas
  EPD_Full(WHITE);     // Fill with white

  EPD_ShowPicture(0, 0, EPD_W, 40, background_top, WHITE); // Show top image
  EPD_Display_Fast(Image_BW); // Display initial screen

  delay(2000);          // Wait 2 seconds
  EPD_Sleep();          // Enter low-power mode

  // Initialize SPIFFS file system
  if (!SPIFFS.begin())
  {
    Serial.println("SPIFFS Failed, formatting...");
    SPIFFS.format();   // Format SPIFFS if failed
    ESP.restart();     // Restart device
  }

  // Set WiFi to AP mode
  WiFi.mode(WIFI_AP);
  WiFi.softAP(AP_SSID, ""); // Start hotspot without password

  Serial.print("IP: ");
  Serial.println(WiFi.softAPIP()); // Print AP IP address

  // Configure HTTP routes
  server.on("/", handle_root); // Root path
  server.on("/ok", HTTP_POST, []() {}, handle_upload); // Upload handler

  server.begin(); // Start server
  Serial.println("HTTP server started");
}
loop
loop() is the main function that will continuously execute infinitely after the Arduino program is powered on. It is the core of the background operation of the entire device. Internally, it only continuously calls the key function server.handleClient(). This function constantly listens for and processes all HTTP requests sent by user devices (such as mobile phones and computers) through the browser from the connected WiFi hotspot. These requests include accessing the upload page, submitting file uploads, and transferring file data, allowing the ESP32 to respond to users' web interactions and file upload instructions in real time, ensuring the continuous and stable operation of the entire Web server, always remaining in a state of waiting and processing user requests.
The code explanation is complete. Next, let's take a look at how to upload the code.
Upload the Code
-
Open the WIFI_refresh.ino
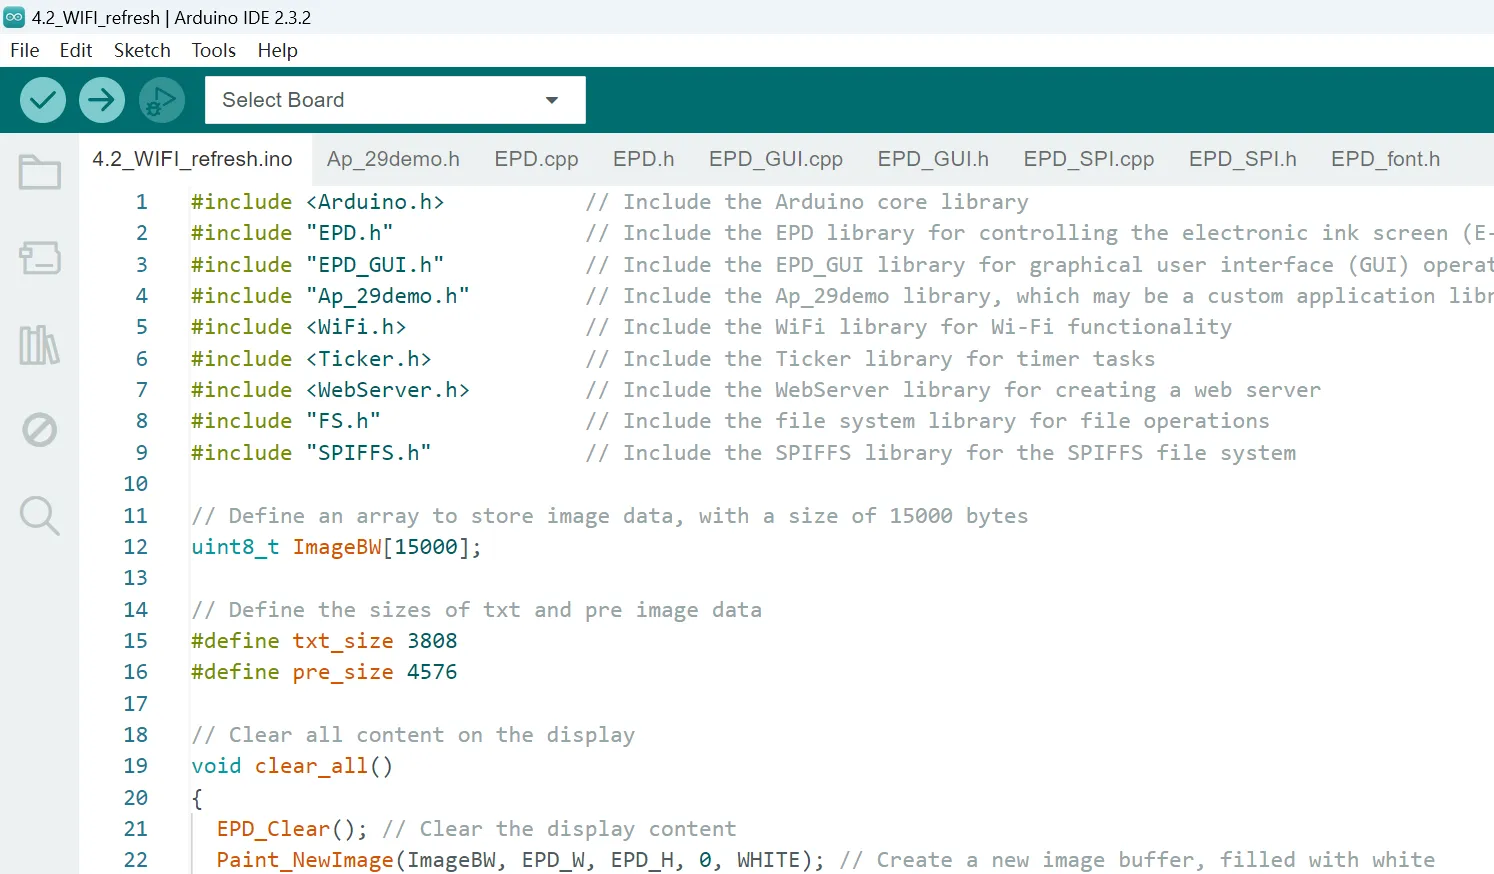
-
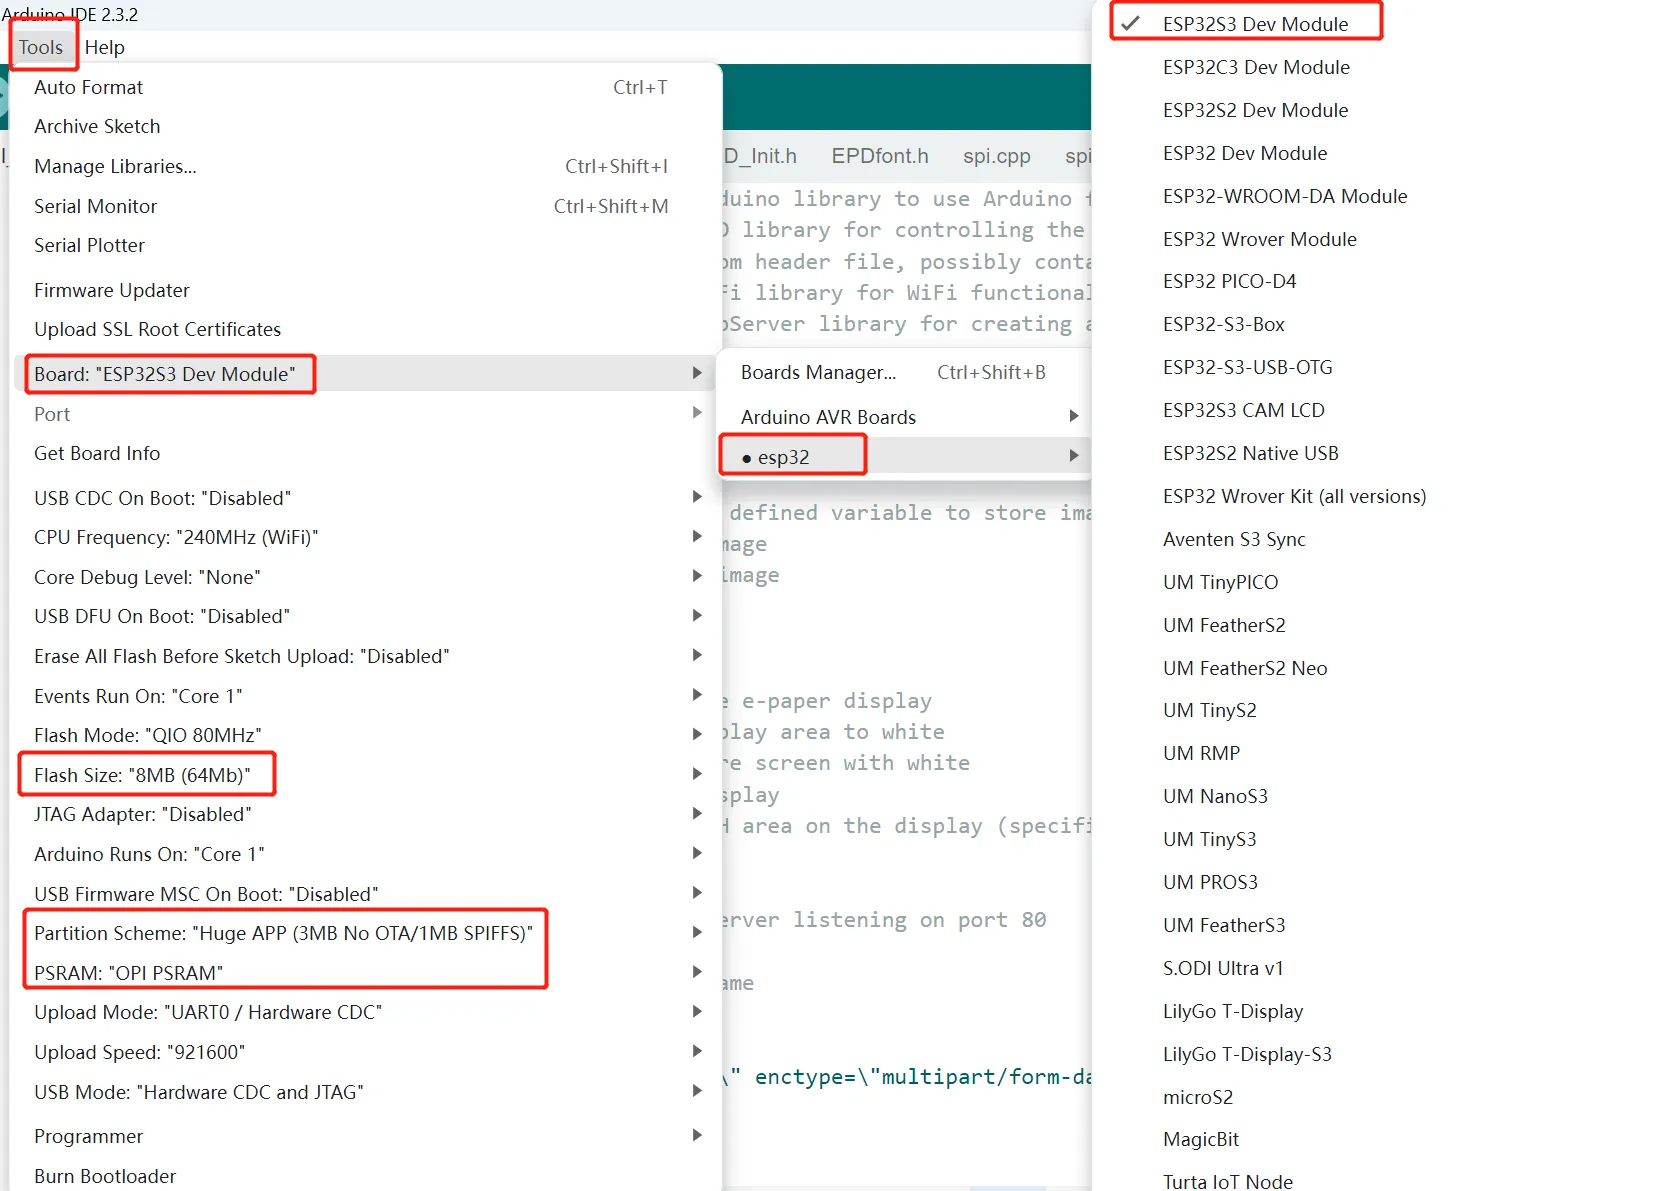
Click "Tools"->"Board"->"esp32"->"ESP32S3 Dev Module", and the "Partition Scheme" select "Huge APP (3MB No OTA/1MB SPIFFS)", "PSRAM" select "OPI PSRAM".
-
Connect ink screen to the computer, click on "Tool" and select the corresponding "port".
-
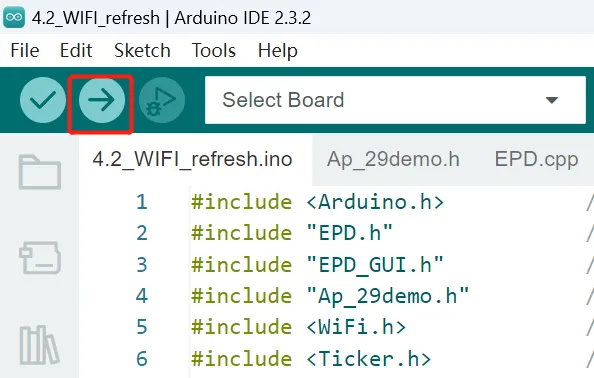
Click "Upload" to upload the code to the board. There will be an image show on the screen.
Update the price tag with WiFi
-
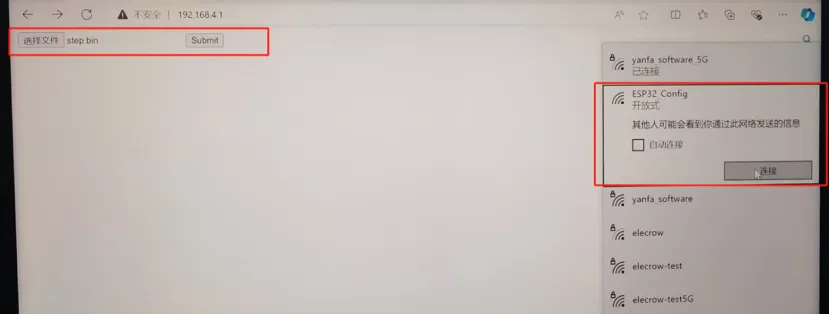
Connect a laptop to the hotspot of the ESP32 E-PAPER display.
-
Enter the IP address 192.168.4.1 in the browser.
-
Select the bin file of the picture you need to show, then click submit.
Note: The size of the images you transfer must be consistent with the size defined in the code, otherwise it will cause image transfer failure
-
After successful transmission, the price and text will be replaced, and the data will be saved in flash.
Update via Bluetooth
Convert the image format
The same as the method in the "Update via WiFi".
You can use the bin file you just converted above. Once again, please be reminded to pay attention to the conversion precautions!
Code Explanation
Click on the link below to download the WIFI_refresh code folder.
Code link:
Function Overview
After the device is powered on, it automatically initializes the screen, file system and BLE Bluetooth. It broadcasts under the name "42_E-Paper_BLE" to wait for the phone to connect. The phone transmits text or price images through the Bluetooth service with the specified UUID. The ESP32 receives the data in blocks and concatenates it to form the complete data.
The image is saved to the SPIFFS flash memory to ensure no loss even in power failure. Then, it automatically drives the electronic paper screen to refresh and display the corresponding content. After the display is completed, the screen enters a low-power sleep state. When the Bluetooth is disconnected, it will automatically restart the broadcast. The entire process does not require WiFi, and it realizes the core functions of low power consumption, offline operation, and wireless updateable electronic price tags.
Add necessary libraries
This line of code is the import section of the library file for the ESP32 e-paper Bluetooth project. Its function is to import all the core dependencies necessary for the program to run: including BLE Bluetooth communication, Arduino basic functions, e-paper screen driver, GUI drawing, image resources, and SPIFFS flash file system related libraries.
These libraries provide the underlying support for the complete functions of receiving images via Bluetooth, storing images, and driving the e-paper display. Without these libraries, the program cannot be compiled and run.
#include <BLEDevice.h>          // BLE core library (device functions)
#include <BLEServer.h>          // BLE server functionality
#include <BLEUtils.h>           // BLE utility helpers
#include <BLE2902.h>            // BLE descriptor (used for notifications)
#include <Arduino.h>            // Arduino core functions
#include "EPD.h"                // E-paper display driver
#include "EPD_GUI.h"            // E-paper drawing GUI library
#include "Ap_29demo.h"          // Demo assets (background images etc.)
#include "FS.h"                 // File system base library
#include "SPIFFS.h"             // SPIFFS flash file system
Define the file variable fsUploadFile Used for accessing files, txt_size and pre_size correspond to the size of the BIN file(Exported in the above steps) for the text label and price label to be transmitted.
The image resolution requirement is smaller than the screen resolution and both width and height are multiples of 8
Note: The size here can be defined based on the size of the images to be transmitted later, otherwise it will cause image transfer failure. --- Make sure that the file size set in the code is consistent with the actual size of the BIN file you want to transfer.
Bluetooth Configuration and Data Definition This code is the core configuration and data cache definition for the ESP32 BLE Bluetooth communication:
Firstly, the unique service UUID and characteristic value UUID for BLE communication are defined through the #define macro (the phone must match these two IDs to establish a connection and transmit data);
then, a pointer pCharacteristicRX pointing to the BLE writable characteristic value is declared, which is used to receive the data sent by the phone;
at the same time, a dynamic byte array dataBuffer is defined as a buffer to concatenate the image data transmitted in BLE blocks, totalReceivedBytes counts the cumulative total number of received bytes, and dataReceived is a flag; when the complete image data is received, it is set to true, thereby triggering the subsequent file storage and screen display processes.
#define SERVICE_UUID          "fb1e4001-54ae-4a28-9f74-dfccb248601d"   // BLE service UUID
#define CHARACTERISTIC_UUID   "fb1e4002-54ae-4a28-9f74-dfccb248601d"   // BLE characteristic UUID

BLECharacteristic *pCharacteristicRX;     // Pointer to BLE characteristic (RX)

std::vector<uint8_t> dataBuffer;          // Buffer to store received BLE data
size_t totalReceivedBytes = 0;            // Total number of received bytes
bool dataReceived = false;                // Flag indicating data reception complete
BLE Connection status callback
This is a custom BLE server connection status callback class, which inherits from the official BLEServerCallbacks and is specifically designed to monitor Bluetooth connection and disconnection events: When the phone successfully connects to the ESP32 Bluetooth, the onConnect function will be triggered and the connection success message will be printed via the serial port;
When the phone disconnects the connection, the onDisconnect function will be triggered, first printing the disconnection message, then automatically calling BLEDevice::startAdvertising() to restart the Bluetooth advertising, ensuring that the device can be re-searched and connected by the phone again, guaranteeing the stability and re-connection capability of Bluetooth communication, and is the key logic for the entire Bluetooth device to be continuously used.
class MyServerCallbacks : public BLEServerCallbacks {

    void onConnect(BLEServer* pServer) {
        Serial.println("[BLE] ===== Device Connected =====");     // Print connection event
        Serial.println("[BLE] Phone is now connected ✔");        // Confirm connection
    }

    void onDisconnect(BLEServer* pServer) {
        Serial.println("[BLE] ===== Device Disconnected =====");  // Print disconnect event
        Serial.println("[BLE] Restart advertising...");           // Restart BLE advertising

        BLEDevice::startAdvertising();                            // Restart advertising after disconnect
    }
};
BLE characteristic value write callback
This is a custom BLE characteristic value write callback class, which inherits from BLECharacteristicCallbacks and is specifically responsible for handling the actual data sent by the phone via Bluetooth: When the phone writes data to the BLE characteristic value of the ESP32, the onWrite method will be automatically triggered. First, the received fragmented data will be obtained, and each piece will be appended to the dataBuffer buffer and the total byte count will be accumulated.
At the same time, the receiving progress will be printed via the serial port. When the cumulative received byte count reaches the fixed size of the preset text image or price image (representing the completion of the transmission of a complete image), a receiving completion prompt will be printed and the dataReceived flag will be set to true to notify the main program to start processing the received complete image data. This is the core logic for implementing BLE fragmented transmission and assembling complete images.
class MyCallbacks : public BLECharacteristicCallbacks {
  void onWrite(BLECharacteristic *pCharacteristic) {
    std::string value = pCharacteristic->getValue();                          // Get received BLE data

    if (value.length() > 0) {

      Serial.printf("[BLE] Chunk received: %d bytes\n", value.length());      // Print chunk size

      dataBuffer.insert(dataBuffer.end(), value.begin(), value.end());        // Append data to buffer
      totalReceivedBytes += value.length(); // Update total received size

      Serial.printf("[BLE] Total received: %d bytes\n", totalReceivedBytes);   // Print progress

      if (totalReceivedBytes == txt_size || totalReceivedBytes == pre_size) {
        Serial.println("[BLE] ===== Receive Complete =====");                  // Mark reception complete
        dataReceived = true;                                                   // Set flag to trigger processing
      }
    }
  }
};
refresh_epd
This is the core refresh function of the electronic paper screen, named "refresh_epd()". It is responsible for completing the entire display process of the screen: first, it resets and initializes the electronic paper, creates a blank canvas and clears the screen. Then, it draws the fixed background image at the top.
Based on the flag_txt and flag_pre flags, it determines whether there are text images and price images. If so, it draws them to the corresponding positions on the screen according to the preset coordinates.
Afterwards, it calls the fast refresh interface to update the picture to the electronic paper. Finally, it puts the screen into a low-power sleep mode to achieve complete display after receiving the image and energy-saving control. This is the key execution function for presenting content on the electronic paper.
void refresh_epd()
{
  EPD_RESET();          // Reset EPD display
  delay(50);            // Wait for reset
  EPD_Init();           // Initialize EPD driver
  delay(50);            // Stability delay

  Paint_NewImage(Image_BW, EPD_W, EPD_H, 0, WHITE); // Create canvas
  EPD_Full(WHITE);      // Clear screen

  // Draw top background image
  EPD_ShowPicture(0, 0, EPD_W, 40, background_top, WHITE);

  if (flag_txt)
  {
    Serial.println("[EPD] Drawing TXT image"); // Debug print
    EPD_ShowPicture(20, 60, 272, 112, txt_formerly, WHITE); // Draw text image
  }

  if (flag_pre)
  {
    Serial.println("[EPD] Drawing PRICE image"); // Debug print
    EPD_ShowPicture(20, 190, 352, 104, price_formerly, WHITE); // Draw price image
  }

  EPD_Display_Fast(Image_BW); // Update display quickly
  Serial.println("[EPD] Display update..."); // Debug print

  delay(100);         // Short delay
  EPD_Sleep();        // Put display into low power mode
}
Receive_BLE_Images
This is the core function Receive_BLE_Images() for processing BLE image data. When it detects that the image data has been completely received, it first obtains the total length of the data and determines whether it is a text image or a price image. It then automatically matches the corresponding file name and writes the complete image data into the SPIFFS flash file system for persistent storage.
Subsequently, it reads the image data from the flash memory into the corresponding display cache array, marks the corresponding image as available, and then calls the screen refresh function to display the image on the electronic paper.
Finally, it clears the receive buffer, resets the byte counter and the data reception completion flag, and returns to the initial state to wait for the next BLE image transmission, achieving a full-process closed-loop processing from data reception, storage, reading to display.
void Receive_BLE_Images()
{
  if (dataReceived)
  {
    if (!dataBuffer.empty())
    {
      size_t bufferSize = dataBuffer.size(); // Get buffer size
      Serial.printf("Received size: %d\n", bufferSize); // Print size

      if (bufferSize == txt_size)
        filename = "/txt.bin"; // Text image file
      else
        filename = "/pre.bin";  // Price image file

      // Write to SPIFFS
      Serial.println("[SPIFFS] Writing file...");
      fsUploadFile = SPIFFS.open(filename, FILE_WRITE);
      fsUploadFile.write(dataBuffer.data(), bufferSize);
      fsUploadFile.close();

      Serial.println("[SPIFFS] Write complete"); // Confirm write
      Serial.println("Saved successfully");
      Serial.printf("File: %s\n", filename.c_str()); // Print file name

      File file = SPIFFS.open(filename, FILE_READ); // Reopen file

      if (bufferSize == txt_size)
      {
        file.read(txt_formerly, txt_size); // Load text image
        flag_txt = 1; // Set flag
      }
      else
      {
        file.read(price_formerly, pre_size); // Load price image
        flag_pre = 1; // Set flag
      }

      file.close(); // Close file

      refresh_epd(); // Refresh display

      dataBuffer.clear(); // Clear buffer
      totalReceivedBytes = 0; // Reset counter
      dataReceived = false; // Reset flag
    }
  }
}
setup
This is the one-time initialization function setup() executed only after the ESP32 device powers on. It completes all the startup preparations for the entire system:
Firstly, it initializes the serial log output, configures and enables GPIO41 and GPIO7 pins to supply power to the e-paper, then initializes the e-paper screen driver, clears the screen and displays the default top background image before putting the screen into low-power sleep mode.
Next, it mounts the SPIFFS flash file system. If the mounting fails, it automatically formats and restarts the device.
Finally, it initializes the BLE Bluetooth device (named 42_E-Paper_BLE), creates a BLE server, binds the connection status callback, configures the specified UUID service and writable characteristic values, and binds the data reception callback.
It starts the Bluetooth broadcast, enabling the device to be searched, connected by the mobile phone, and receive image data. All the preparations for subsequent cyclic processing of BLE data and screen display are made.
void setup() {
  Serial.begin(115200); // Initialize serial communication

  pinMode(41, OUTPUT);  // Set GPIO41 as output (power control)
  digitalWrite(41, HIGH); // Turn on power

  pinMode(7, OUTPUT);   // Set GPIO7 as output
  digitalWrite(7, HIGH); // Enable display power

  EPD_GPIOInit();       // Initialize EPD GPIO
  EPD_Clear();          // Clear display
  delay(500);           // Stability delay

  EPD_RESET();          // Reset EPD
  delay(100);
  EPD_Init();           // Initialize display

  Paint_NewImage(Image_BW, EPD_W, EPD_H, 0, WHITE); // Create canvas
  EPD_Full(WHITE);     // Clear screen

  EPD_ShowPicture(0, 0, EPD_W, 40, background_top, WHITE); // Show top image
  EPD_Display_Fast(Image_BW); // Refresh screen

  delay(2000);          // Wait for stability
  EPD_Sleep();          // Enter low power mode

  Serial.println("Ink Screen Initialization successful"); // Debug info

  if (!SPIFFS.begin()) {
      Serial.println("SPIFFS Failed, formatting..."); // File system error
      SPIFFS.format();   // Format SPIFFS
      ESP.restart();     // Restart system
  }

  BLEDevice::init("42_E-Paper_BLE"); // Initialize BLE device name
  BLEServer *pServer = BLEDevice::createServer(); // Create BLE server

  pServer->setCallbacks(new MyServerCallbacks()); // Register connection callbacks

  BLEService *pService = pServer->createService(SERVICE_UUID); // Create BLE service

  pCharacteristicRX = pService->createCharacteristic(
                          CHARACTERISTIC_UUID,
                          BLECharacteristic::PROPERTY_WRITE
                      ); // Create writable characteristic

  pCharacteristicRX->setCallbacks (new MyCallbacks());  // Register data callback
  pCharacteristicRX->addDescriptor(new BLE2902());      // Add BLE descriptor

  pService->start(); // Start BLE service

  BLEAdvertising *pAdvertising = BLEDevice::getAdvertising(); // Get advertising object
  pAdvertising->addServiceUUID(SERVICE_UUID);                 // Add service UUID
  pAdvertising->start();                                      // Start advertising

  Serial.println("BLE Advertising started"); // Debug info
}
loop
This is the main function loop() of the program that performs an infinite loop. Inside, it continuously calls the Receive_BLE_Images() function, constantly checking if there is complete BLE-received image data. Once it detects that the data reception is complete, it automatically triggers storage, reading, and screen refresh operations. During the rest of the time, it remains idle and waits, allowing the program to always focus on responding to the phone's Bluetooth image transmission requests, achieving low overhead and high efficiency in real-time processing.
The code explanation is complete. Next, let's take a look at how to upload the code.
Upload the Code
-
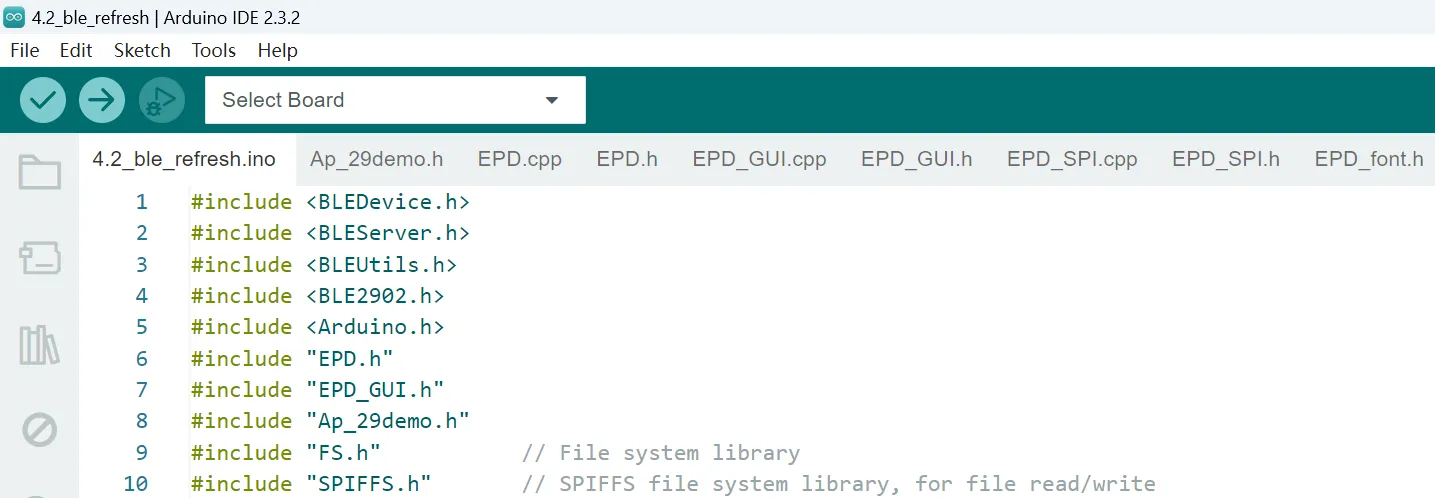
Open the ble_refresh.ino.
-
Click "Tools"->"Board"->"esp32"->"ESP32S3 Dev Module", and the "Partition Scheme" select "Huge APP (3MB No OTA/1MB SPIFFS)", "PSRAM" select "OPI PSRAM".
-
Connect ink screen to the computer, click on "Tool" and select the corresponding "port".
-
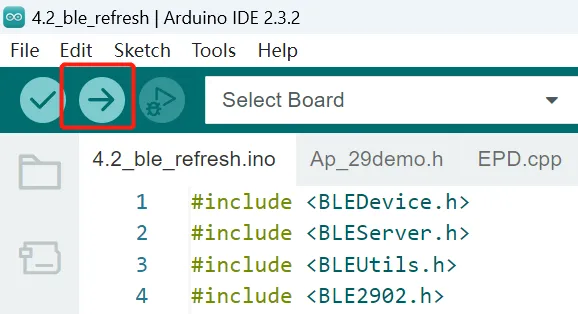
Click "Upload" to upload the code to the board. There will be an image show on the screen.
Update the images via bluetooth
-
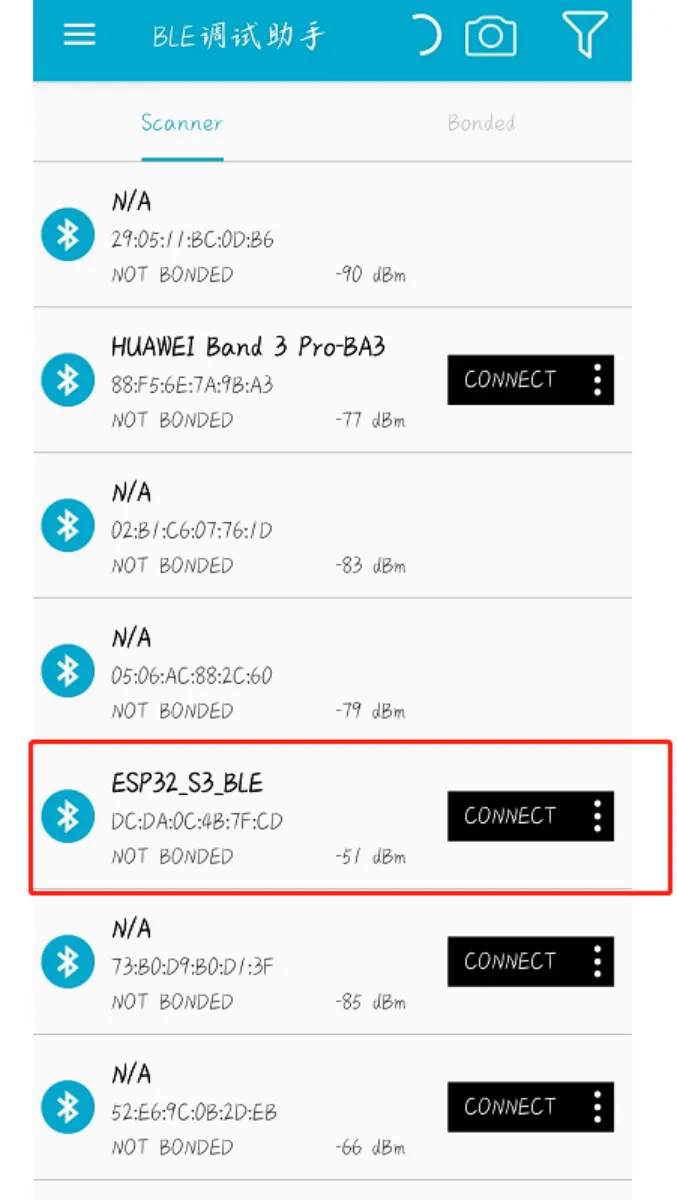
Download a BLE debugging assistant to your phone, and connect it your phone to the screen device BLE.
-
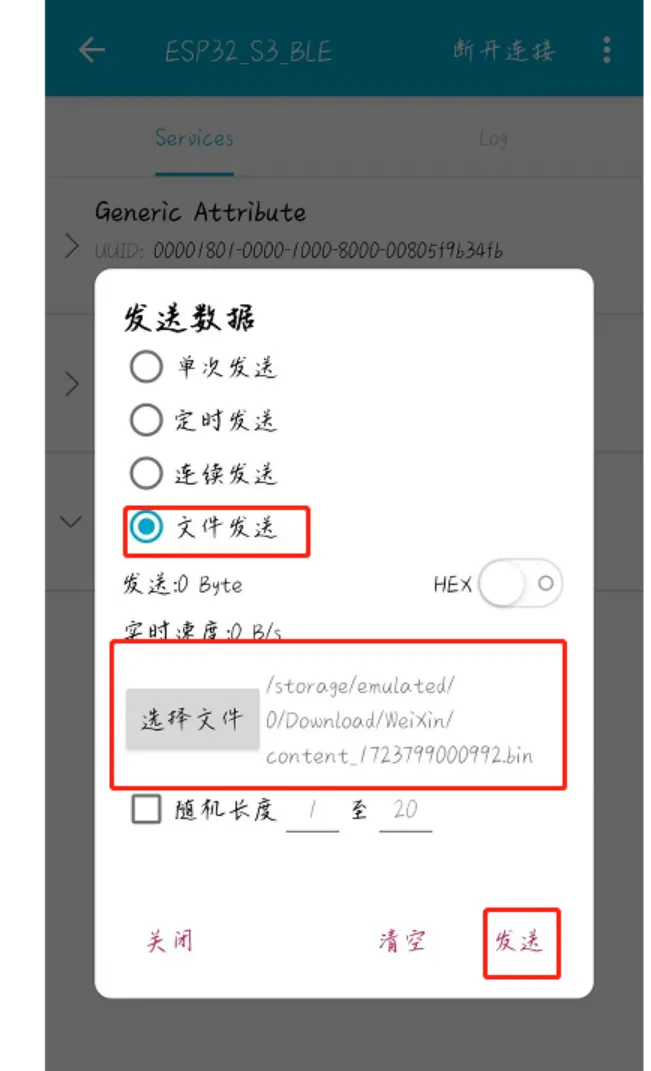
Upload the bin file(Save the bin file to your phone in advance).
You can use the bin file you prepared during the Wi-Fi upload process. Just make sure the file size is consistent.
Note: The size of the images you transfer must be consistent with the size defined in the code, otherwise it will cause image transfer failure

-
After successful transmission, the price and text will be replaced, and the data will be saved in flash.
Demo 2 Weather Station
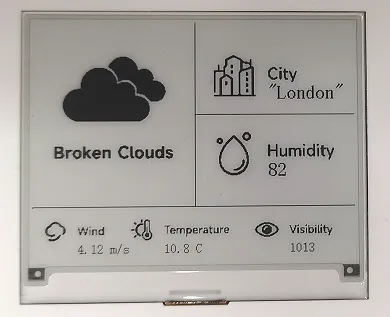
Obtain weather information through OpenWeather and display the information on the CrowPanel ESP32 4.2 ” E-Paper HMI display.
Convert the image format
First, let's take a look at the weather information panel we design in this example, which is divided into 6 parts(all are images).
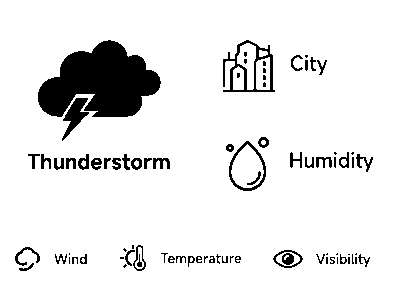
- weather icon
- city
- humidity
- wind
- temperature
-
visibility
- the icons.
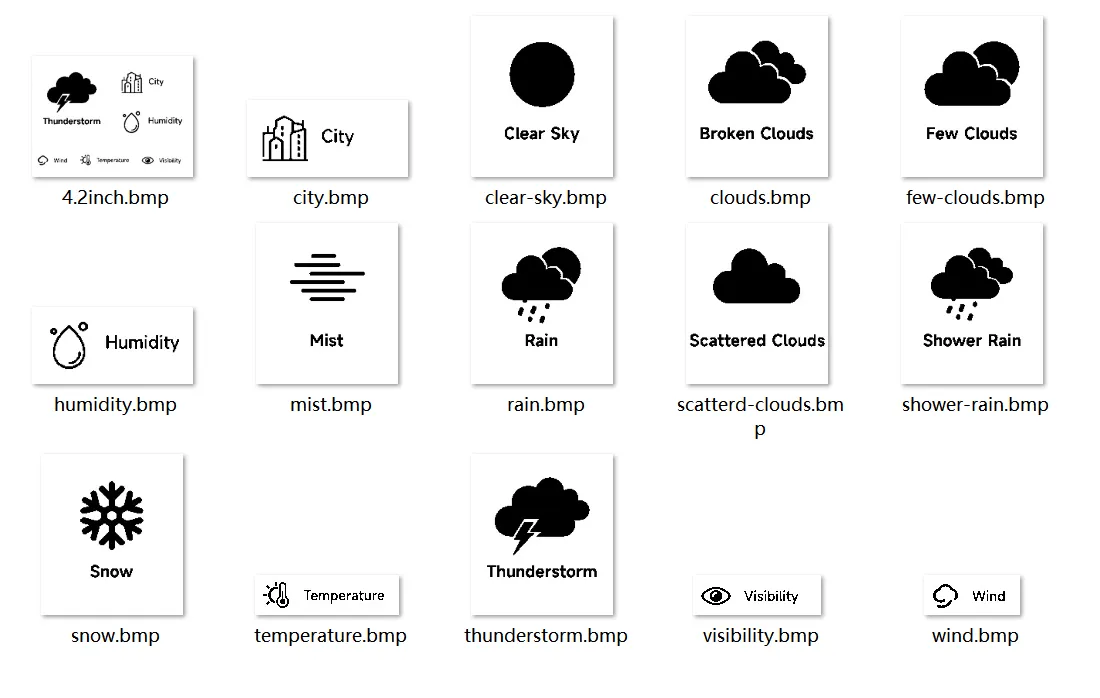
We need to convert the images of these 6 parts into C arrays and put them in the code, and combine them to form the UI interface above.
- the image modulo tool Image2Lcd and open it.
-
Click open and select the images, convert them to array format.
- Open file
- Output date type: C language array by default
- The width and height should consistent with the width and height of the image. Note that it must be a multiple of 8, otherwise it cannot be displayed properly. After setting the width and height, click the arrow next to it to confirm.
- One of the notes in the picture is that you should uncheck the "Include Image Header Data" option below the maximum width and height.
- Save the file
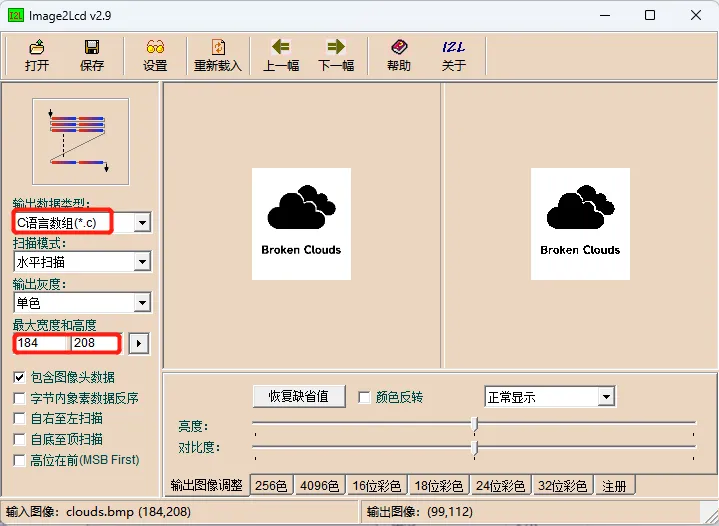
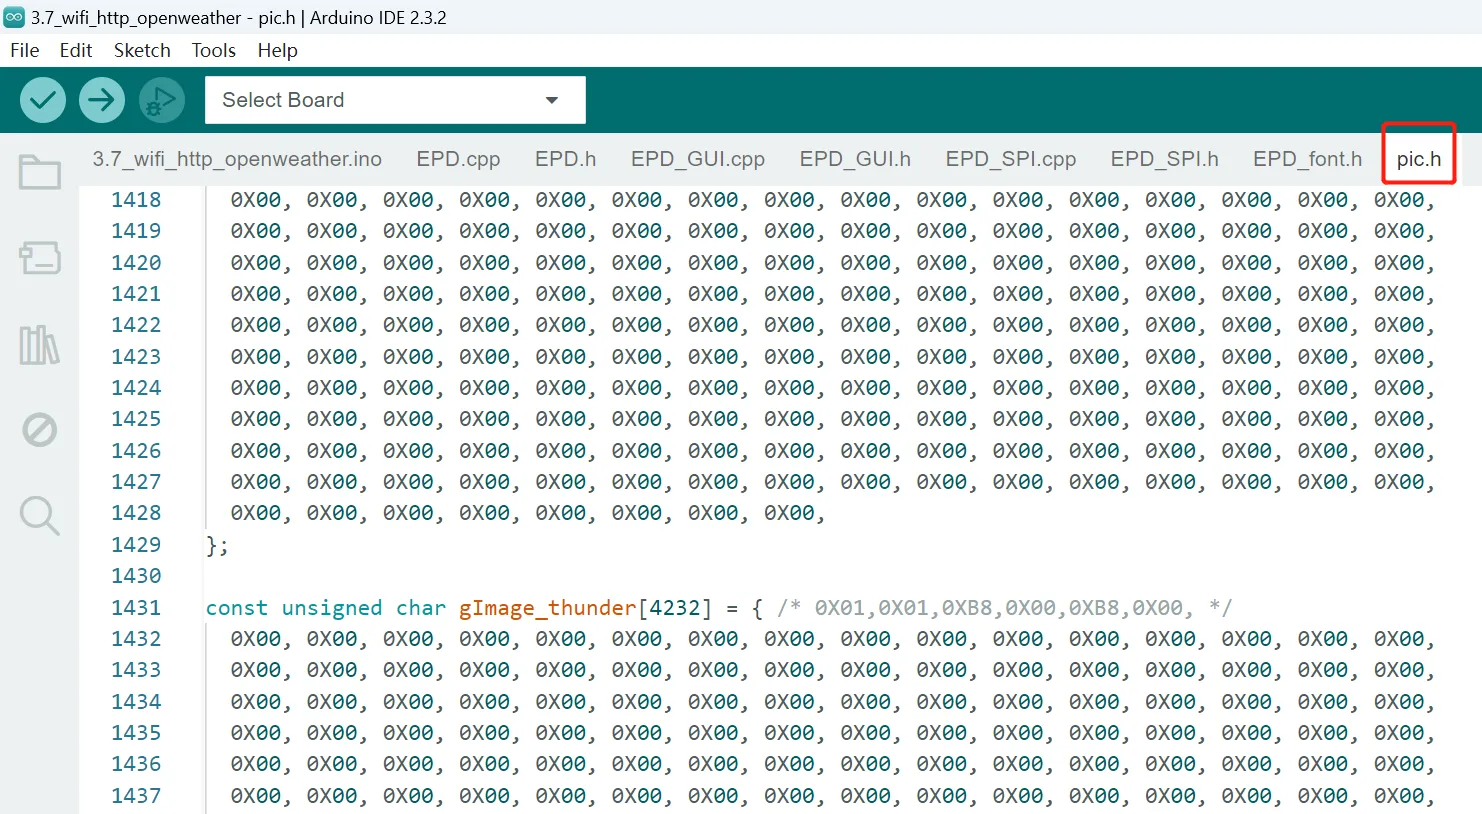
You can put this array in a suitable header file, and I have placed it in pic. h here.
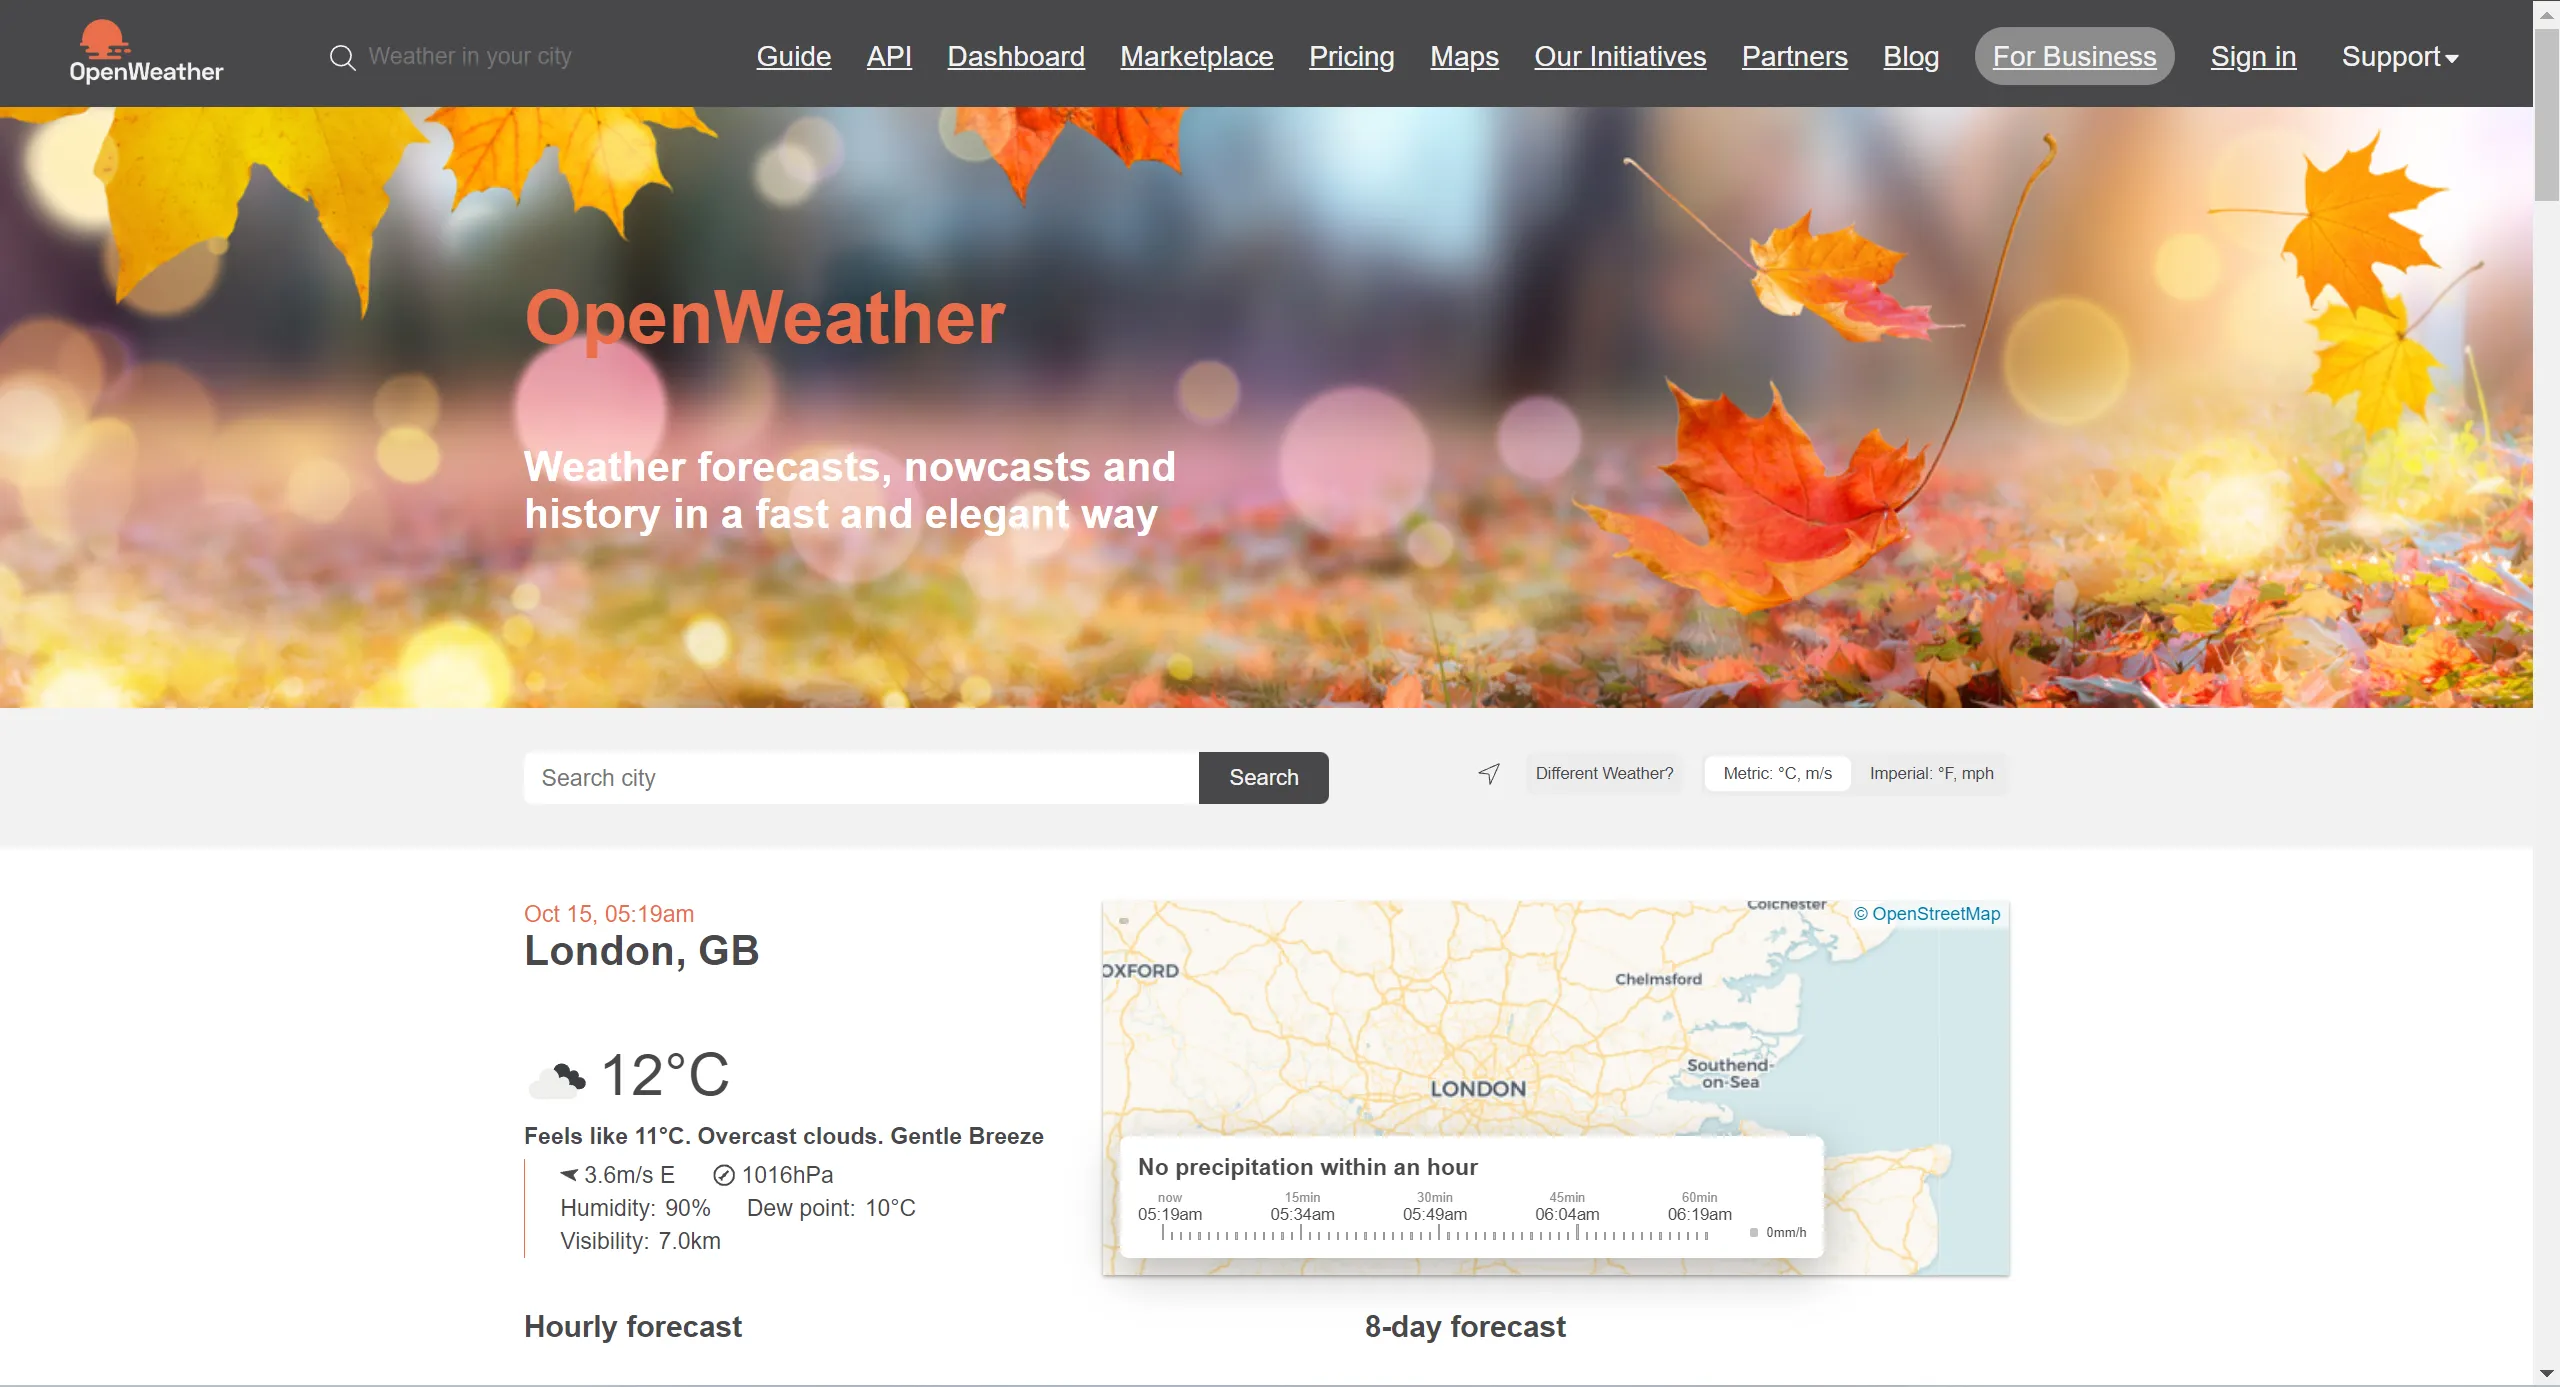
Register an OpenWeather account
-
Enter https://openweathermap.org/ and click "Sing in" to register an OpenWeather account.
-
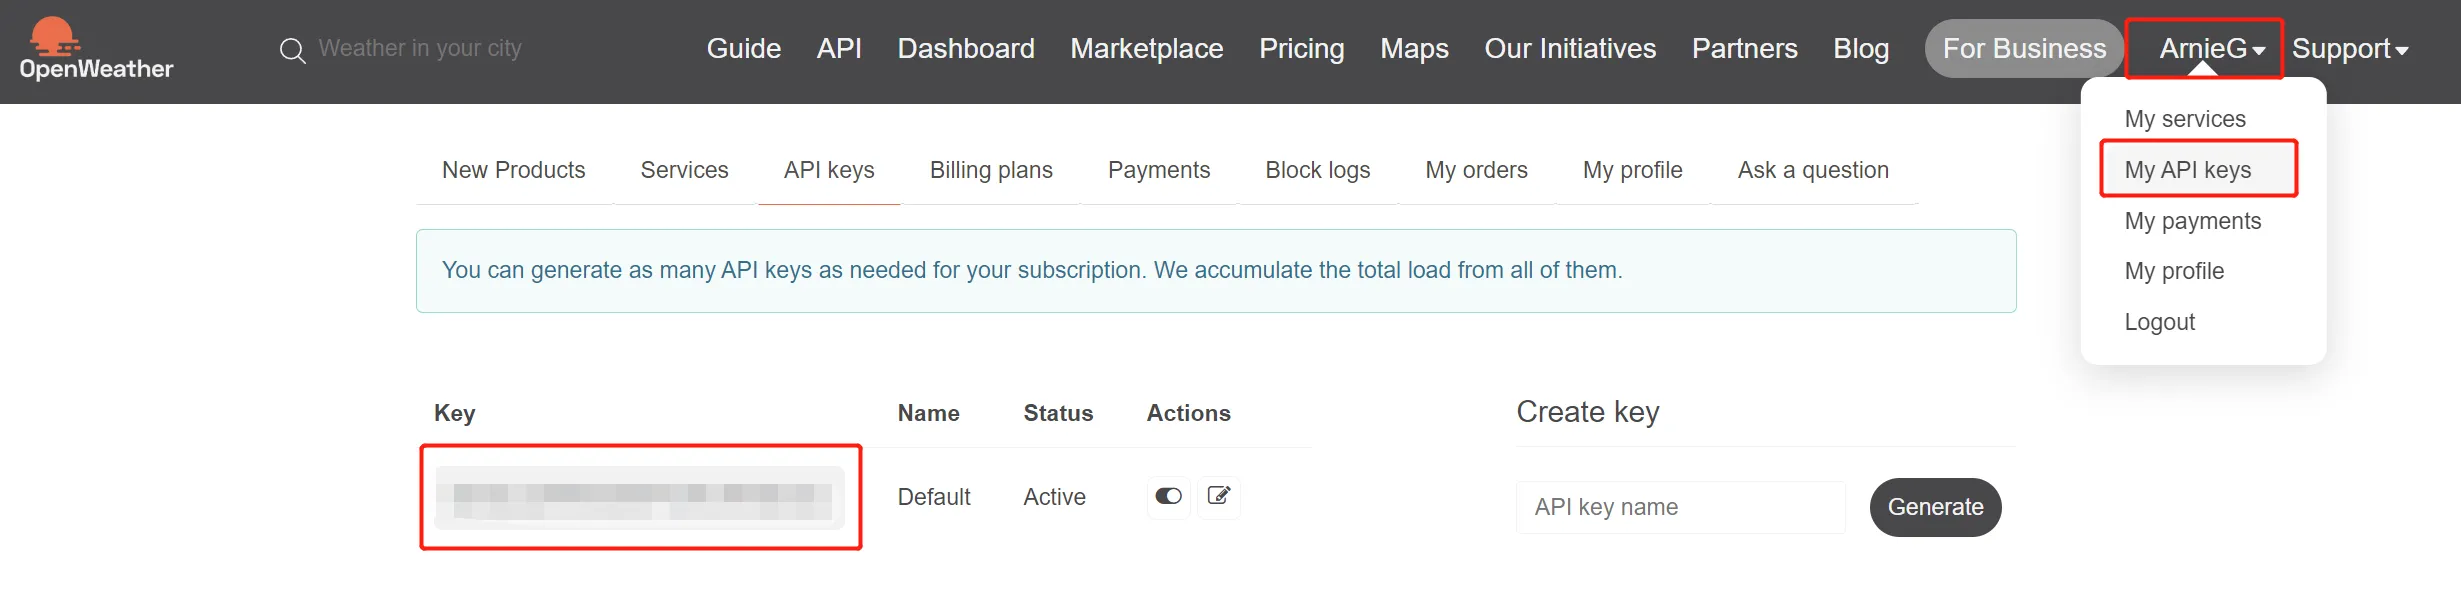
Log in your account.
-
Click your user name -> "My API Keys" to find your API key.
Code Explanation
Click on the link below to download the WIFI_refresh code folder.
Code link:
Function Overview
This code is a low-power WiFi automatic weather display based on ESP32 and a 4.2-inch electronic paper. After the device is powered on, it initializes the screen and connects to the specified WiFi. It accesses the OpenWeatherMap weather API via HTTP requests to obtain real-time data. It parses the JSON to extract information such as the city, weather conditions, temperature, humidity, wind speed, visibility, etc., and automatically matches the corresponding weather icons. It draws a complete and beautiful weather interface on the electronic paper. After refreshing, the screen enters a sleep mode for power saving, and automatically updates the weather information every 5 minutes, achieving the function of an electronic paper weather station that operates stably without intervention for a long time.
Add libraries
#include <WiFi.h>
#include <HTTPClient.h>
#include <Arduino_JSON.h>
#include "EPD.h"  // Include the EPD library for controlling the electronic ink screen (E-Paper Display)
#include "EPD_GUI.h"  // Include the EPD_GUI library for graphical user interface (GUI) operations
#include "pic.h"
Click the link below to download the library files we provide. https://github.com/Elecrow-RD/CrowPanel-ESP32-4.2-E-paper-HMI-Display-with-400-300/tree/master/example/arduino_A_green_circular_sticker_on_the_back/libraries
Then place these library files at this location in your code.
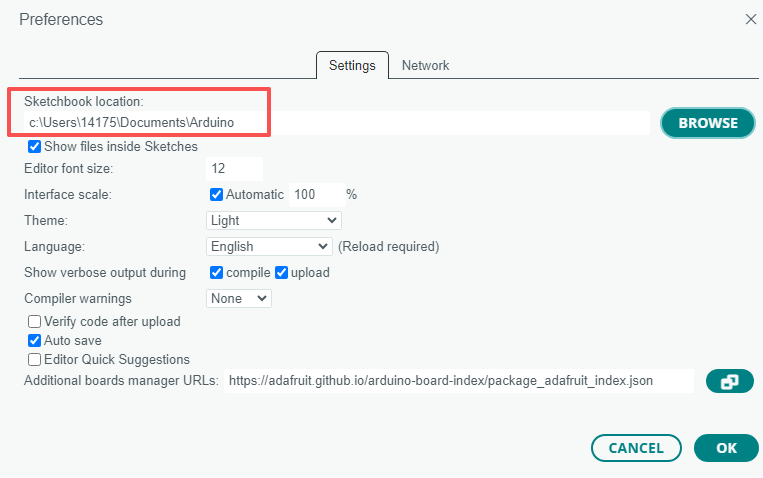
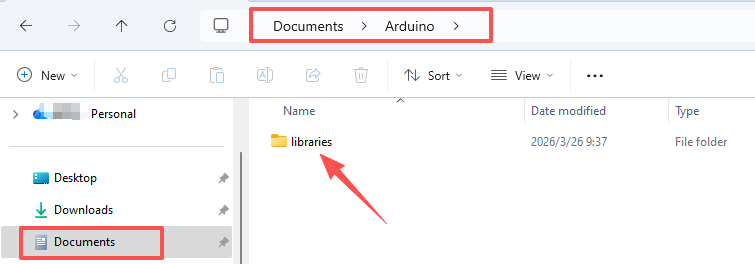
Modify your information
You can modify these details in your code.
- You need to set up the Wi-Fi properly before you can connect to the internet.
- After filling in the API of OpenWeather, you will be able to access the weather information.
- After filling in the name and code of the city, you will be able to access the specific weather data information for your city.
const char* ssid = " ";       // Enter your ssid
const char* password = " ";     // Enter your WiFi password

// OpenWeatherMap API key
String openWeatherMapApiKey = "You-API"; //Enter your API key
// For example: String openWeatherMapApiKey = "bd939aa3d23ff33d3c8f5dd1dd435";

// Replace with city and country code you're in
String city = "London";                    // City Name
String countryCode = "2643743";            // Country Code
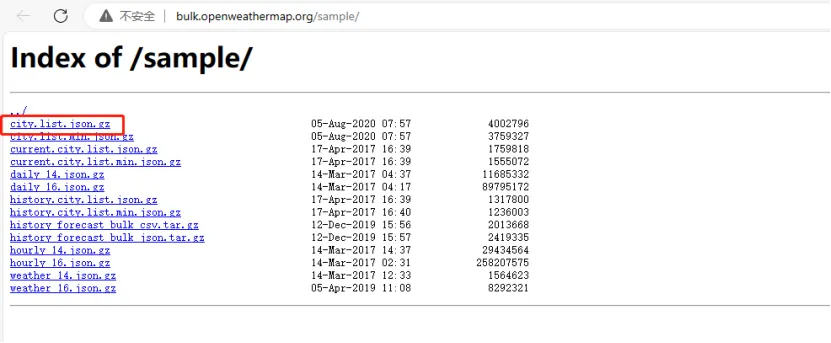
Country Code
You can find the country code at: http://bulk.openweathermap.org/sample/
Function Explanation
js_analysis
This is the core function js_analysis() for weather data parsing. It first checks if the WiFi connection is stable, then constructs a weather request URL that includes the city name and API key.
It makes an HTTP request to obtain the original JSON data returned by OpenWeatherMap, parses the JSON, extracts key information such as city name, weather condition, temperature, humidity, wind speed, visibility, etc., and performs error handling (displaying "N/A" if visibility is missing). It also prints the parsing results through the serial port.
Finally, it matches the corresponding icon numbers for sunny, rainy, cloudy, snowy, foggy, and thunderstorm based on the weather text content. All operations are completed successfully and return true, providing complete and reliable weather data for the subsequent display on the electronic paper.
bool js_analysis()                         // Function to parse weather JSON data
{
  if (WiFi.status() != WL_CONNECTED)       // Check whether WiFi is connected
  {
    Serial.println("WiFi disconnected");   // Print disconnect message
    return false;                          // Return failure
  }

  String url = "http://api.openweathermap.org/data/2.5/weather?q=" + // Build API URL
               city + "," + countryCode +
               "&APPID=" + openWeatherMapApiKey +
               "&units=metric";

  jsonBuffer = httpGETRequest(url.c_str()); // Send request and get JSON data

  Serial.println("========== RAW JSON =========="); // Print JSON header
  Serial.println(jsonBuffer);                     // Print raw JSON text

  myObject = JSON.parse(jsonBuffer);             // Parse the JSON text

  if (JSON.typeof(myObject) == "undefined")      // Check whether parsing failed
  {
    Serial.println("JSON parse failed");         // Print parse error
    return false;                                // Return failure
  }

  city_js     = (const char*)myObject["name"];               // Read city name
  weather     = (const char*)myObject["weather"][0]["main"]; // Read weather condition
  temperature = String((double)myObject["main"]["temp"]);    // Read temperature
  humidity    = String((int)myObject["main"]["humidity"]);   // Read humidity
  wind_speed  = String((double)myObject["wind"]["speed"]);   // Read wind speed
  // visibility  = String((int)myObject["visibility"]);      // Direct visibility read (disabled)

  if (myObject.hasOwnProperty("visibility"))     // Check if visibility exists
    visibility = String((int)myObject["visibility"]); // Read visibility value
  else
    visibility = "N/A";                          // Use fallback text if missing

  Serial.println("========== DATA ==========");  // Print parsed data header
  Serial.print("The City    : "); Serial.println(city_js);     // Print city
  Serial.print("Weather     : "); Serial.println(weather);     // Print weather
  Serial.print("Temperature : "); Serial.println(temperature); // Print temperature
  Serial.print("Humidity    : "); Serial.println(humidity);    // Print humidity
  Serial.print("Wind_Speed  : "); Serial.println(wind_speed);  // Print wind speed
  Serial.print("Visibility  : "); Serial.println(visibility);  // Print visibility
  Serial.println("=========================");               // Print footer line

  // Set the weather flag based on the weather description
  if (weather.indexOf("clouds") != -1 || weather.indexOf("Clouds") != -1 ) { // Check for clouds
    weather_flag = 1;                    // Set cloudy icon

  } else if (weather.indexOf("clear sky") != -1 || weather.indexOf("Clear sky") != -1) { // Check for clear sky
    weather_flag = 3;                    // Set clear icon

  } else if (weather.indexOf("rain") != -1 || weather.indexOf("Rain") != -1) { // Check for rain
    weather_flag = 5;                    // Set rainy icon

  } else if (weather.indexOf("thunderstorm") != -1 || weather.indexOf("Thunderstorm") != -1) { // Check thunderstorm
    weather_flag = 2;                    // Set thunderstorm icon

  } else if (weather.indexOf("snow") != -1 || weather.indexOf("Snow") != -1) { // Check snow
    weather_flag = 4;                    // Set snow icon

  } else if (weather.indexOf("mist") != -1 || weather.indexOf("Mist") != -1) { // Check mist
    weather_flag = 0;                    // Set mist icon
  }

  return true;                           // Return success
}
UI_weather_forecast
This is the UI_weather_forecast() function for the electronic paper weather interface, responsible for initializing the 4.2-inch electronic paper, drawing the complete weather UI layout and displaying the parsed weather data:
First, perform screen reset and initialization, create a blank image buffer and clear the screen to white; then draw the weather icons (selected by the weather_flag index), city / wind speed / humidity / temperature / visibility icons according to the coordinates, and then use black lines to divide the interface areas;
subsequently, format the data such as city name, humidity (%), wind speed (m/s), temperature (°C), visibility (meters to kilometers) and display them at the corresponding positions;
finally, perform a full-screen refresh to complete the display of the screen, delay and enter sleep mode to reduce power consumption, which is the core UI rendering function that connects data parsing and screen presentation.
// Display weather forecast information
void UI_weather_forecast()
{
  // Create character arrays to store information
  char buffer[40];

  EPD_GPIOInit();  // Initialize the screen GPIO
  EPD_Clear();  // Clear the screen
  Paint_NewImage(ImageBW, EPD_W, EPD_H, 0, WHITE);  // Create a new canvas, set the canvas to white
  EPD_Full(WHITE);  // Clear the canvas, fill with white
  EPD_Display_Part(0, 0, EPD_W, EPD_H, ImageBW);  // Display a blank canvas

  EPD_Init_Fast(Fast_Seconds_1_5s);  // Initialize the screen, set update speed to 1.5 seconds

  // Display weather-related icons and information
  EPD_ShowPicture(7, 10, 184, 208, Weather_Num[weather_flag], WHITE);
  EPD_ShowPicture(205, 22, 184, 88, gImage_city, WHITE);
  EPD_ShowPicture(6, 238, 96, 40, gImage_wind, WHITE);
  EPD_ShowPicture(205, 120, 184, 88, gImage_hum, WHITE);
  EPD_ShowPicture(112, 238, 144, 40, gImage_tem, WHITE);
  EPD_ShowPicture(265, 238, 128, 40, gImage_visi, WHITE);

  // Draw partition lines
  EPD_DrawLine(0, 230, 400, 230, BLACK); // Draw horizontal line
  EPD_DrawLine(200, 0, 200, 230, BLACK); // Draw vertical line
  EPD_DrawLine(200, 115, 400, 115, BLACK); // Draw horizontal line

  // Display city name
  memset(buffer, 0, sizeof(buffer));
  snprintf(buffer, sizeof(buffer), "%s ", city_js); // Format the updated city as a string
  EPD_ShowString(290, 74, buffer, 24, BLACK); // Display city name

  // Display temperature
  memset(buffer, 0, sizeof(buffer));
  snprintf(buffer, sizeof(buffer), "%s C", temperature); // Format the updated temperature as a string
  EPD_ShowString(160, 273, buffer, 16, BLACK); // Display temperature

  // Display humidity
  memset(buffer, 0, sizeof(buffer));
  snprintf(buffer, sizeof(buffer), "%s ", humidity); // Format the humidity as a string
  EPD_ShowString(290, 171, buffer, 16, BLACK); // Display humidity

  // Display wind speed
  memset(buffer, 0, sizeof(buffer));
  snprintf(buffer, sizeof(buffer), "%s m/s", wind_speed); // Format the wind speed as a string
  EPD_ShowString(54, 273, buffer, 16, BLACK); // Display wind speed

  // Display sea level pressure
  memset(buffer, 0, sizeof(buffer));
  snprintf(buffer, sizeof(buffer), "%s ", sea_level); // Format the sea level pressure as a string
  EPD_ShowString(316, 273, buffer, 16, BLACK); // Display sea level pressure

  // Update the e-ink display content
  EPD_Display_Part(0, 0, EPD_W, EPD_H, ImageBW); // Refresh the screen display

  EPD_Sleep(); // Enter sleep mode to save energy
}
setup
This is the initialization function setup() that is executed only once after the ESP32 electronic paper weather project is powered on.
Firstly, it initializes the serial log output, configures and enables GPIO41 and GPIO7 to provide power for the electronic paper.
Then, it completes the GPIO initialization, hardware reset, driver initialization and screen clearing operations to ensure the screen is in a ready state.
Next, it starts the WiFi connection and continuously waits for successful connection. After the connection is established, it prints the connection information and device IP address.
Finally, it calls the weather data parsing function to obtain real-time weather information. Once the parsing is successful, it immediately calls the UI rendering function to display the weather content on the electronic paper, completing all the initialization and the first weather display process after the device is powered on.
void setup()
{
  Serial.begin(115200);                // Start serial communication

  pinMode(41, OUTPUT);                 // Configure power control pin
  digitalWrite(41, HIGH);              // Enable display power

  pinMode(7, OUTPUT);                  // Configure display enable pin
  digitalWrite(7, HIGH);               // Turn on display

  EPD_GPIOInit();                      // Initialize display GPIO pins

  EPD_RESET();                         // Reset display
  delay(100);                          // Wait after reset

  EPD_Init();                          // Initialize display
  delay(500);                          // Wait after init

  EPD_Clear();                         // Clear display
  delay(500);                          // Wait after clear

  // ================= WiFi =================
  WiFi.begin(ssid, password);          // Connect to WiFi

  Serial.print("Connecting WiFi");     // Print connection status

  while (WiFi.status() != WL_CONNECTED) // Wait until WiFi connects
  {
    delay(500);                        // Wait 500 ms
    Serial.print(".");                 // Print progress dot
  }

  Serial.println("\nWiFi OK");         // Print successful connection
  Serial.println(WiFi.localIP());      // Print local IP address

  // ================= First display =================
  if (js_analysis())                   // Get weather data
  {
    UI_weather_forecast();             // Show weather on display
  }
}
loop
This is the main loop function loop() that the program continuously executes. Its core function is to use the millis() timer to determine if the 5-minute refresh interval has been reached. When the time condition is met, it first calls the js_analysis() function to re-obtain and parse the latest weather data. If the data acquisition is successful, it calls the UI_weather_forecast() function to refresh the display on the electronic paper screen. Then, it updates the last refresh timestamp. During the remaining time, it remains idle and waits, achieving the automatic and timed update of weather information.
void loop()
{
  if (millis() - lastTime > timerDelay) // Check if refresh interval passed
  {
    if (js_analysis())                  // Update weather data
    {
      UI_weather_forecast();            // Refresh display
    }

    lastTime = millis();                // Update last refresh time
  }
}
Upload the Code
-
Double click the wifi_http_openweather.ino.
-
Click "Tools"->"Board"->"esp32"->"ESP32S3 Dev Module", and the "Partition Scheme" select "Huge APP (3MB No OTA/1MB SPIFFS)", "PSRAM" select "OPI PSRAM".
-
Connect CrowPanel ESP32 E-Paper HMI 4.2-inch Display to the computer, click on "Tool" and select the corresponding "port".
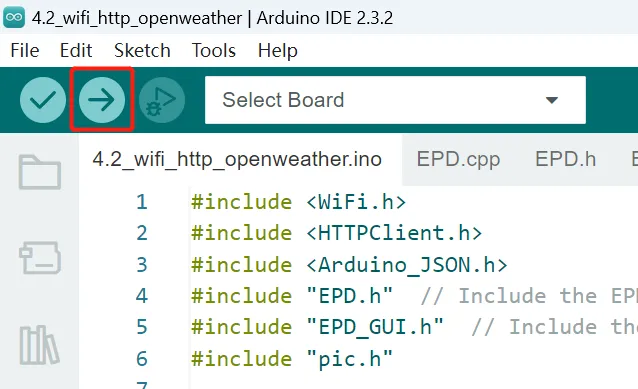
-
Click "Upload" to upload the code to the board. There will be an image show on the screen.
-
After downloading, the weather information for the city you have selected will be displayed on CrowPanel ESP32 E-Paper HMI 4.2-inch Display.
Examples for the E-Paper HMI 4.2-inch Display Interfaces
Click on the link below to download the WIFI_refresh code folder.
Code link:
Example 1 Control the GPIO
-
Open the 4.2_Example1_GPIO.ino.
-
Connect the LED to the GPIO pins.
-
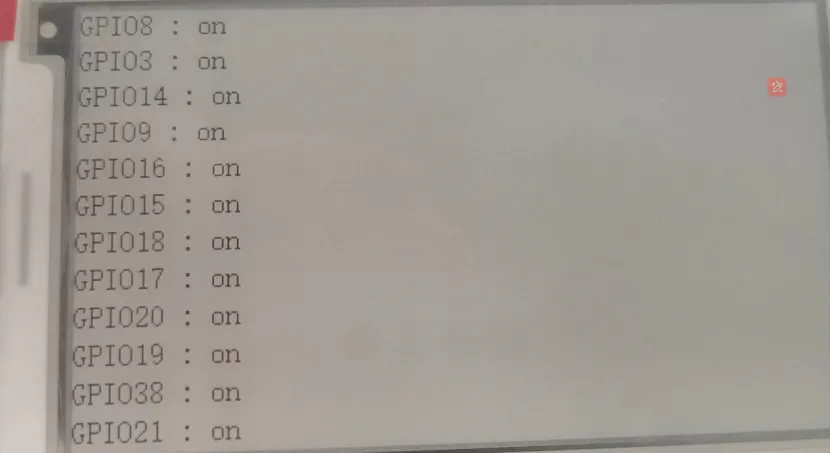
Upload the code to the CrowPanel ESP32 E-Paper HMI 4.2-inch Display. The LEDs will turn on, and the status of the GPIO will show on the screen.

Example 2 Count the times of pressing the keys
-
Open 4.2_Example2_KEY.ino
-
Press the button.
-
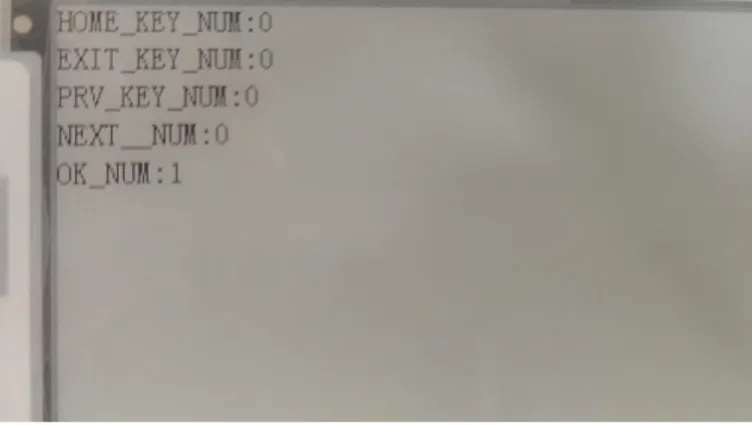
The times each button is pressed will be displayed on the screen.
Example 3 Control PWR LED with menu Key
-
Open the 4.2_Example3_PWR.ino
-
Upload the code to the CrowPanel ESP32 E-Paper HMI 4.2-inch Display.
-
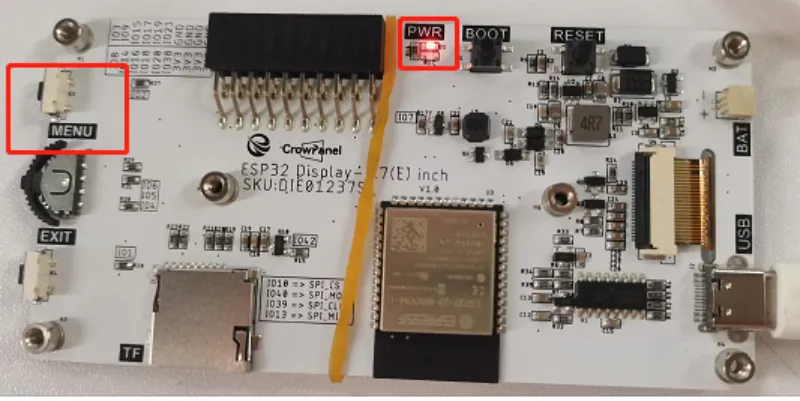
Press the menu key and the PWR LED will turn on/off.
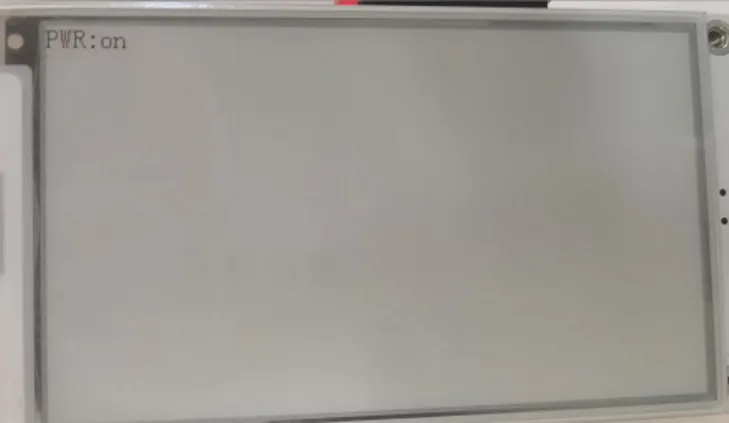
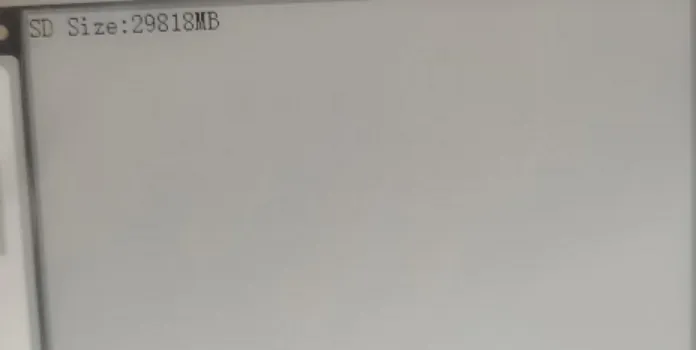
Example 4 Initialize SD card
-
Open 4.2_Example4_TFCard.ino
-
Insert the TF card to the card slot.
-
Upload the code to the CrowPanel ESP32 E-Paper HMI 4.2-inch Display.
-
The size of the TF card will show on the screen.
Example 5 Connect Bluetooth
-
Open 4.2_Example5_BLE.ino
-
Upload the code to the CrowPanel ESP32 E-Paper HMI 4.2-inch Display.
-
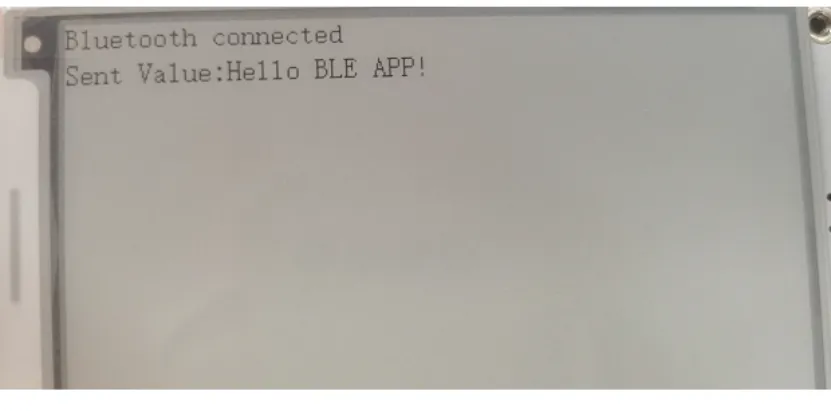
After the blutooth is connected, the screen will show:
Example 6 Connect WiFi
-
Open 4.2_Example6_WIFI.ino
-
Modify your ssid and password
-
Upload the code to the CrowPanel ESP32 E-Paper HMI 4.2-inch Display.
-
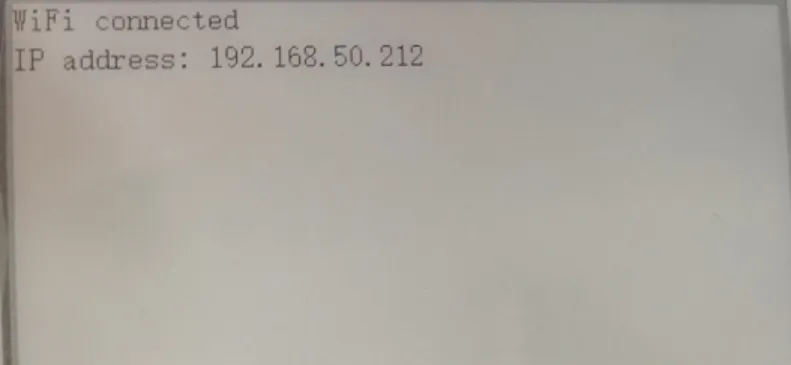
After the WiFi is connected, the screen will show:
Example 7 Refresh image
This example will demonstrate two scenarios: refreshing full screen images and non full screen images.
For the method of converting images to C arrays, please refer to the previous content of the course, where there is an explanation on how to do the conversion.
- Full screen image: The resolution of the image is the same as the screen
- Non full screen image: The image resolution is lower than the screen resolution
Refresch full screen image
-
Open 4.2_Example7_Global_Refresh.ino
-
Upload the code to the CrowPanel ESP32 E-Paper HMI 4.2-inch Display
-
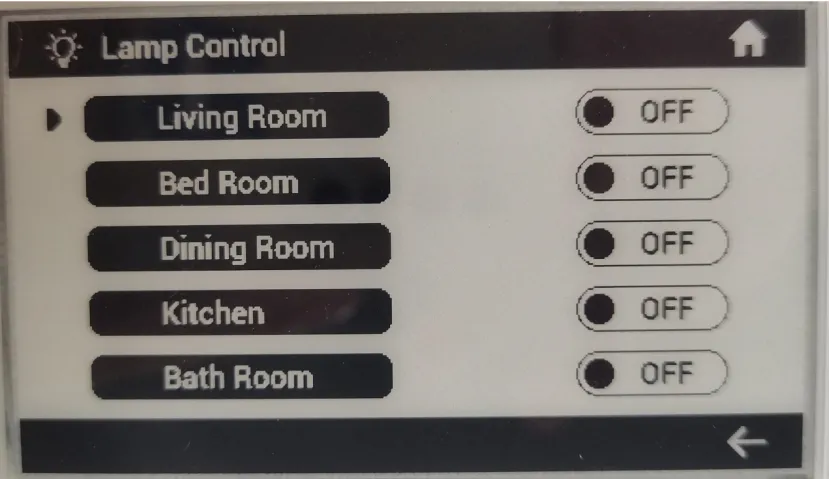
The image will refresh on the screen.
Refresh non full screen image
-
Open 4.2_Example7_Partial_Refresh.ino
-
Upload the code to the CrowPanel ESP32 E-Paper HMI 4.2-inch Display
-
The image will refresh on the screen.