2 Introduce the screen user interface and external speakers for playing songs
Welcome to the second lesson of learning. I believe that after completing the first lesson, everyone has gained a deeper understanding of our product. Next, I will lead you to the first application case of the Advance series products - connecting to WiFi to play songs.
1 Product Interface Introduction
When you power on the product, you will see the following interface.
The following interface was generated by introducing the official firmware of LVGL, and the specific operation will not be explained in this lesson for now. In the next class, we will mainly explain the LVGL graphics library. You can follow our updates to facilitate your learning.
(The interface has not yet developed any functions and can only be viewed by sliding the interface.)


However, you can choose the theme color you want to use.

2 Download Code
You can click the link below to download the corresponding version of the code for this lesson. Code link:
2.8-inch / 2.4-inch V1.0:
2.8-inch / 2.4-inch V1.1/V1.2:
2.1 Using Arduino IDE to Open Code

2.2 Code Introduction
You can understand the overall code based on the comments after each line of code.

Before using the code, please change the wifi account and password in the code. The settings in the code are for our company's wifi; you need to set it to the one you are using yourself.

After specifying an MP3 network link through audio.connecttohost(), the Audio library will automatically complete tasks such as server connection, audio data download, MP3 decoding, and PCM data output. Users can enjoy online music playback without having to concern themselves with the underlying audio processing procedures.

The audio.loop() function is the core function for the normal operation of the Audio library and needs to be continuously called within the loop() function. It is responsible for receiving network data, decoding the audio stream, managing the buffer, and outputting audio data to the I2S. It acts as the scheduling center for the entire audio playback task. If this function is not continuously executed, even if the network connection and audio stream acquisition have been successfully established, the sound cannot be played normally.

Version 1.1
V1.1 upgraded, optimized the amplifier circuit, better sound quality, and use IO21 to control mute. i2s_mic changed to two pins IO9 and IO10 control.
Version 1.2
Only the button component has been updated. All other hardware and I/O pins remain the same as in the previous version.
3 Configure library file
3.1 Select the appropriate library file based on the product screen size
Click the link below to download the relevant library files.
Library file link:
If you are not sure where to place the library files and how to configure them properly so that the code can correctly recognize these library files, please refer to the operation steps in the first lesson.
4 How to play the song we want to play
Principle:
After the CrowPanel ESP32 Advance HMI is connected to WIFI, it will search for this song through the URL link provided in our code and achieve network playback (this is an external link for a song)

Note: The audio stream encoding formats supported by the parameters of the audio.connecttohost function, such as MP3, AAC, FLAC, etc
The reason why people do not use familiar music websites such as Spotify, Apple Music, and YouTube Music to play songs is because most legitimate music streaming services only provide song page links or embedded player code to play music. To protect copyright, not providing direct download links in MP3 format, distributing or obtaining MP3 download links directly may violate the terms of service and copyright laws of these platforms. So we didn't use it. We use Chinese music websites to play music here. If you want to use a music website that you are familiar with, just find a URL link in MP3 format similar to the one in the code and replace it.
First, connect our speakers

In NetEase Cloud Music or other music platforms, the ID of a song is usually a unique identifier for each song. So the main thing is to replace the ID number in the URL link in the code

Next, I will use NetEase Cloud Music as an example to introduce, searching for an ID number
Use a browser to search for NetEase Cloud Music and open it

Play the song you want to listen to

Retrieve the ID number from the link and replace it with the ID number in the code

This way, you can change the music you want to play. (Remember to re burn the program after changing the ID)
Tips:
1. If the program runs without errors but the song doesn't play, you should check the URL to ensure that the provided link is correct.
2. If the song you want to play is a VIP song, it cannot be played.
3. Before burning the code, remember to configure the environment in which the code will run.
Before burning the code, remember to configure the environment in which the code will run.
For small sizes, there is no need to dial the code and it can be directly burned.
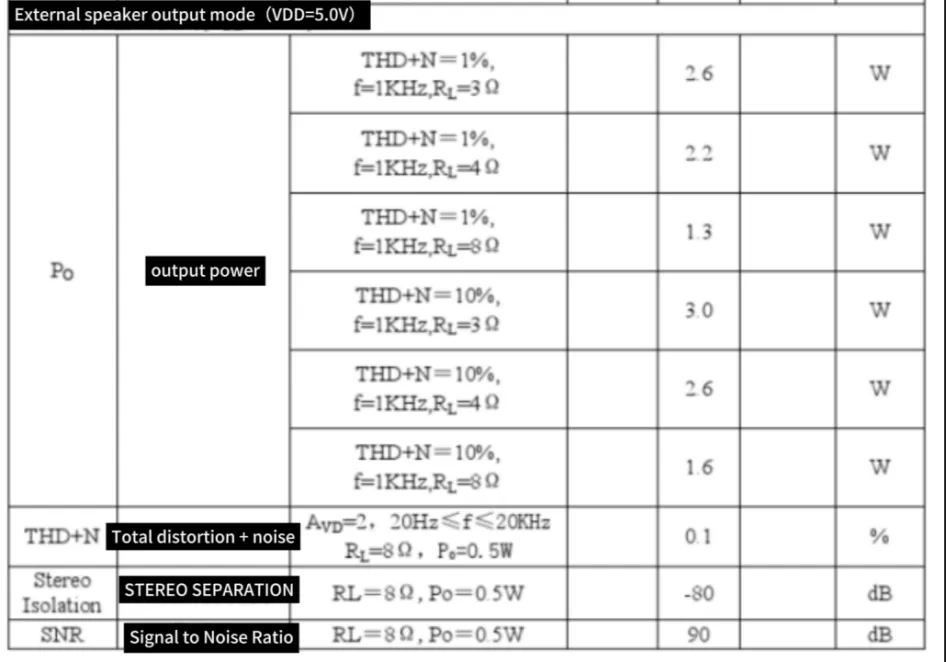
5 How to adjust the size of the sound output from the speaker
When an external speaker is connected, this is the power consumption that our built-in amplifier chip can provide
5.1 The volume can be adjusted by adjusting the knob

If you are using the V1.1/V1.2 versions of the 2.8-inch or 2.4-inch products, please note that these two versions have removed the onboard volume adjustment knob. Therefore, it is no longer possible to adjust the speaker volume through the knob.
Meanwhile, in the V1.1/V1.2 versions, we have optimized the audio power amplifier circuit. While enhancing the audio quality, we have simplified the mute control method. Now, the mute control of the speakers can be achieved simply by using IO21.
Furthermore, the pin configuration of the I2S microphone (i2s_mic) has also been adjusted. In the new version, the control is achieved using IO9 and IO10 pins. Therefore, when porting or running the sample code, please confirm the correctness of the relevant pin configuration based on the hardware version you are using to ensure that the audio function works properly.
5.2 Adjustment principle
This refers to the 2.4-inch and 2.8-inch V1.0 versions.
Open the schematic diagram we provide
By changing the resistance of the R51 adjustable resistor, the volume can be adjusted.

6 Code presentation
6.1 OnlineAudio_small
#include <Wire.h>
#include "Arduino.h"
#include "WiFiMulti.h"
#include "Audio.h"
// Built-in amplifier chip pins
#define I2S_DOUT    12
#define I2S_BCLK    13
#define I2S_LRC     11

Audio audio;
WiFiMulti wifiMulti;
String ssid = "yanfa1";                 // WiFi name
String password = "1223334444yanfa";    // WiFi password
void setup() {
  Serial.begin(115200);                 // Set baud rate

  pinMode(21, OUTPUT);                  // Sound shutdown pin
  pinMode(14, OUTPUT);                  // MUTE pin
  digitalWrite(14, LOW);                // The 2.8-inch and 2.4-inch V1.1 / V1.2 versions have removed this pin.
  digitalWrite(21, HIGH);               // Set pins to enable music playback

  delay(50);
  Serial.printf("[LINE--%d]\n", __LINE__);
  WiFi.mode(WIFI_STA);                              // Set the WiFi mode of the device to Station mode.
  wifiMulti.addAP(ssid.c_str(), password.c_str());  // Add WiFi credentials
  wifiMulti.run();                                  // Connect to WiFi
  if (WiFi.status() != WL_CONNECTED) {              // WiFi connection failed
    WiFi.disconnect(true);
    wifiMulti.run();                                // Attempt to connect again
  }
  Serial.printf("[LINE--%d]\n", __LINE__);
  Serial.println("----- WIFI_CONNECTED -----");
  audio.setPinout(I2S_BCLK, I2S_LRC, I2S_DOUT);     // Initialize audio
  audio.setVolume(20);                              // Volume level: 0...21
  digitalWrite(21, LOW);                            // Pull the mute control pin low to enable sound

  // Choose the URL of the music you want to play
  // audio.connecttohost("http://music.163.com/song/media/outer/url?id=2086327879.mp3"); // Flowers.mp3

  // This is Taylor Swift singing 'Last Christmas'
  audio.connecttohost("http://music.163.com/song/media/outer/url?id=1405259103.mp3");   // Last Christmas.mp3

  // audio.connecttohost("http://music.163.com/song/media/outer/url?id=5103312.mp3");   // Empire state of mine.mp3
  Serial.printf("[LINE--%d]\t ready to play!!\n", __LINE__);
}

void loop() {
  audio.loop(); // Play each frame of the music
  if (Serial.available()) {         // Condition to stop music, triggered when serial data is received
    audio.stopSong();               // Stop playback
    String r = Serial.readString(); // Read music data from serial
    r.trim();                       // Ensure there are no extra spaces or line breaks in the received data,
              // so that the subsequent check of r.length()>5 accurately reflects the length of valid characters.
    if (r.length() > 5) audio.connecttohost(r.c_str()); // Try connecting to the next song URL
    log_i("free heap=%i", ESP.getFreeHeap());
  }
}
If your code compiles incorrectly, you can check if the ESP32 version number is correct. The ESP32 version number we need for this lesson is 3.0.2.

Secondly, please pay attention to replacing the corresponding size library file.
Select the appropriate library file based on the product screen size
You can refer to the third point mentioned above, "Configure library file".