Lesson 07: Lighting Up the Screen and Displaying Text with LVGL
1. Course Introduction
Initialize the MIPI-DSI display, GT911 touch, and LVGL 9.1, then create a white background with a centered Hello Elecrow label.
2. Learning Objectives
After completing this lesson, you should be able to:
- Understand how
board_config.hbinds the screen and touch. - Read and understand LVGL locks, labels, styles, and centering layout.
- Make the screen display text reliably.
3. What You Need
- Prepare the required number of CrowPanel Advanced 5-inch ESP32-P4 HMI AI Display boards and USB-C cables capable of data transfer.
- The display panel resolution is 800×480.
Code reference: https://github.com/Elecrow-RD/-CrowPanel-Advanced-5inch-ESP32-P4-HMI-AI-Display-800x480-IPS-Touch-Screen/tree/master/example/V1.0
4. Software Operation Steps
Double-click to open the Lesson 7 code (.ino file).
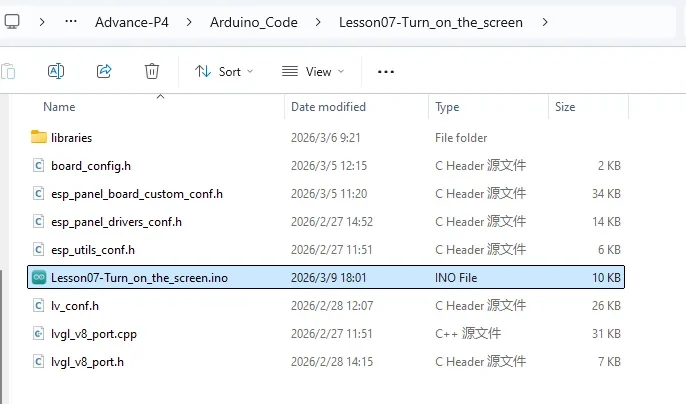
board_config.h centrally defines the GT911 I2C/reset/interrupt pins, the LCD backlight/reset pins.
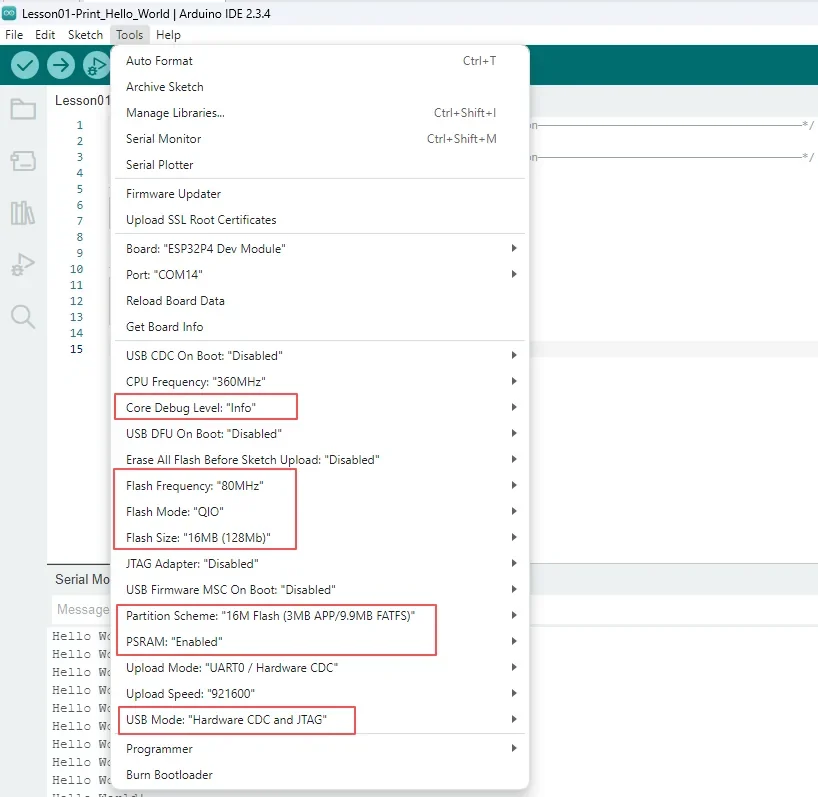
Configure the options as described below.
- Board:
ESP32P4 Dev Module - Core Debug Level:
Info - Flash Frequency / Mode / Size:
80MHz/QIO/16MB (128Mb) - Partition Scheme:
16M Flash (3MB APP/9.9MB FATFS) - PSRAM:
Enabled - USB Mode:
Hardware CDC and JTAG - Port: After connecting the USB data cable to the board's UART0, select the newly appeared COM port under "Tools → Port".
Follow the library import steps explained in detail in Lesson 1 to import the library files required by this project into the development environment, ensuring that the code can correctly locate the relevant dependencies during compilation, thereby guaranteeing normal program operation.

5. Hardware Operation Steps
Connect a USB-C cable capable of data transfer between the board's UART0 port and your computer. After connecting, the board's power indicator should light up, and the corresponding COM port should appear in the Arduino IDE.

Select the correct board and port in the Arduino IDE, then click Upload. After the upload completes and the board resets automatically, observe whether the screen backlight turns on.
The screen should display a white background with the centered black Hello Elecrow text, with no screen corruption, flickering, or misalignment.
If the display is unstable when powered only through UART0, use another Type-C cable to connect the USB 2.0 port for auxiliary power.

If the backlight does not turn on, first check the power supply and the LCD ribbon cable, then check the backlight PWM, and screen initialization configuration in the Arduino project.
6. Key Code Explanation
6.1 lvgl_show_hello_elecrow()
if (lvgl_port_lock(-1) != true) {  // 0 means non-blocking wait for the lock (timeout = 0)
        MAIN_ERROR("LVGL lock failed");  // Print error if lock fails
        return;  // Exit function
    }

    // 2. Create screen background (optional: set background color for better text visibility)
    lv_obj_t *screen = lv_screen_active();  // Get current active screen object
    lv_obj_set_style_bg_color(screen, LV_COLOR_WHITE, LV_PART_MAIN);  // Set background color to white
    lv_obj_set_style_bg_opa(screen, LV_OPA_COVER, LV_PART_MAIN);      // Set background fully opaque

    // 3. Create label object (parent object = current screen)
    lv_obj_t *hello_label = lv_label_create(screen);  // Create label
    if (hello_label == NULL) {  // Check if creation failed
        MAIN_ERROR("Create LVGL label failed");  // Log error
        lvgl_port_unlock();  // Unlock LVGL before returning
        return;  // Exit function
    }
After obtaining the LVGL lock, the function gets the active screen, sets an opaque white background, creates the label, and checks for allocation failure before continuing. The remaining code sets the label text, black color, center alignment, and the size-42 Montserrat font. LVGL objects are modified only while lvgl_port_lock() is held, followed by lvgl_port_unlock().
6.2 Display and Touch Initialization
board->init() initializes the MIPI-DSI panel, LCD, and GT911 touch device; board->begin() starts the panel and backlight. lvgl_port_init(board->getLCD(), board->getTouch()) registers the LCD flush and touch input drivers and starts the LVGL service task.
7. Experimental Results
- After the backlight turns on, the black
Hello Elecrowappears at the center of the screen; the serial output shows logs confirming successful display, touch, and LVGL initialization.