Lesson 13: Fetching and Displaying Weather via Wi-Fi
This lesson uses the onboard ESP32-C6 as a Wi-Fi coprocessor, with the ESP32-P4 communicating with it via SDIO.
1. Course Introduction
This lesson configures the development board in Wi-Fi STA mode. After connecting to a router, it fetches weather JSON data over HTTP, parses the temperature, weather description, and timestamp, and displays the results on an 800×480 screen using LVGL. The experiment also covers the ESP32-P4/ESP32-C6 cooperative architecture, HTTP requests, JSON parsing, thread-safe LVGL updates, and partition configuration for large image assets.
2. Learning Objectives
- Be able to explain the relationship between the ESP32-P4 and ESP32-C6 collaborating for network connectivity via SDIO.
- Be able to configure STA mode, connect to a router, and determine whether the connection is successful.
- Be able to describe the data flow among HTTP fetching, JSON parsing, and LVGL display.
- Be able to modify Wi-Fi credentials and partition configuration, and complete compilation, uploading, and result verification.
3. What You Need
- One CrowPanel Advanced 5-inch ESP32-P4 HMI AI Display development board.
- Two USB Type-C cables that support data transfer: UART0 is used for uploading, and the USB 2.0 port is used for auxiliary power.
- Arduino IDE 2.x, ESP32 Arduino Core 3.3.3, and the dependency libraries bundled with the course code.
- A 2.4 GHz Wi-Fi network with internet access. Do not enter real long-term passwords in public documents.
The onboard ESP32-C6 handles scanning, authentication, encryption, and TCP/IP communication, while the ESP32-P4 handles application logic and graphics display.

4. Software Operation Steps
4.1 Open the Course Project
Open Lesson13_Get_weather_via_WiFi.ino and confirm that the project directory also contains board_config.h, weather.c, weather.h, image_both.c, and the display driver files.

4.2 Check the Weather Service Configuration
Open weather.h and confirm the weather service interface and request address. This service returns local weather data based on the egress IP and returns it in JSON format; the service is not suitable for high-frequency or large-scale access.
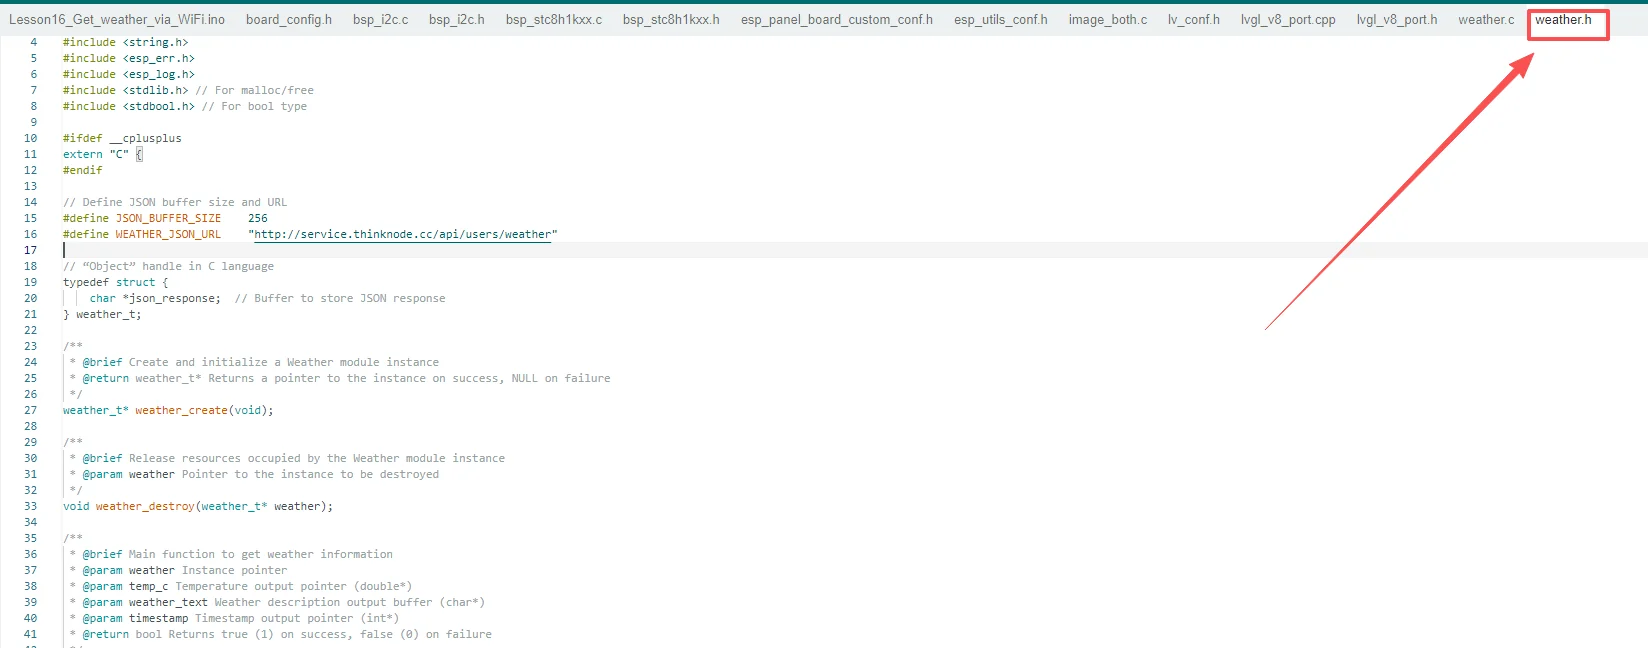


The main program calls the weather module by including weather.h, eliminating the need to re-implement the HTTP and JSON parsing logic in the .ino file.

4.3 Configure Wi-Fi
In the main .ino file, locate sta_ssid and sta_password and change them to the SSID and password of the experimental network.

After initializing the display, the program calls WiFi.setPins() to configure the SDIO pins between the ESP32-P4 and ESP32-C6, then enters STA mode.

4.4 Configure the Arduino IDE
Connect the USB-C cable that supports data transfer to the port labeled UART0 on the development board, then connect it to the computer.
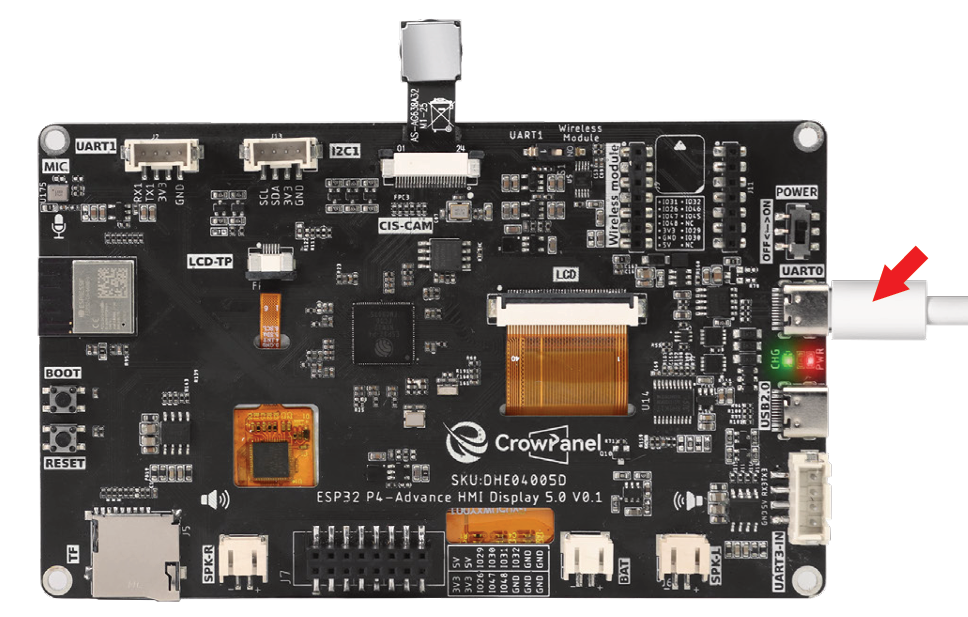
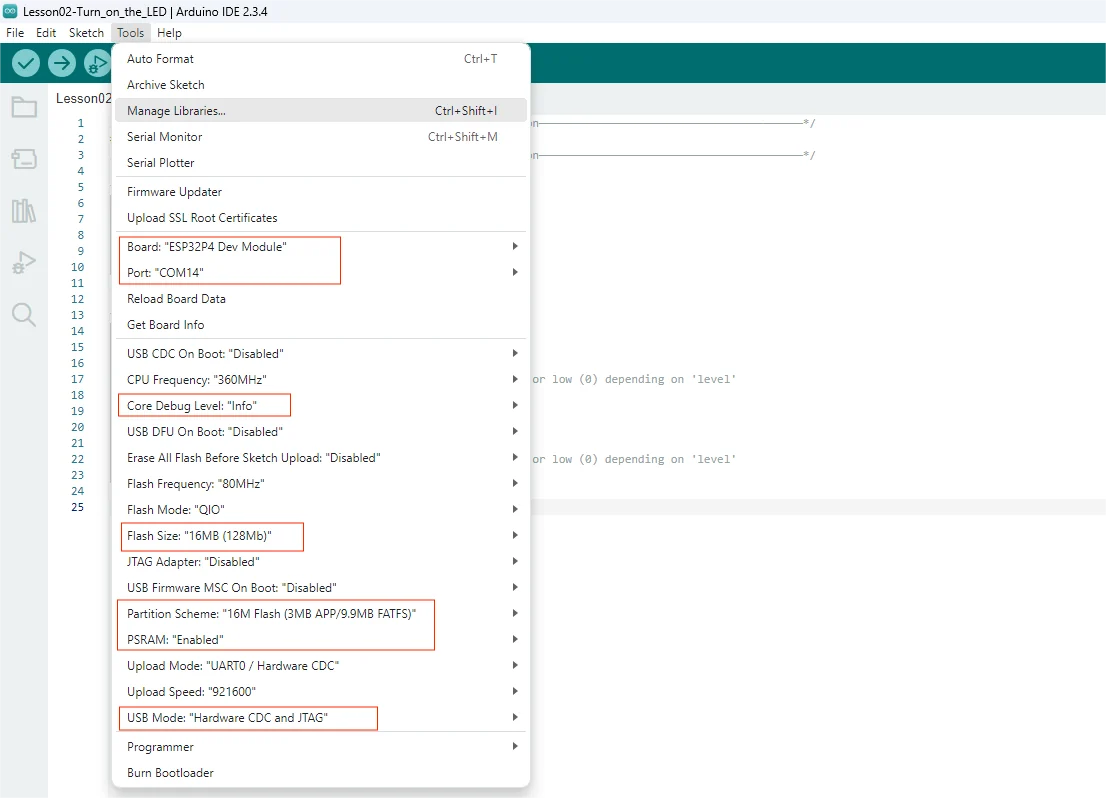
After connecting, select the following in the Arduino IDE:
- Board:
ESP32P4 Dev Module - Flash Frequency / Mode / Size:
80MHz/QIO/16MB (128Mb) - PSRAM:
Enabled - USB Mode:
Hardware CDC and JTAG - Port: The COM port corresponding to UART0
4.5 Expand the Application Partition
image_both.c contains a large background image array. If the default 3 MB application partition causes compilation to fail, you need to expand the APP space using the partition table provided with the course project. Back up the original file before modifying, and ensure the total Flash capacity remains 16 MB.

Come to this path of the file system.
Path reference:
C:\Users\admin\AppData\Local\Arduino15\packages\esp32\hardware\esp32\3.3.8

Openthe "boards.txt" file and search for "esp32p4". Locate this section of the area.

First, add a "#" symbol in front of this size for annotation, and then add a new size.

The size of this partition table occupies 10,485,760 bytes. This is because we modified this partition table. Go to the following path and find app3M_fat9M_16MB.csv

Use the contents of our partition table

# Name,   Type, SubType, Offset,  Size, Flags
nvs,      data, nvs,     0x9000,  0x5000,
otadata,  data, ota,     0xe000,  0x2000,
app0,     app,  ota_0,   0x10000, 0x600000,
app1,     app,  ota_1,   0x610000,0x600000,
ffat,     data, fat,     0xC10000,0x3E0000,
coredump, data, coredump,0xFF0000,0x10000,
# to create/use ffat, see https://github.com/marcmerlin/esp32_fatfsimage
After making the revisions, be sure to save the document.
Then close all Arduino IDE programs, and reopen them.
4.6 Compile and Upload
Click the Verify button and confirm that compilation completes before uploading. The first full compilation of the large image assets may take a long time.

5. Hardware Operation Steps
Inspect the LCD ribbon cable and the onboard antenna area, and connect the USB-C cable that supports data transfer to the development board's UART0 port and to the computer.

The ESP32-C6 Wi-Fi coprocessor is already installed on the development board, so no external module is needed. Confirm that there are no metal obstructions or short-circuit hazards around it.

In the Arduino IDE, select the correct board, COM port, and partition configuration, then click Upload. After uploading completes, open the Serial Monitor at a baud rate of 115200.
For details on how to open the Serial Monitor and set the baud rate, please refer to Lesson 1.
The serial output should show that Wi-Fi connected successfully and the assigned IP address, followed by the weather data or HTTP request result.
The screen should display the background image, temperature, weather description, date, and day of the week, with the backlight steadily lit.

If the development board reboots when Wi-Fi and the screen are operating simultaneously, you can use another Type-C cable to connect to the USB 2.0 port for auxiliary power.
6. Key Code Explanation
6.1 Wi-Fi Initialization
WiFi.setPins(WIFI_HOSTED_SDIO_PIN_CLK,
             WIFI_HOSTED_SDIO_PIN_CMD,
             WIFI_HOSTED_SDIO_PIN_D0,
             WIFI_HOSTED_SDIO_PIN_D1,
             WIFI_HOSTED_SDIO_PIN_D2,
             WIFI_HOSTED_SDIO_PIN_D3,
             WIFI_HOSTED_SDIO_PIN_RESET);
WiFi.mode(WIFI_STA);
WiFi.begin(sta_ssid, sta_password);
WiFi.setPins() maps the hosted ESP32-C6 SDIO signals using the definitions in board_config.h. WiFi.mode(WIFI_STA) selects station mode and WiFi.begin(sta_ssid, sta_password) starts association with the configured router; the connection loop continues until WiFi.status() == WL_CONNECTED or the retry limit is reached.
6.2 Fetching and Parsing Weather
weather_t *weather = weather_create();
weather_get_weather(weather, &temperature, weather_text, ×tamp);
weather_create() allocates and initializes the weather context. weather_get_weather() performs the HTTP request, parses the JSON response, and writes the temperature, description, and timestamp to the supplied outputs. weather_destroy() must be called when the task is finished to release the context and its buffers.
6.3 LVGL Interface Updates
The weather task acquires lvgl_port_lock() before changing the temperature, description, or time labels and releases it immediately afterward. Network requests and delays remain outside the lock, preventing the LVGL refresh task from racing with UI updates without blocking it during Wi-Fi work.
7. Experimental Results
- The serial output shows that Wi-Fi is connected and prints the assigned IP address.
- After a successful HTTP request, the screen displays the temperature, weather description, date, and day of the week.
- The weather location is determined by the egress IP of the current network, and the result may differ from a precise GPS location.
8. Common Issues and Troubleshooting
- Wi-Fi won't connect: Check the SSID, password, 2.4 GHz network, and SDIO pin configuration.
- HTTP request fails: Check whether the network can access the internet, and reduce the request frequency.
- Compilation reports insufficient program space: Check whether the custom partition table has been saved and selected in the Arduino IDE.
- Screen reboots or flickers: Add independent power to the USB 2.0 port.
- No text on the interface but the background is normal: Check the weather request return value, JSON fields, and the use of the LVGL lock.