5inch_P4_Micropython_03_Play_Music: STC8 Amplifier Control and I2S Music Playback
1. Course Introduction
This lesson uses the STC8 on-board controller of the 5-inch CrowPanel to enable the audio amplifier, and then the ESP32-P4's I2S1 outputs a 16 kHz, 16-bit, dual-channel sine wave melody. The program generates continuous audio blocks according to the note table and plays a scale; during operation, the melody can be heard from the speakers, and STC8, I2S, playback, and amplifier shutdown logs can be seen in the Shell.
2. Learning Objectives
- Be able to correctly connect two speakers with the power off, and flash the 5-inch dedicated firmware.
- Be able to explain the relationship between STC8 I2C amplifier enable and the I2S LRCLK, BCLK, and SDATA signals.
- Be able to run
speaker.pyand determine whether the audio chain is working properly based on sound and logs. - Be able to safely adjust the beat duration and restore the default value, observing changes in playback speed.
3. Preparations
- One CrowPanel Advanced 5-inch ESP32-P4 HMI AI Display, with a screen resolution of 800 × 480 and RGB565 16-bit color.
- One USB data cable that supports data transfer; charging-only cables cannot flash firmware or transfer files.
- A Windows PC and the Thonny IDE; if the latest version has issues with flashing or running, use Thonny 4.1.7, which has been verified by the source documentation.
- The 5-inch dedicated firmware
lvgl_micropy_ESP32_GENERIC_P4-C6_WIFI-16_ELECROW_INCH5_V1_0.bin; do not replace it with the 7/9/10-inch firmware. - Close any software occupying the serial port before flashing; power off before plugging or unplugging the SD card, speakers, or other hardware.
- Two speakers matching the development board's interface, along with connecting cables.
- The
speaker.pyfile and the 5-inch dedicated firmware from this lesson's directory.
Code reference:
4. Software Operation Steps
Flash lvgl_micropy_ESP32_GENERIC_P4-C6_WIFI-16_ELECROW_INCH5_V1_0.bin following the procedure from Lesson 1. After success, confirm that boot.py appears in the device area.
Flashing the firmware follows the same process as the first case.
You need to flash the "
lvgl_micropy_ESP32_GENERIC_P4-C6_WIFI-16_ELECROW_INCH5_V1_0.bin" firmware onto the device.Once the flashing is successful, a "boot.py" file will appear.

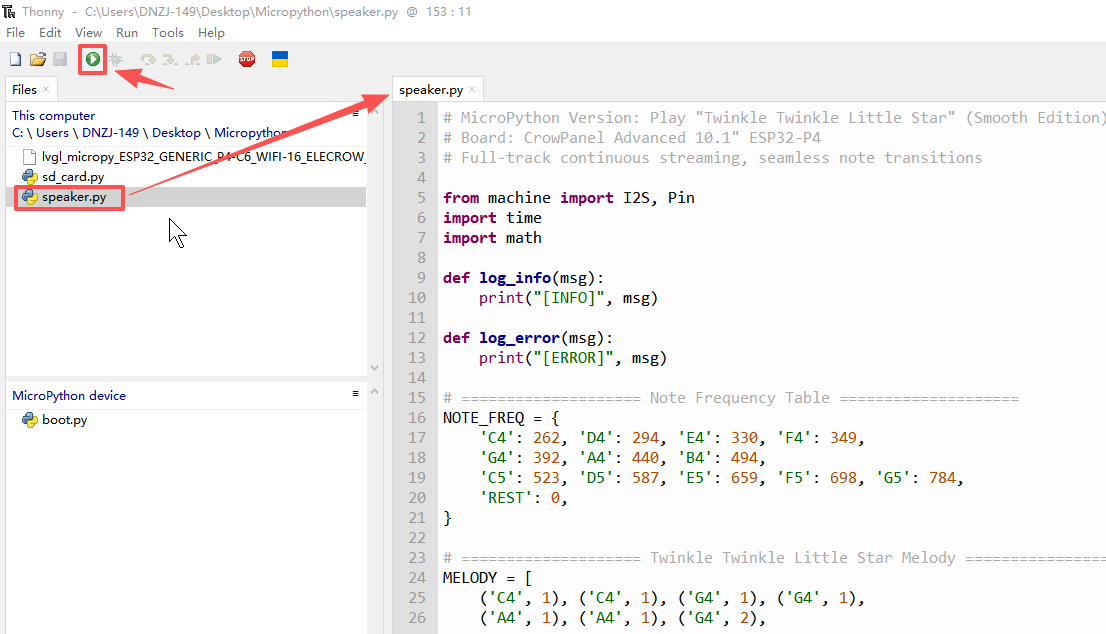
Upload and open speaker.py, then click Run. Once the Shell shows that STC8 I2C and I2S initialization succeeded, the speakers should start playing.
5. Hardware Operation Steps
Disconnect the power, insert the left and right speaker connectors into their corresponding ports, ensure they are fully seated with no short circuits in the wiring, then power on again.

Maintain a safe distance during the first run. If obvious distortion, popping, or abnormal heating occurs, stop the program immediately and check the speaker specifications and connections.
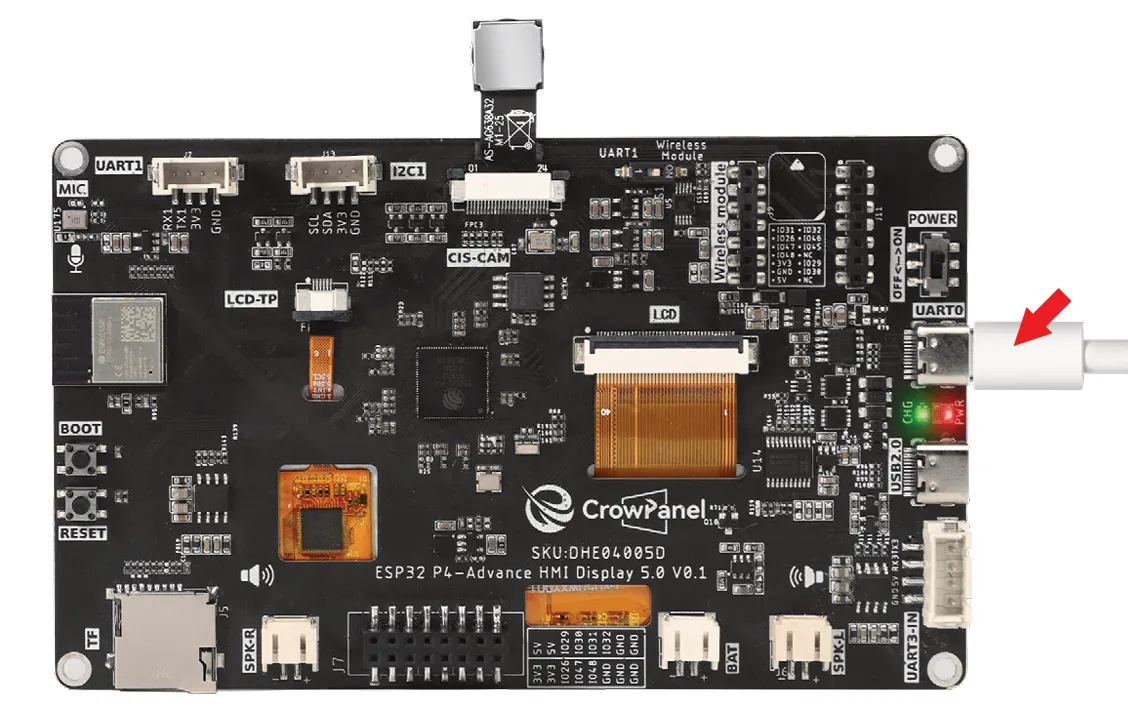
Connect the CrowPanel Advanced 5-inch ESP32-P4 HMI AI display to your computer using a USB cable.
6. Key Code Explanation
6.1 STC8 controls the power amplifier via I2C.
First, communication is established between this device and STC8 via I2C. Then, the level is written to the GPIO register of STC8 using the writeto_mem() function, thereby controlling the enable state of the audio power amplifier. set_audio_ctrl(True) is used to turn on the power amplifier, and set_audio_ctrl(False) is used to turn it off. Therefore, STC8 is not responsible for generating the audio in this case; instead, it acts as an I2C controller, responsible for controlling the on/off of the audio power amplifier.
def stc8_i2c_init():
    global i2c_bus
    try:
        i2c_bus = I2C(0, scl=Pin(I2C_SCL_PIN), sda=Pin(I2C_SDA_PIN), freq=100000)
        log_info(f"STC8 I2C initialized successfully")
        return True
    except Exception as e:
        log_error(f"STC8 I2C initialization failed: {e}")
        return False

def stc8_gpio_set_level(gpio_num, level):
    global i2c_bus
    if i2c_bus is None:
        return False
    try:
        reg_addr = STC8_REG_ADDR_SET_GPIO + gpio_num
        i2c_bus.writeto_mem(STC8_I2C_ADDR, reg_addr, bytes([level]))
        return True
    except Exception as e:
        log_error(f"STC8 GPIO set failed: {e}")
        return False

def set_audio_ctrl(state):
    """Control audio power amplifier"""
    level = 0 if state else 1
    result = stc8_gpio_set_level(STC8_GPIO_OUT_AUDIO_SD, level)
    if result:
        log_info(f"audio power amplifier {'enabled' if state else 'disabled'}")
    return result
6.2 I2S initialization, establishing the actual audio output channel
Here, the audio output is configured through I2S. BCLK, LRCLK and SDATA are respectively connected to the I2S clock, left and right channel clocks, and audio data lines. 16-bit sampling, stereo output and a sampling rate of 16000 Hz are set. Additionally, ibuf=8192 is used to increase the I2S buffer, reducing the probability of data shortage during playback, which causes sound lag or interruption. After initialization, the program can send the generated audio data out through tx_i2s.write().
        tx_i2s = I2S(
            1,
            sck=Pin(AUDIO_GPIO_BCLK),
            ws=Pin(AUDIO_GPIO_LRCLK),
            sd=Pin(AUDIO_GPIO_SDATA),
            mode=I2S.TX,
            bits=16,
            format=I2S.STEREO,
            rate=SAMPLE_RATE,
            ibuf=8192  # Increased buffer
        )
6.3 Generate a sine wave and play it in blocks.
This function is responsible for actually generating the sound data. The program calculates the sine wave sampling values based on the frequencies corresponding to the notes, such as C4 = 262 Hz and A4 = 440 Hz, using the math.sin() function. Then, it writes the same sampling value into the left and right channels in a 16-bit stereo format. This process does not generate the entire piece of music at once. Instead, it generates a small section of audio data every CHUNK_SEC = 0.1 seconds, and immediately sends it to I2S using tx_i2s.write(chunk). At the same time, phase_offset is used to save the current phase position of the sine wave, so that the next audio segment can continue from where the previous one left off, avoiding each audio block starting anew from the beginning of the sine wave, thus ensuring the continuity of the sound.
def generate_chunk(frequency, chunk_sec, sample_rate, phase_offset):
    """Generate sine wave audio chunk"""
    samples = int(chunk_sec * sample_rate)
    buffer = bytearray(samples * 4)
    amplitude = AMPLITUDE if frequency > 0 else 0
    two_pi = 2 * math.pi

    for i in range(samples):
        if frequency > 0:
            sample = int(amplitude * math.sin(two_pi * frequency * (phase_offset + i) / sample_rate))
        else:
            sample = 0
        left_bytes = (sample & 0xffff).to_bytes(2, 'little')
        right_bytes = (sample & 0xffff).to_bytes(2, 'little')
        idx = i * 4
        buffer[idx:idx+2] = left_bytes
        buffer[idx+2:idx+4] = right_bytes

    return buffer, phase_offset + samples
7. Experimental Results
After running, the Shell sequentially displays STC8 I2C initialization successful, amplifier enabled, I2S initialization successful, and playback started; the two speakers should play a continuous ascending scale. After playback ends, a completion message is displayed and the amplifier is turned off. If there are only logs but no sound, check the speaker connectors, the STC8 address, and the low-level enable in sequence; if the sound is intermittent, confirm that the designated firmware is being used and stop other high-load scripts.