Arduino IDE Library Import Guide
Arduino libraries are pre-built code modules that add ready-to-use functionality to your projects. Once the correct library is installed, you can use displays, sensors, wireless modules, and other hardware directly from your course code — no need to write everything from scratch.
This guide covers two ways to install libraries:
- Install via the Arduino IDE Library Manager;
- Download from the course link and copy to your "libraries" folder (Recommended).
Installing a different version — even a newer one — can break your code. Version mismatches commonly cause compilation failures, incompatible function signatures, and devices that simply won't work. Never just grab the "latest."
We strongly recommend Method 2. Many course libraries include custom configuration changes that have been tested end-to-end with your course code. Using the course-provided files is far more reliable than hunting down libraries on your own.
1. Install via Arduino IDE Library Manager
Use this method when the library is available in the Arduino IDE Library Manager and your course has not provided a modified version.
We'll use LVGL as an example. The version numbers shown in screenshots are for illustration only — always follow the version required by your course.
Step 1: Open Arduino IDE
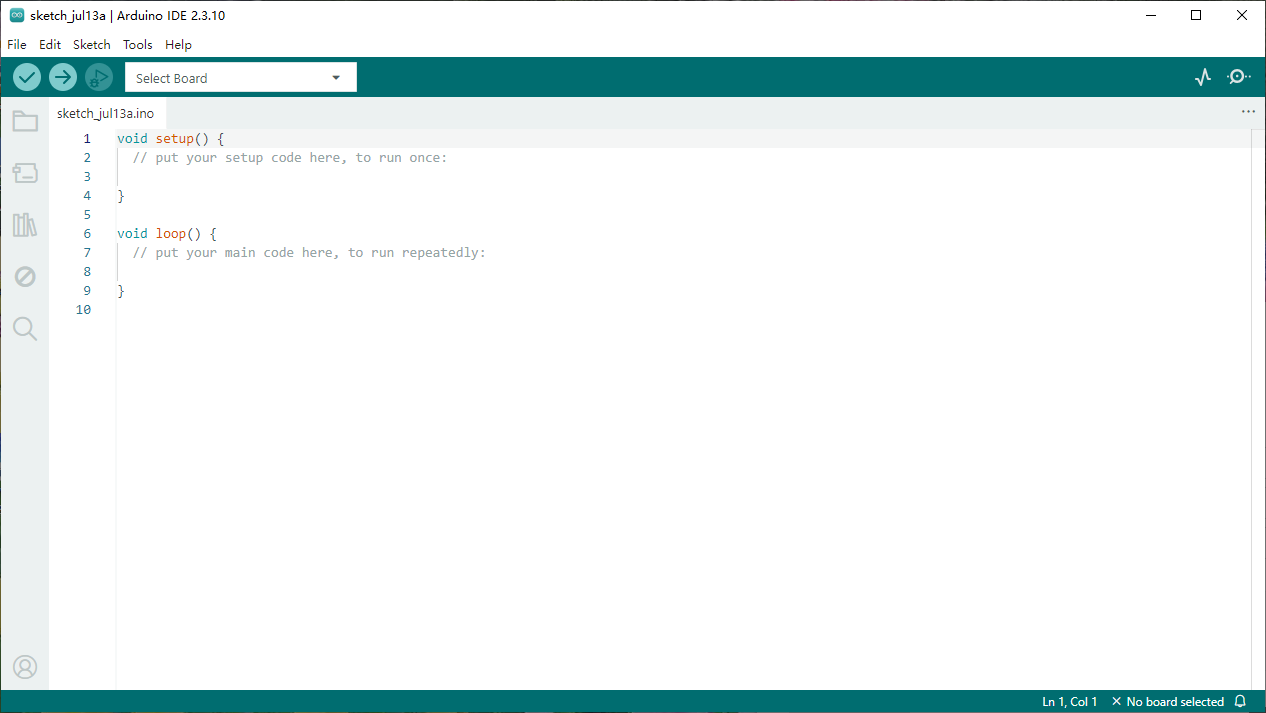
Fire up Arduino IDE. You should land on the main screen shown below.
Step 2: Open the Library Manager
In the left sidebar, click the Library Manager icon — it looks like a few books standing side by side.
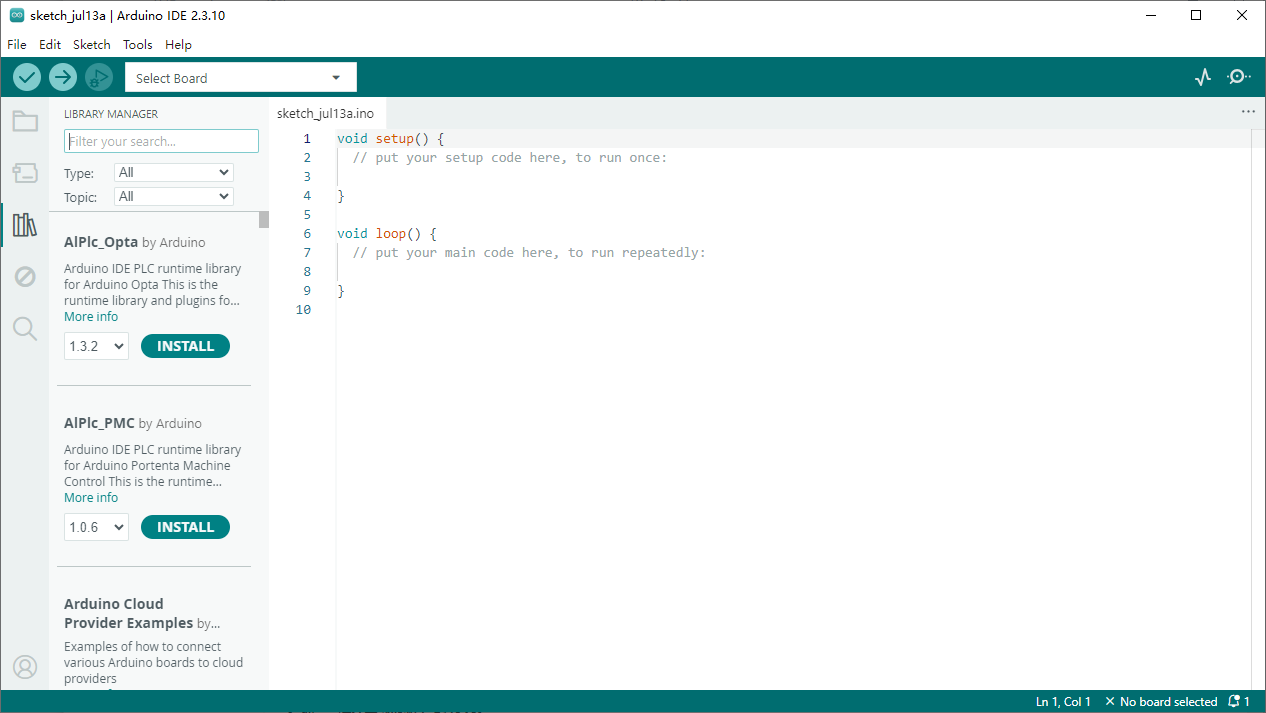
Alternatively, go through the top menu:
Tools → Manage Libraries
Step 3: Search for the library
In the search bar at the top of the Library Manager, type the library name listed in your course. For LVGL, you'd type lvgl.
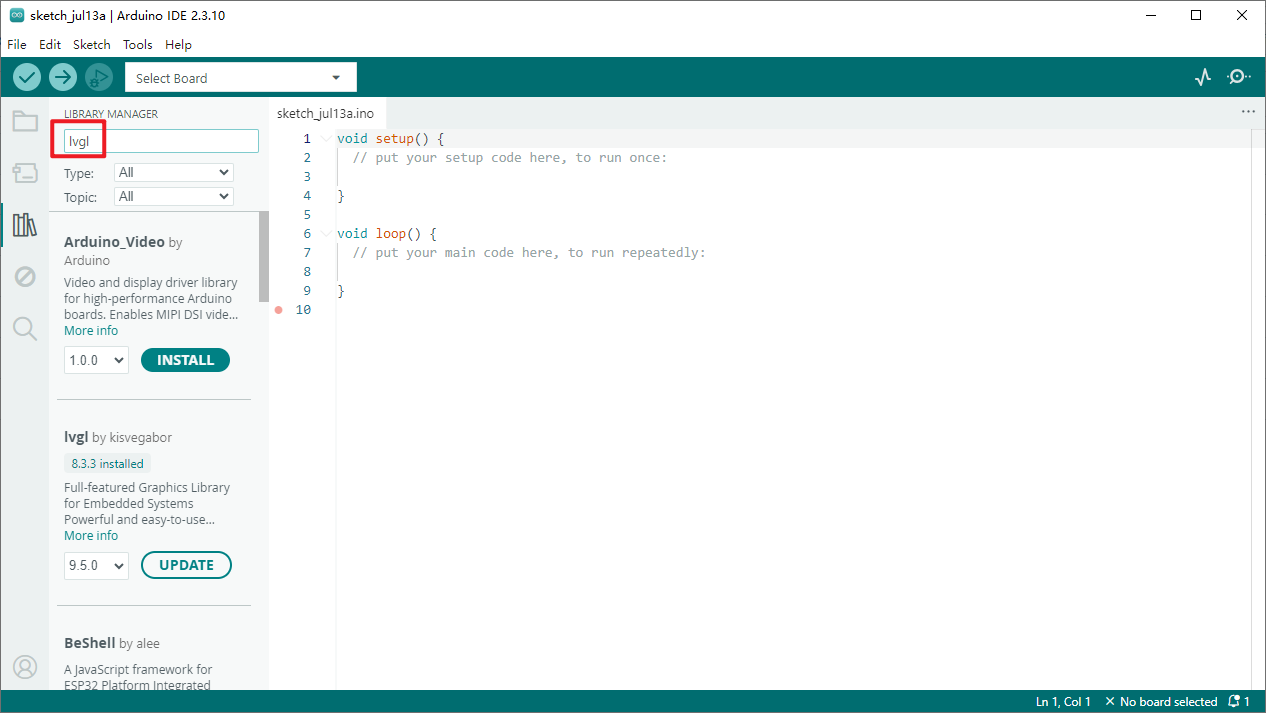
You may see multiple results. Check carefully:
- The library name matches your course exactly;
- The author is correct;
- Don't install something that just looks similar.
In the screenshot, the right pick is lvgl by kisvegabor — not Arduino_Video above it.
Step 4: Pick the right version and install
Once you've found the correct library, click the version dropdown, select the version your course calls for, and hit "INSTALL."
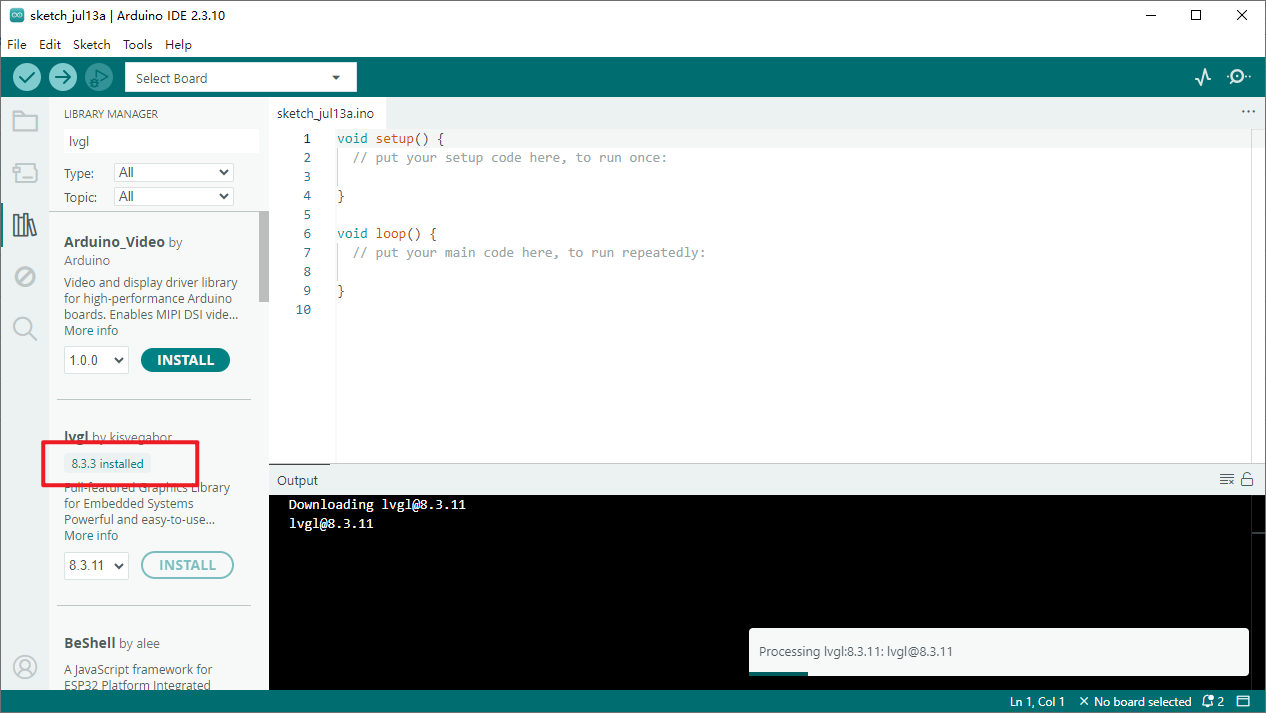
The screenshot shows LVGL 8.3.11 as an example. Arduino IDE will show download and installation progress in the bottom panel — give it a moment.
Newer versions may rename functions, shuffle parameters, restructure files, or change default settings — any of which can make your course code fail.
If Arduino IDE asks whether to install dependencies too, go with "Install All" unless your course tells you otherwise.
Step 5: Confirm it installed
After installation, you should see "VERSION installed" beneath the library name, along with an "Installed" message in the output console.
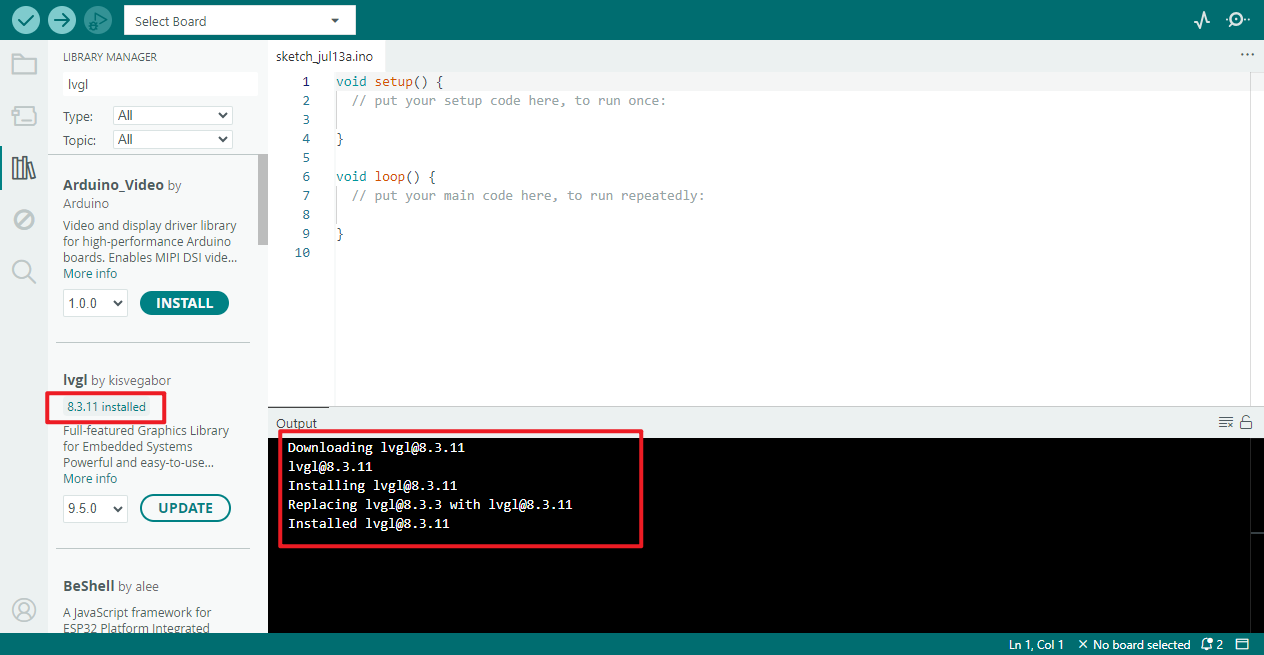
That's it — the library is now available in your Arduino IDE.
2. Download Course Library Files and Copy Manually (Recommended)
Course-provided libraries often come with pre-tuned configurations and have been tested alongside your course code. For the safest bet, download and copy them yourself.
Step 1: Download the course libraries
Grab the library files from your course link:
📂 Library Download Link — To Be Added
This is the single, centralized download point for all course libraries. Every product tutorial points here, so you only need one bookmark.
(Link will be provided before the course goes live.)
Before you download, double-check the filename and version against what your course requires.
Even if the name and version look the same, the course-provided library may include custom configurations. Only use the files linked here.
Step 2: Extract the downloaded archive
After downloading, fully extract the ZIP file. Do not peek inside with your archive tool and call it done — and definitely don't toss the unzipped archive into your Arduino libraries folder.
Here's what a typical course library package looks like:
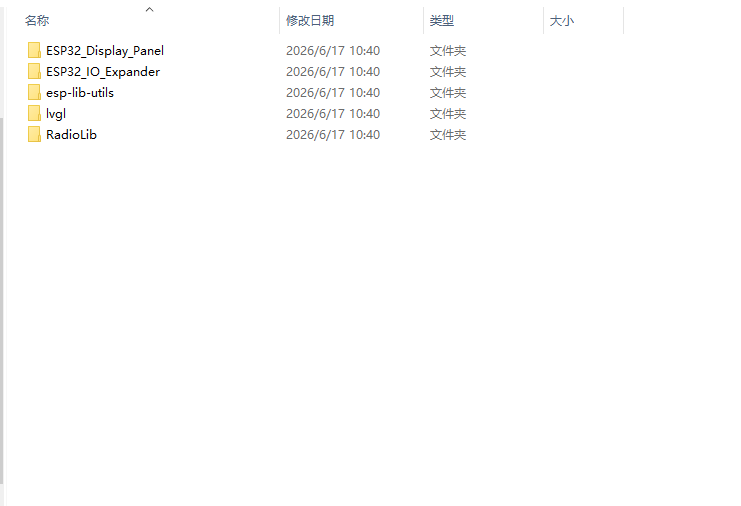
The screenshot includes these libraries:
ESP32_Display_PanelESP32_IO_Expanderesp-lib-utilslvglRadioLib
Your actual package may differ. When multiple libraries are bundled together, copy every one of them — not just a single folder.
Peek inside any library folder and you should see files like src, examples, and library.properties:
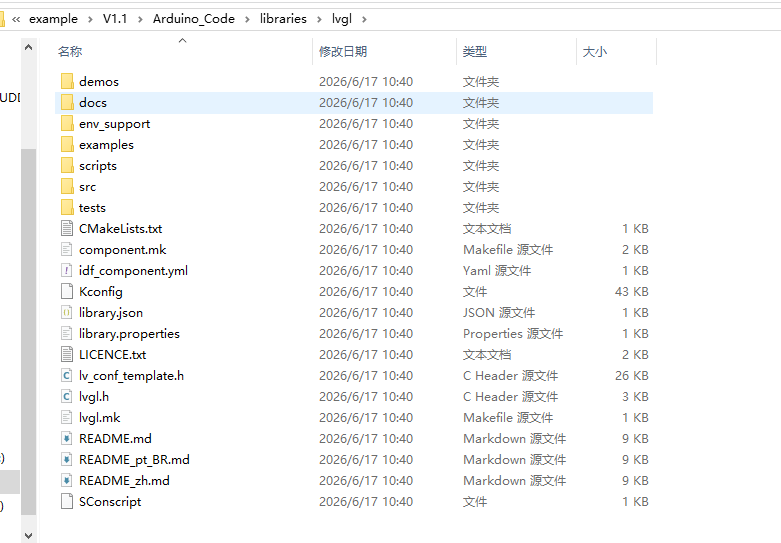
This means you're looking at the library folder itself — the one you're about to copy. Avoid nesting an extra layer of the same name.
✓ Correct:
✗ Wrong (note the extra lvgl folder):
Step 3: Find your sketchbook folder
In Arduino IDE, go to:
File → Preferences
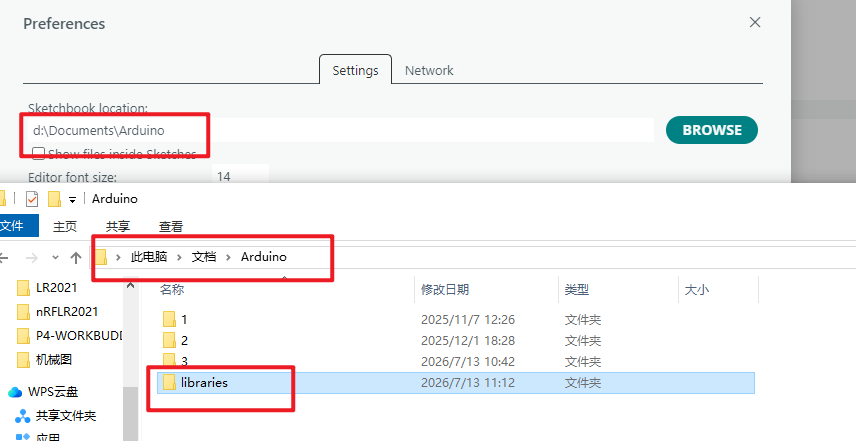
Look for the "Sketchbook location" field. The example below points to:
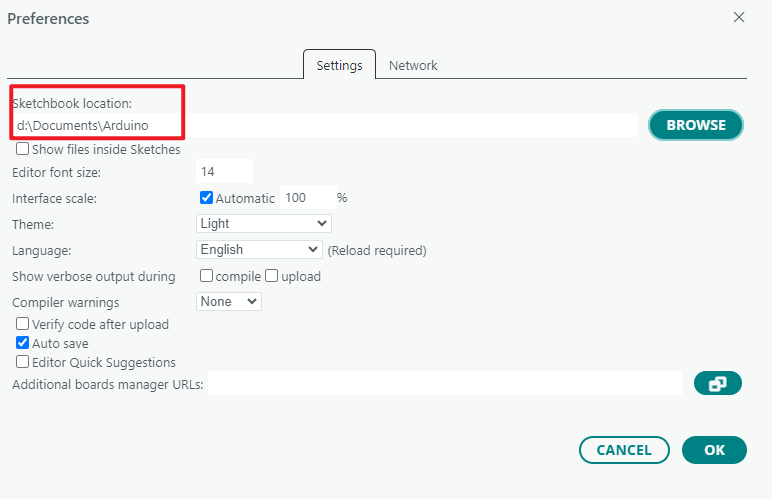
Heads up: The path on your machine will almost certainly be different. Use whatever your Arduino IDE shows — don't just copy
D:\Documents\Arduino.
Step 4: Open the libraries folder
In File Explorer, navigate to the sketchbook folder you found above, then open the libraries subfolder inside it.
For the example path D:\Documents\Arduino, you'd go to:
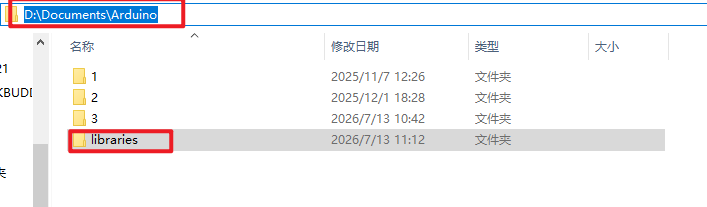
The image below shows how the sketchbook location in Arduino IDE maps to the actual folder in File Explorer:
If there's no libraries folder, create one yourself. The name must be spelled exactly:
Step 5: Copy the library folders
Close Arduino IDE first, then copy every library folder from Step 2 into the libraries directory.
Your result should look something like:
Arduino
└── libraries
    ├── ESP32_Display_Panel
    ├── ESP32_IO_Expander
    ├── esp-lib-utils
    ├── lvgl
    └── RadioLib
If an older version of a library with the same name is already in libraries, move it out first (and back it up). Keeping two versions side by side will confuse Arduino IDE and may cause it to load the wrong one.
Step 6: Restart Arduino IDE and verify
Restart Arduino IDE after copying. Then go to:
Sketch → Include Library
Under "Contributed libraries," you should see the libraries you just added.
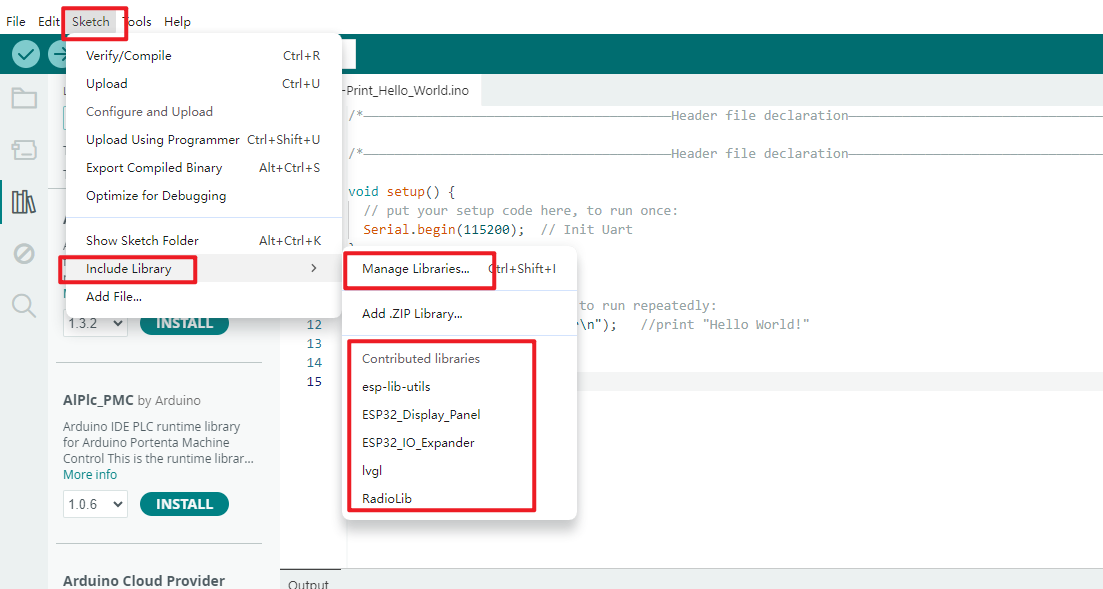
Finally, open your course code and click the Verify button (the checkmark icon). If it compiles without any "file not found" errors, everything is wired up correctly.
3. Pre-Launch Checklist
Run through this list before you move on:
- Library name matches the course requirement
- Library version matches the course requirement
- If the course provides modified libraries, you used the files from the course link
- Library folders are inside
librariesunder your sketchbook directory - Any old versions with the same name have been moved out of
libraries - After restarting Arduino IDE, the libraries appear under
Sketch→Include Library - Your course code compiles without errors
A mismatch can silently break your course code even when Arduino IDE reports a successful install. Always match the version your course specifies.
Bottom line: Whenever your course gives you a library download link, use Method 2. Those files have been configured and tested specifically for your course — it's the safest path to a working setup.