Lesson02_CrowPanel_Display_LVGL: Basic Display on a 360×360 Round Screen
1. Lesson Introduction
In this lesson, ESPHome 2026.7.4 and ESPHome Device Builder 1.9.2 are used to configure the CrowPanel 1.46inch-HMI ESP32 Rotary Display. The program first enables the 5 V power and backlight-related outputs, then sends a custom initialization sequence to the 360×360 round LCD over SPI, and finally uses LVGL to create a white page with Hello World! displayed in the center.
Learners need to add the YAML to ESPHome, configure their private Wi-Fi credentials, complete validation and flashing, and observe the screen and startup logs. This lesson provides the foundation for subsequent rotary-dial dimming and touch interface lessons: the display pipeline in this lesson must work correctly before the subsequent UI and input functions can be evaluated.
2. Learning Objectives
- Explain the CrowPanel startup sequence, from power output and the SPI bus through LCD initialization and LVGL rendering.
- Import, validate, and install a YAML configuration in ESPHome Device Builder 1.9.2.
- Identify how the 360×360 resolution, 40 MHz SPI rate, and RGB color order affect the displayed output.
- Determine whether the basic display experiment was successful based on the backlight, the
Hello World!page, and the serial logs.
3. Requirements
- 1 CrowPanel 1.46inch-HMI ESP32 Rotary Display.
- 1 USB data cable compatible with data transfer for the rotary display.
- ESPHome Device Builder 1.9.2.
- ESPHome 2026.7.4.
- An available 2.4 GHz Wi-Fi network.
Code download link: Official Elecrow Lesson_Code
4. Software Procedure
Step01: Open ESPHome Device Builder 1.9.2 and confirm that its ESPHome Core version is shown as 2026.7.4. If the versions do not match, upgrade or switch environments first to avoid differences in component syntax. 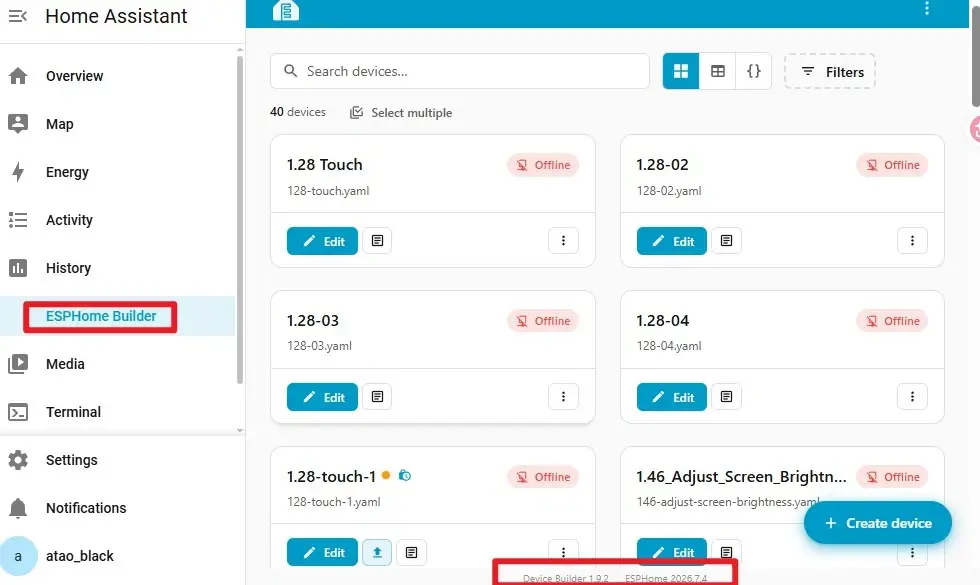
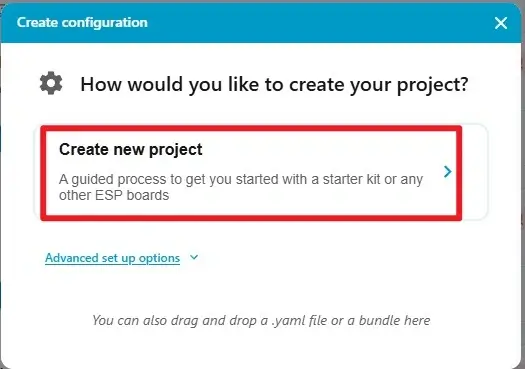
Step02: Create a new project, place rotary-screen-146-display.yaml in the ESPHome configuration directory, and open the corresponding configuration from the device list. The filename and esphome.name may be different, but device names on the same network must be unique.
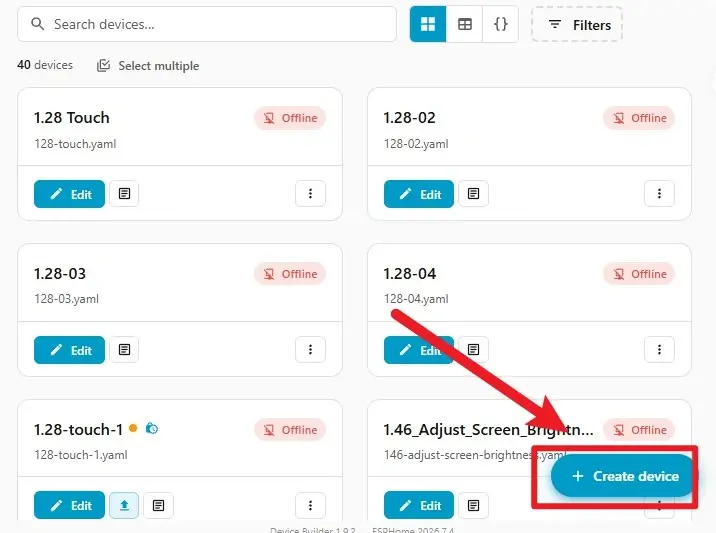
A. Click Create device to create a new project.
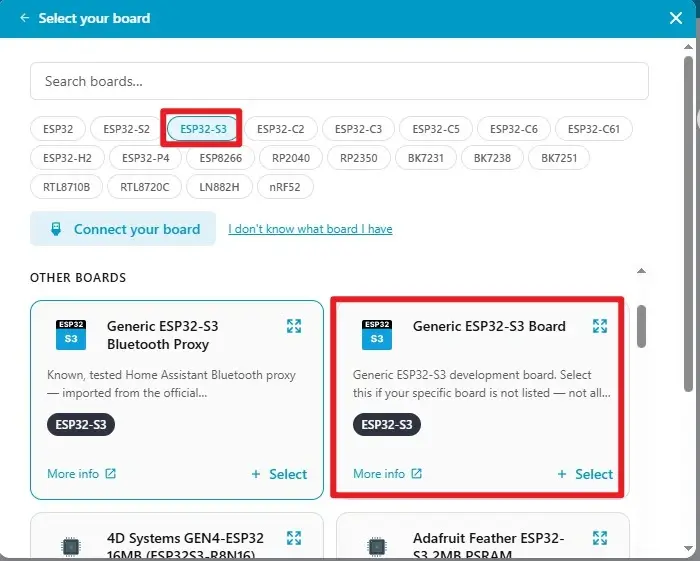
B. Select the esp32s3 microcontroller.
C. Name the project. Complete the new project creation process.
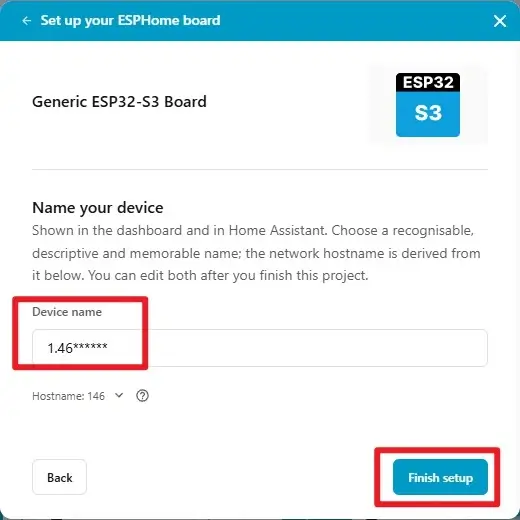
Step03: Copy the official code into the project. Be careful not to copy the API key information. Use the newly generated api. 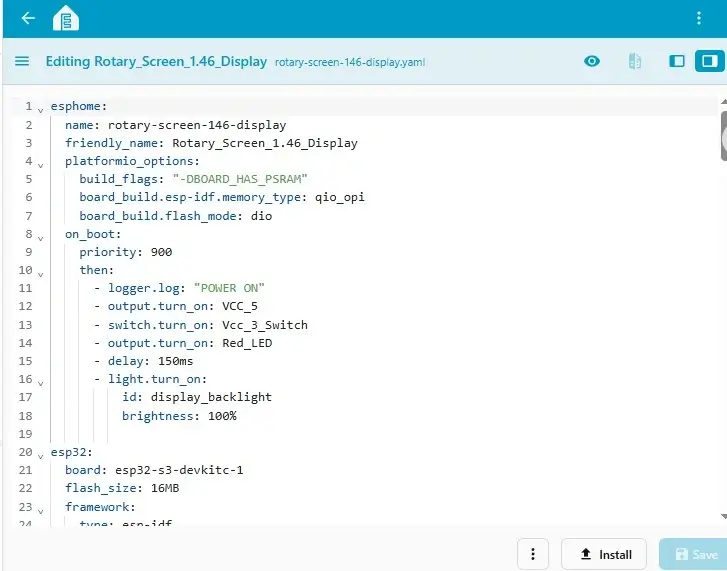
Step04: Modify the WiFi settings. Click the three dots in the upper-right corner, then click secret. Enter your own WiFi name and password.
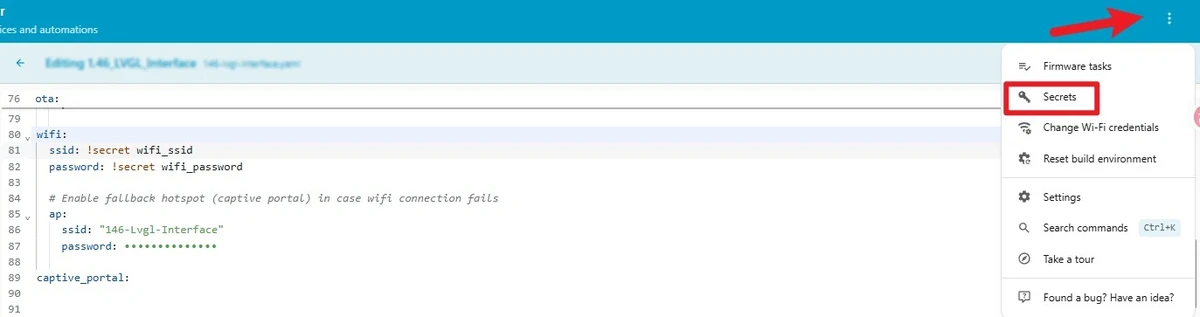
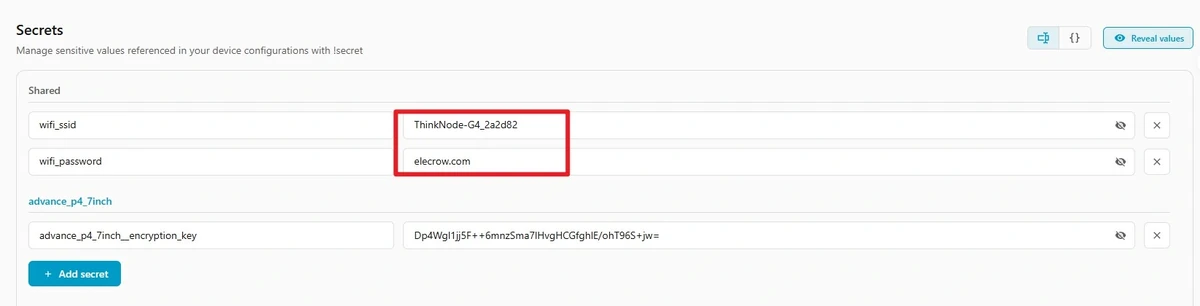

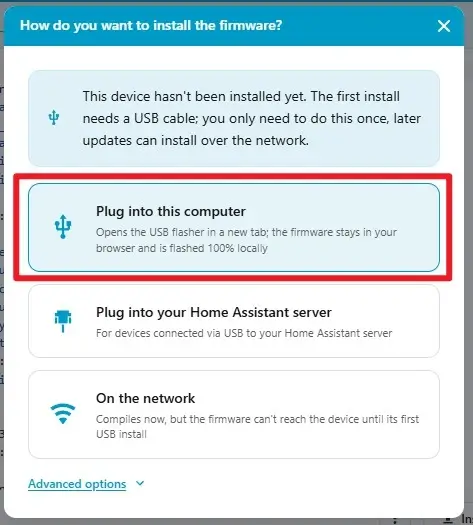
Step05: Click Install, select the USB installation method appropriate for the current environment, select the serial port corresponding to the CrowPanel, and complete compilation and flashing. After flashing is complete, open the log window. You should see the device startup messages and the POWER ON log entry.
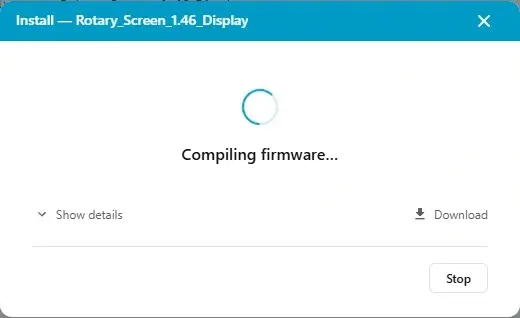
Step06: Wait for compilation to complete.
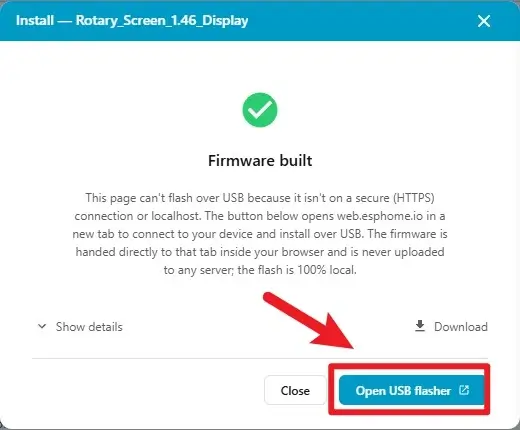
Step07: After compilation is complete, click flash to upload the firmware.
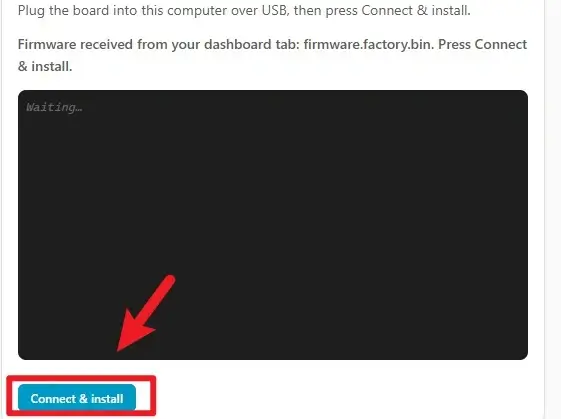
Step08: Click CONNECT & INSTALL.
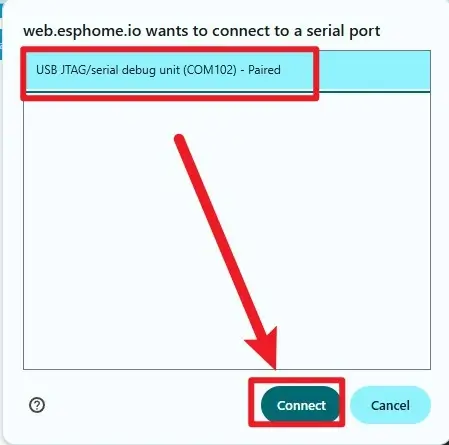
Step09: Click to connect to the corresponding serial port (confirm that the hardware is connected).
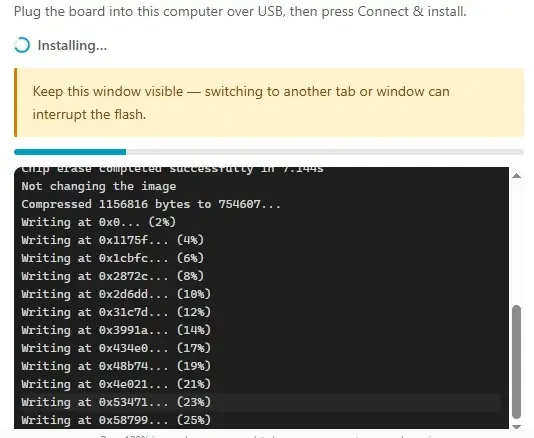
Step10: Wait for the download to complete.
5. Hardware Procedure
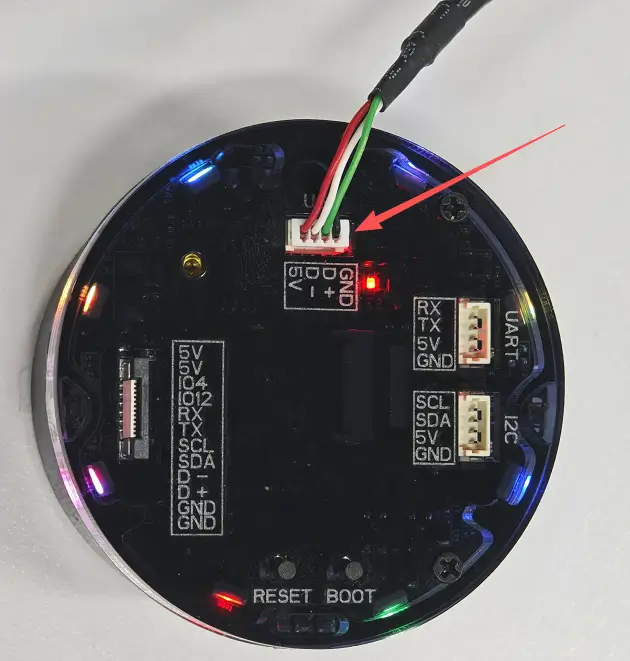
Step01: With the device powered off, check that the screen, rotary-dial enclosure, and USB port have no visible damage. Then use a USB cable that supports data transfer to connect the CrowPanel to the computer.
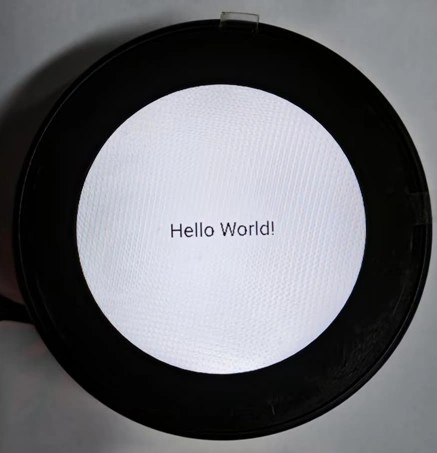
Step02: Wait for the LVGL page to load, then look directly at the center of the round screen. The screen should display a white background with black Hello World! text. The text should be complete and centered, without obvious misalignment or visual corruption.
6. Key Code Explanations
6.1 Enable Power and the Backlight During Startup
on_boot:
  priority: 900
  then:
    - output.turn_on: VCC_5
    - switch.turn_on: Vcc_3_Switch
    - output.turn_on: Red_LED
    - delay: 150ms
    - light.turn_on:
        id: display_backlight
        brightness: 100%
This automation runs early in the device startup process. GPIO2 and GPIO1 are involved in the onboard power supply control. The 150 ms delay allows the power supply to stabilize before the backlight is enabled. During normal operation, the backlight and status indicator appear first, followed by the LVGL content. If the power output is removed, the LCD driver may continue to run, but the physical screen will not work correctly. If only the backlight operation is removed, pixel data may already be present on the screen, but the display may still appear nearly black to the naked eye. When troubleshooting a black screen, first distinguish between “the backlight is off” and “the LCD is not receiving data.”
6.2 ESP32-S3 and PSRAM Settings
esp32:
  board: esp32-s3-devkitc-1
  flash_size: 16MB
  framework:
    type: esp-idf

psram:
  mode: octal
  speed: 80MHz
The project uses the generic ESP32-S3 DevKitC definition as the compilation target while using the CrowPanel's actual 16 MB Flash and Octal PSRAM configuration. Display buffers and LVGL resources consume a significant amount of memory. An incorrect PSRAM mode commonly causes startup failures, repeated resets, or an inability for the display component to allocate a buffer. The mode and speed shown here are hardware parameters and should not be modified arbitrarily for experimentation.
6.3 SPI and Screen Dimensions
spi:
  id: spi_bus
  mosi_pin: 11
  clk_pin: 10

display:
  - platform: ili9xxx
    cs_pin: GPIO9
    dc_pin: GPIO3
    reset_pin: GPIO14
    dimensions:
      width: 360
      height: 360
    data_rate: 40MHz
GPIO11 transmits pixel and command data, GPIO10 provides the clock signal, and GPIO9, GPIO3, and GPIO14 are used for chip select, data/command selection, and reset, respectively. 360 × 360 defines the area that LVGL can render and must match the screen resolution. Incorrect dimensions will cause clipping or coordinate errors. An excessively high data rate may cause visual corruption, while an excessively low rate will reduce the refresh speed. If the entire screen displays no image, check the power supply, reset pin, and SPI pins before modifying the LVGL page.
6.4 Custom LCD Initialization Sequence
model: CUSTOM
init_sequence:
  - [0xDE, 0x00]
  - [0xDF, 0x98, 0x55]
  # ... hardware-specific register commands ...
  - [0x11,120]
  - [0x29,20]
These register commands control the panel's exit from sleep mode, pixel format, scan direction, and display activation timing. The sequence runs when ESPHome initializes the display component and is designed specifically for the CrowPanel LCD. Arbitrary changes may result in a black screen, abnormal colors, or incorrect image orientation. Therefore, this lesson only explains its purpose and does not require students to modify it. If the backlight works normally but the page remains invisible, confirm that this sequence is complete and that its indentation has not changed.
6.5 LVGL Styles and Label
lvgl:
  displays:
    - round_display
  default_font: roboto24
  disp_bg_color: white
  pages:
    - id: hello_page
      widgets:
        - label:
            text: "Hello World!"
            styles: hello_style
            align: CENTER
LVGL uses round_display as the rendering target and creates a page with a white background using the 24-pixel Roboto font. The label is the most direct validation target in this lesson. If the label is commented out, the screen should remain white. This makes it possible to distinguish between “the display driver is working, but the widget was not created” and “the entire display pipeline has failed.” Changing align to another position is a safe interface experiment. Restore it to CENTER afterward.
7. Expected Results
After display initialization is complete, the 360×360 round screen should show a white background with black Hello World! text in the center. The text should not be clipped by the circular edge, and the screen should not continuously flicker, display visual corruption, or restart periodically. If the page remains stable during continuous operation, the power supply, SPI, LCD initialization, font, and basic LVGL pipeline are functioning correctly.
8. Code Download
- Official code: Elecrow ESPHome Lesson_Code