CrowPanel Advance 3.5inch Arduino Course V13
Product Model: CrowPanel-Advance-3.5-HMI-ESP32-S3-AI-Powered-IPS-Touch-Screen
Hardware Version: V1.3
Number of Lessons: 9 lessons: Lessons 1-7, Lesson 9, and Lesson 10
Development Platform: Arduino IDE + ESP32-S3
Learning Path: Environment Setup -> Serial Counter -> Network Audio -> LVGL Interface -> SD Card Display -> Sensors -> Wireless Communication -> Microphone Recording and Playback
1. Course Overview
This course is designed for the CrowPanel Advance 3.5-inch HMI ESP32-S3 Screen V1.3, using Arduino IDE as the development platform. The course starts with serial counter verification and gradually covers WiFi HTTP MP3 network audio playback, LCD / Touch / LVGL light control, SD card BMP image slideshow, DHT20 display with LVGL, nRF24L01 transmit/receive communication, LoRaWAN AT command control, Zigbee light control, and microphone recording and playback.
The 3.5-inch version is based on the ESP32-S3 and is designed for AI HMI and Meshtastic / wireless module expansion applications. It is suitable for learning combined development of touch displays, human-machine interaction, audio playback, sensor data acquisition, and multiple wireless communication modules.
After completing this course, users will understand the basic development workflow for this screen on the Arduino platform and will be able to extend their own HMI applications based on display, touch, audio, sensors, and wireless modules.
2. Preparation Before You Begin
- Hardware: CrowPanel Advance 3.5-inch HMI ESP32-S3 Screen V1.3
- USB Cable: Use a USB cable that supports data transfer
- Development Software: Arduino IDE
- Getting Started with Arduino IDE: https://www.elecrow.com/pub/wiki/arduino_advance.html
- Development Board: ESP32S3 Dev Module
- Flash Size: 16MB (128Mb)
- PSRAM: OPI PSRAM
- Partition Scheme: Huge APP (3MB No OTA/1MB SPIFFS)
The board package must use esp32 by Espressif Systems version 3.3.8.
3. Library Version Requirements
The course documentation requires you to first import the required library files according to the instructions in Lesson 01 and keep the library files consistent with the screen size. The 3.5-inch Arduino course uses the following code and library files:
Library Import: Link to two ways to import third-party Arduino IDE libraries
| Library / Component | Version / Source | Purpose |
|---|---|---|
| esp32 by Espressif Systems | 3.3.8 | ESP32-S3 Arduino Core, explicitly required by Lessons 01/03/09/10 |
| lvgl | 9.1.0 | LVGL UI and SquareLine Studio exported projects |
| LovyanGFX | 1.2.25 | Arduino graphics display and screen driver |
| TAMC_GT911 | 1.0.2 | Touchscreen support library |
| ESP32-audioI2S-master | 2.0.0 | Network audio playback |
| RF24 | 1.6.1 | nRF24L01 wireless communication |
| RadioLib | 7.1.0 | Wireless module support related to LoRaWAN AT command control |
| Crowbits_DHT20 | Use the library files provided with the course | DHT20 temperature and humidity sensor |
| lv_conf.h | Use the configuration file provided with the course | LVGL configuration file |
| ESP_I2S.h | Built into Arduino-ESP32 3.3.8 | Microphone recording and audio playback |
| Wire / SPI / FS / SD | Built into Arduino / ESP32 Core | I2C, SPI, file system, and SD card |
Note: For LVGL projects, use LVGL 9.1.0. When creating a project in SquareLine Studio, you also need to select LVGL 9.1.0 and set the LVGL Include Path to lvgl.h.
4. ESP32S3_120M Notes
After installing the ESP32 board package, you need to replace the corresponding files in the ESP32 framework directory. Download the officially provided ESP32S3_120M files:
Copy the files from the ESP32S3_120M folder to the corresponding idf-release_* directory in the Arduino ESP32 framework, and replace existing files when prompted. The directory name changes depending on the ESP32 Core version. Use the actual directory for the locally installed esp32 by Espressif Systems version 3.3.8:
C:\Users\your-username\AppData\Local\Arduino15\packages\esp32\tools\esp32-arduino-libs\idf-release_*
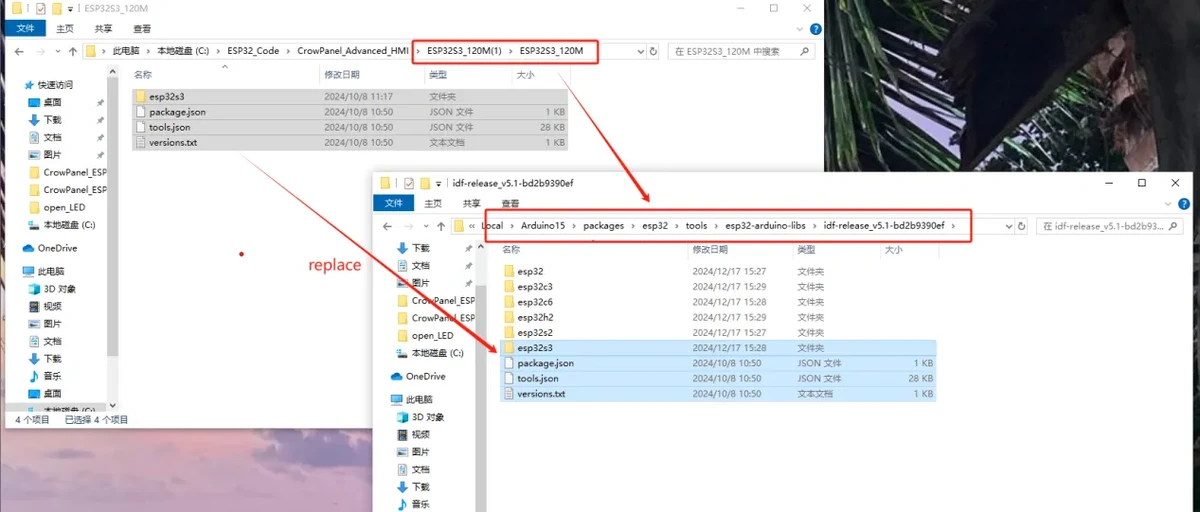
ESP32S3_120M contains ESP32 framework files recompiled after enabling high-speed PSRAM communication mode. After replacement, the PSRAM frequency can be increased to 120 MHz, which helps improve display refresh performance and reduce screen flickering or jitter during operation.
5. Course Catalog
| Lesson | Lesson Name | Main Content |
|---|---|---|
| 01 | Serial Counter | Serial counter verification |
| 02 | WiFi HTTP MP3 | WiFi HTTP MP3 network audio playback |
| 03 | LCD Touch LVGL Lamp | LCD, touch, and LVGL light control |
| 04 | SD BMP Slideshow | SD card BMP image slideshow display |
| 05 | DHT20 LVGL LED | DHT20 temperature and humidity display with LVGL LED control |
| 06 | nRF24L01 TX RX | nRF24L01 transmit/receive communication |
| 07 | LoRaWAN AT Command | LoRaWAN AT command control |
| 09 | Zigbee Light Control | Zigbee light control |
| 10 | Microphone Record Playback | Microphone recording and playback |
This series does not include Lesson 8. Please study in the order of Lessons 1-7, Lesson 9, and Lesson 10.
6. Lesson Links
Lesson 01 | Serial Counter Verification
Lesson Link: https://www.elecrow.com/wiki/3.5_Arduino-01-Serial_Counter.html
Lesson 02 | WiFi HTTP MP3 Network Audio Playback
Lesson Link: https://www.elecrow.com/wiki/3.5_Arduino-02-WiFi_HTTP_MP3.html
Lesson 03 | LCD Touch and LVGL Light Control
Lesson Link: https://www.elecrow.com/wiki/3.5_Arduino-03-LCD_Touch_LVGL_Lamp.html
Lesson 04 | SD Card BMP Image Slideshow
Lesson Link: https://www.elecrow.com/wiki/3.5_Arduino-04-SD_BMP_Slideshow.html
Lesson 05 | DHT20 Temperature and Humidity Display with LVGL LED Control
Lesson Link: https://www.elecrow.com/wiki/3.5_Arduino-05-DHT20_LVGL_LED.html
Lesson 06 | nRF24L01 Transmit/Receive Communication
Lesson Link: https://www.elecrow.com/wiki/3.5_Arduino-06-nRF24L01_TX_RX.html
Lesson 07 | LoRaWAN AT Command Control
Lesson Link: https://www.elecrow.com/wiki/3.5_Arduino-07-LoRaWAN_AT_Command.html
Lesson 09 | Zigbee Light Control
Lesson Link: https://www.elecrow.com/wiki/3.5_Arduino-09-Zigbee_Light_Control.html
Lesson 10 | Microphone Recording and Playback
Lesson Link: https://www.elecrow.com/wiki/3.5_Arduino-10-Microphone_Record_Playback.html
7. Recommended Learning Sequence
- Basic Verification: Complete Lesson 01 first to confirm that Arduino IDE, the board package, serial output, and program upload are working properly.
- Audio and Interface: In Lessons 02-03, learn WiFi HTTP MP3 playback, LCD touch, and LVGL interface control.
- Peripheral Display: In Lessons 04-05, learn SD card BMP image display and DHT20 temperature and humidity data display.
- Wireless Expansion: In Lessons 06-07, learn nRF24L01 transmit/receive communication and LoRaWAN AT command control.
- Application Expansion: In Lessons 09-10, learn Zigbee light control and microphone recording and playback.